
How to Build an MCP Server — Let AI Answer Questions About Your Database with Python and FastMCP (Part 1)
A hands-on guide to building an MCP server, with working code from start to finish. Using Python and FastMCP, we wrap a SQLite sales database as MCP tools so an AI can take a plain-language question, write the SQL itself, and return aggregated results.

Hello! This is the Qualiteg Product Development Team!
You want to make your local database queryable by an AI. What you need for that is an MCP server.
The goal sounds simple, but once you start researching, you can get as far as "just build an MCP server" and still get stuck on how exactly to turn your own database into MCP.
This article walks you through everything up to
building your own MCP server with Python and FastMCP and querying a sales database in natural language from the CLI version of Claude Code
, with working code from start to finish. The code is about 200 lines. When you ask "Show me the top 3 occupations by sales" (in Japanese, in our demo), Claude Code assembles the SQL itself and comes back with the aggregated answer.
All the code is on GitHub. Clone it, install the dependencies, create the DB, and it runs.The repository README covers every step of running it, so if you'd rather get your hands moving without reading the article, start there.
qualiteg/mcp-server-tutorial | Complete sample code and README (GitHub)
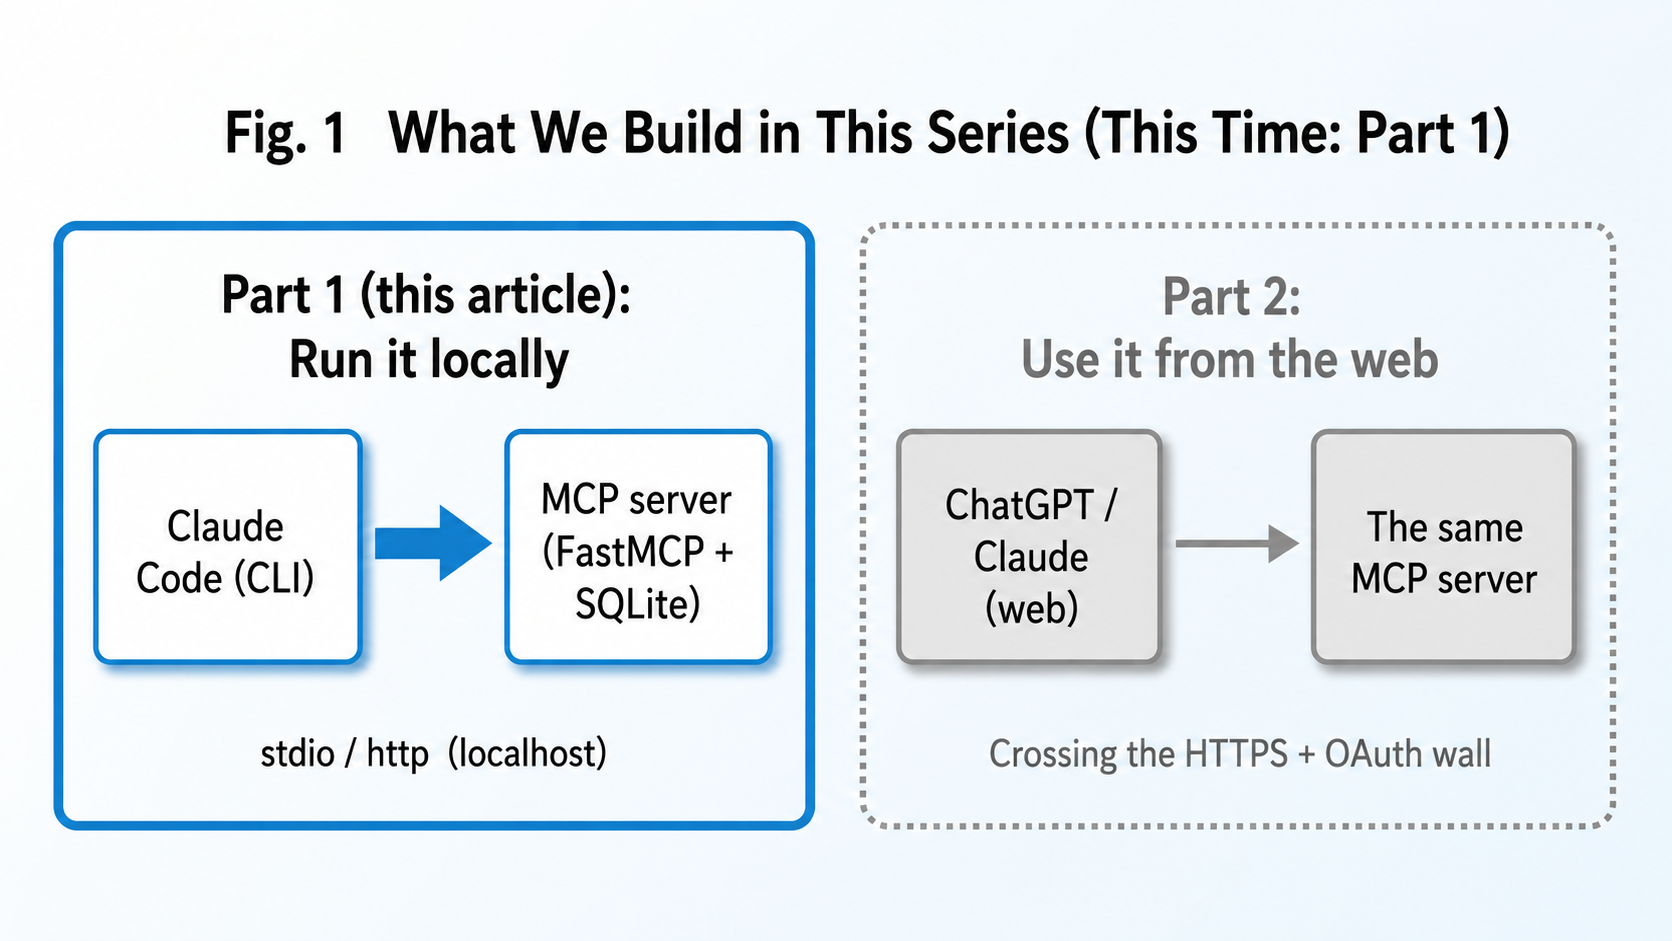
This is a two-part series. Part 1 (this article) gets you to the point where it works from the CLI version of Claude Code. In Part 2, we make the same server usable from the web versions of ChatGPT and Claude. A CLI version running locally, and a web version running in the browser. Between those two lies a wall that trips up a lot of people.
What MCP is, in three minutes
MCP (Model Context Protocol) is a common standard for connecting AI apps to external data and tools. Anthropic released it in late 2024, and today it is supported not just by Claude but by ChatGPT, Gemini, and a range of coding agents.
Before MCP, if you wanted an AI to touch your database, you had to build one-off integrations for each AI app's proprietary plugin or function-calling scheme. MCP standardizes how the "server" (the side exposing data and tools — what we build here) and the "client" (the AI app side: Claude, ChatGPT, and so on) talk to each other. Build an MCP server once, and multiple MCP-capable AI apps can use it without app-specific plugins. That said, the available transports, auth methods, plans, and admin settings differ per client.
An MCP server can expose three kinds of things — tools, resources, and prompts — but the one you will use first in practice is tools: functions the AI can call. This article covers tools only.
One more piece of background that pays off in Part 2: the MCP spec defines two standard transports.
| Transport | How it works | Main use |
|---|---|---|
| stdio | The client launches the server process locally and talks to it over standard input/output | Local MCP servers running on the same machine as the client |
| Streamable HTTP | The server runs as a resident HTTP server and clients connect to its URL | MCP servers that run independently and are used over the network |
In this article, Part 1 uses a local stdio server from the CLI version of Claude Code, and Part 2 uses a remote Streamable HTTP server from the web versions. That said, it is not a strict one-to-one mapping of "CLI means stdio, web means HTTP". Claude Code, for example, can connect to both stdio servers and remote HTTP servers. In Part 1 we will try both.
What we are building
A sales database (SQLite) modeled on an online store for PC parts, plus an MCP server that queries it.
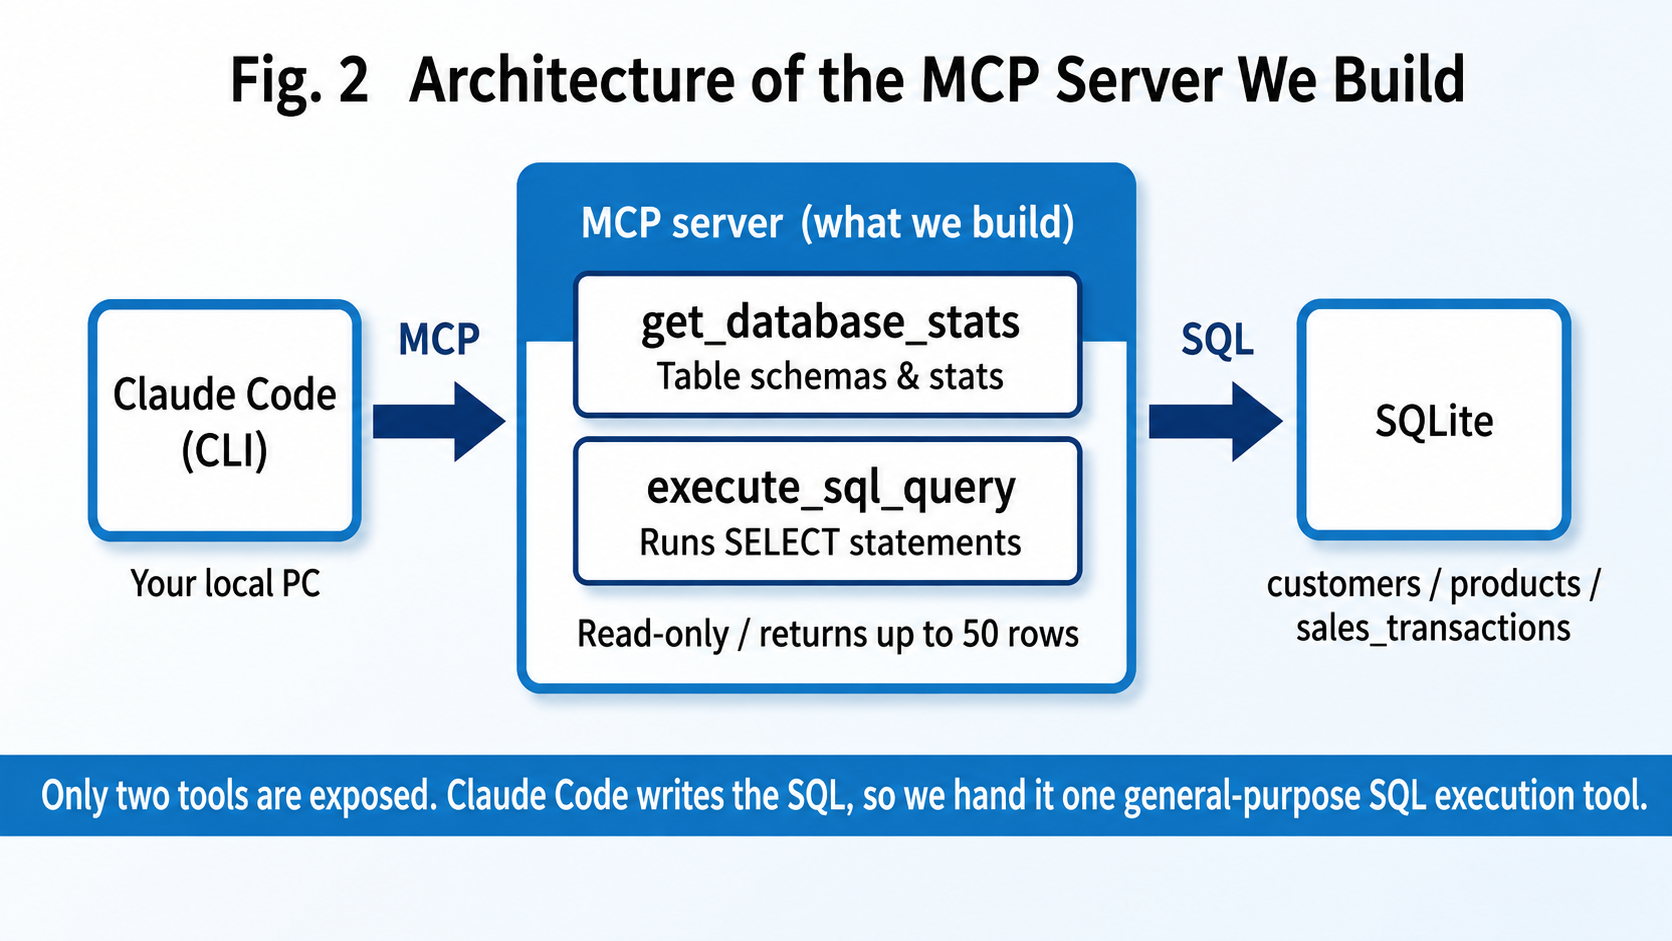
There are three tables: a customer master (customers) with 500 people, a product master (products) with 72 products across 8 PC-part categories, and sales line items (sales_transactions) with 4,000 records spanning 2024 through 2026. Customers carry attributes like age, occupation, and income bracket, so you can run analyses like "broken down by occupation."
We are going to be bold and give Claude Code just two tools: get_database_stats, which returns the table structure and statistics, and execute_sql_query, which executes SELECT statements.
You could also design this as a lineup of per-task functions — a "sales aggregation tool," a "customer analysis tool," and so on. But it is Claude Code that can write SQL, so handing over one general-purpose SQL execution tool goes further. The trade-off is that the safety work becomes the server's responsibility — more on that later.
Setup
Implementing the MCP server itself requires Python 3.10 or later and FastMCP. If you want to try it from Claude Code the way this article does, you will also need a working Claude Code environment.
python -m pip install fastmcppip is not the one to use here; go with python -m pip instead.pip can land the package in a different environment from the Python that will later launch your MCP server.
FastMCP is a high-level framework that lets you define MCP tools by adding a single decorator to a Python function. It also bundles client functionality and an HTTP server. The version I verified against is standalone FastMCP 3.4.5.
First, a working MCP server in 10 lines
Before diving into the sales DB, let's get the full picture with a minimal build.
# hello_mcp.py
from fastmcp import FastMCP

mcp = FastMCP(name="hello-server")

@mcp.tool(description="Adds two numbers")
def add(a: int, b: int) -> int:
    return a + b

if __name__ == "__main__":
    mcp.run()  # stdio transport by default
That's it — a complete server. The tool definition handed to the AI is generated automatically from the function's type hints and description.
Note that just running python hello_mcp.py prints nothing. It simply sits waiting for input as a stdio server. To see it work, call it from FastMCP's in-memory client.
import asyncio

from fastmcp import Client
from hello_mcp import mcp


async def main():
    async with Client(mcp) as c:
        print([t.name for t in await c.list_tools()])   # ['add']
        result = await c.call_tool("add", {"a": 120, "b": 5})
        print(result.data)                              # 125


if __name__ == "__main__":
    asyncio.run(main())
Registering it with Claude Code is a one-liner (we will actually register and use it later in this article).
claude mcp add hello-server -- python hello_mcp.pyIf it fails to connect, specify absolute paths for both Python and the script. If you are using a virtual environment, you need to point at the Python inside it.
What I want you to notice here is that the only material the AI has for deciding "this needs a calculation," "there is a tool called add," and "let's call it" is the tool name, the description, and the inputSchema generated from the argument names and types. Among these, the description is the central place where you can explain in natural language when the tool should be used — and it turns out to matter more than anything else in MCP server design.
Step 1: Prepare the sales database
Create three tables in SQLite.
db_setup.py(Full code for the table definitions and dummy-data generation (GitHub))
cur.execute("""
CREATE TABLE sales_transactions (
    transaction_id   INTEGER PRIMARY KEY,
    date             TEXT NOT NULL,     -- 'YYYY-MM-DD'
    customer_id      TEXT NOT NULL REFERENCES customers(customer_id),
    product_id       TEXT NOT NULL REFERENCES products(product_id),
    product_name     TEXT NOT NULL,
    product_category TEXT NOT NULL,
    quantity         INTEGER NOT NULL,
    unit_price       INTEGER NOT NULL,
    total_price      INTEGER NOT NULL
)""")

cur.execute("CREATE INDEX idx_trans_date     ON sales_transactions(date)")
cur.execute("CREATE INDEX idx_trans_customer ON sales_transactions(customer_id)")
cur.execute("CREATE INDEX idx_trans_category ON sales_transactions(product_category)")
Do create the indexes. The AI will not hesitate to fire full-period aggregation queries at you.
The random seed is fixed, so everyone who runs it gets identical data. Here is what it looked like in my environment.
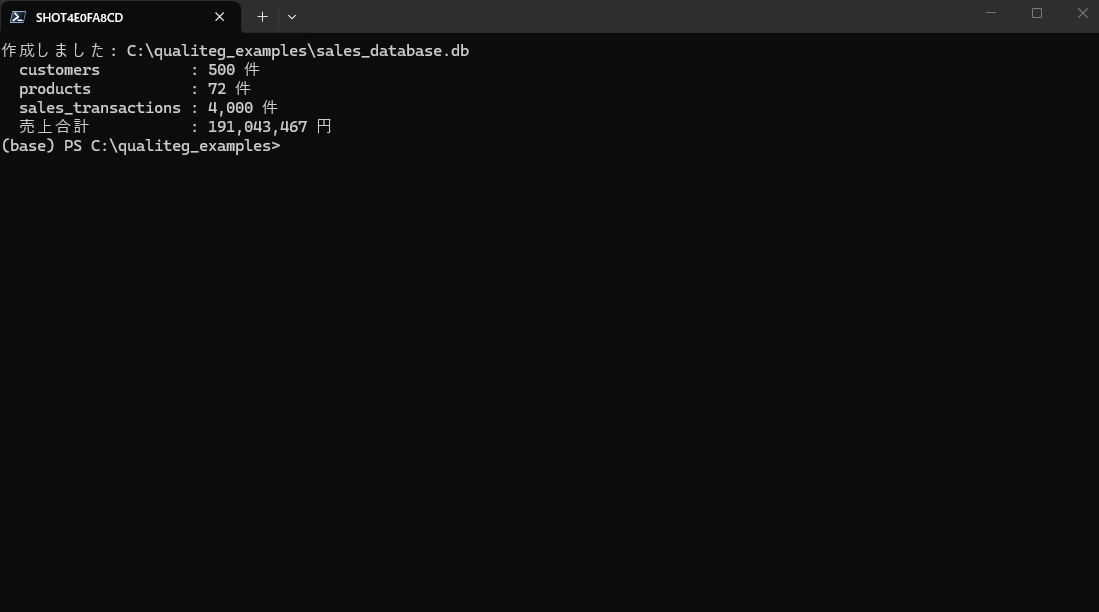
Every number in this article is a measured value from this data. You should see the same numbers on your machine.
Step 2: Write the entire schema into the tool description
This is the single most important point in this article.
execute_sql_query's description, we write in the entire database schema plus example queries。
mcp_server_sales.py(Full code for the description (GitHub))
@mcp.tool(description="""Executes a SQL query against the sales data. Only SELECT statements are supported.

[Database schema]

■ customers (customer master)
  - customer_id (TEXT): customer ID (e.g. 'C0001')
  - age (INTEGER): age
  - gender (TEXT): gender ('男性' = male, '女性' = female)
  - prefecture (TEXT): prefecture
  - occupation (TEXT): occupation ('ITエンジニア' = IT engineer, '会社員' = office worker, '学生' = student, '自営業' = self-employed, etc.)
  - annual_income (INTEGER): annual income (in units of 10,000 yen)

■ products (product master)
  - product_id (TEXT): product ID (e.g. 'CPU_001')
  - product_category (TEXT): CPU, GPU, Memory, SSD, HDD, Motherboard, PowerSupply, PCCase
  - tier (TEXT): 'high' / 'mid' / 'entry'
  (and so on — list every column in this style)

■ sales_transactions (sales line items)
  - date (TEXT): sale date (YYYY-MM-DD format)
  - customer_id (TEXT): customer ID → customers.customer_id
  - product_id (TEXT): product ID → products.product_id
  - quantity / unit_price / total_price (INTEGER)

[Data period] 2024-01-01 to 2026-12-31 (4,000 rows)

[Example queries]
- Sales by occupation:
  SELECT c.occupation, SUM(t.total_price) AS sales
  FROM sales_transactions t JOIN customers c ON t.customer_id = c.customer_id
  GROUP BY c.occupation ORDER BY sales DESC

- High-end GPU sales:
  SELECT p.product_name, SUM(t.total_price) AS sales
  FROM sales_transactions t JOIN products p ON t.product_id = p.product_id
  WHERE p.product_category = 'GPU' AND p.tier = 'high'
  GROUP BY p.product_name ORDER BY sales DESC
""")
async def execute_sql_query(sql: str, ctx: Context) -> str:
    ...
That may look absurdly long. But whether the AI writes correct SQL depends less on how smart the model is and more on how accurately you hand it the schema. For a small, fixed schema like this one, putting the necessary columns and JOIN relationships in the description proved effective.
The AI's material for choosing tools is the tool name, the description, and the inputSchema generated from argument names and types. Of these, the description is where you can say in natural language when the tool should be called.
Including two or three example queries is another good trick. With worked examples of how to write the JOINs and use the columns, the accuracy of the AI's SQL stabilizes visibly.
Step 3: Give the SQL execution tool three safety valves
If you are letting an AI execute SQL, you have to guard against writes and against heavy queries hogging your resources. We set up three safety valves with distinct roles.
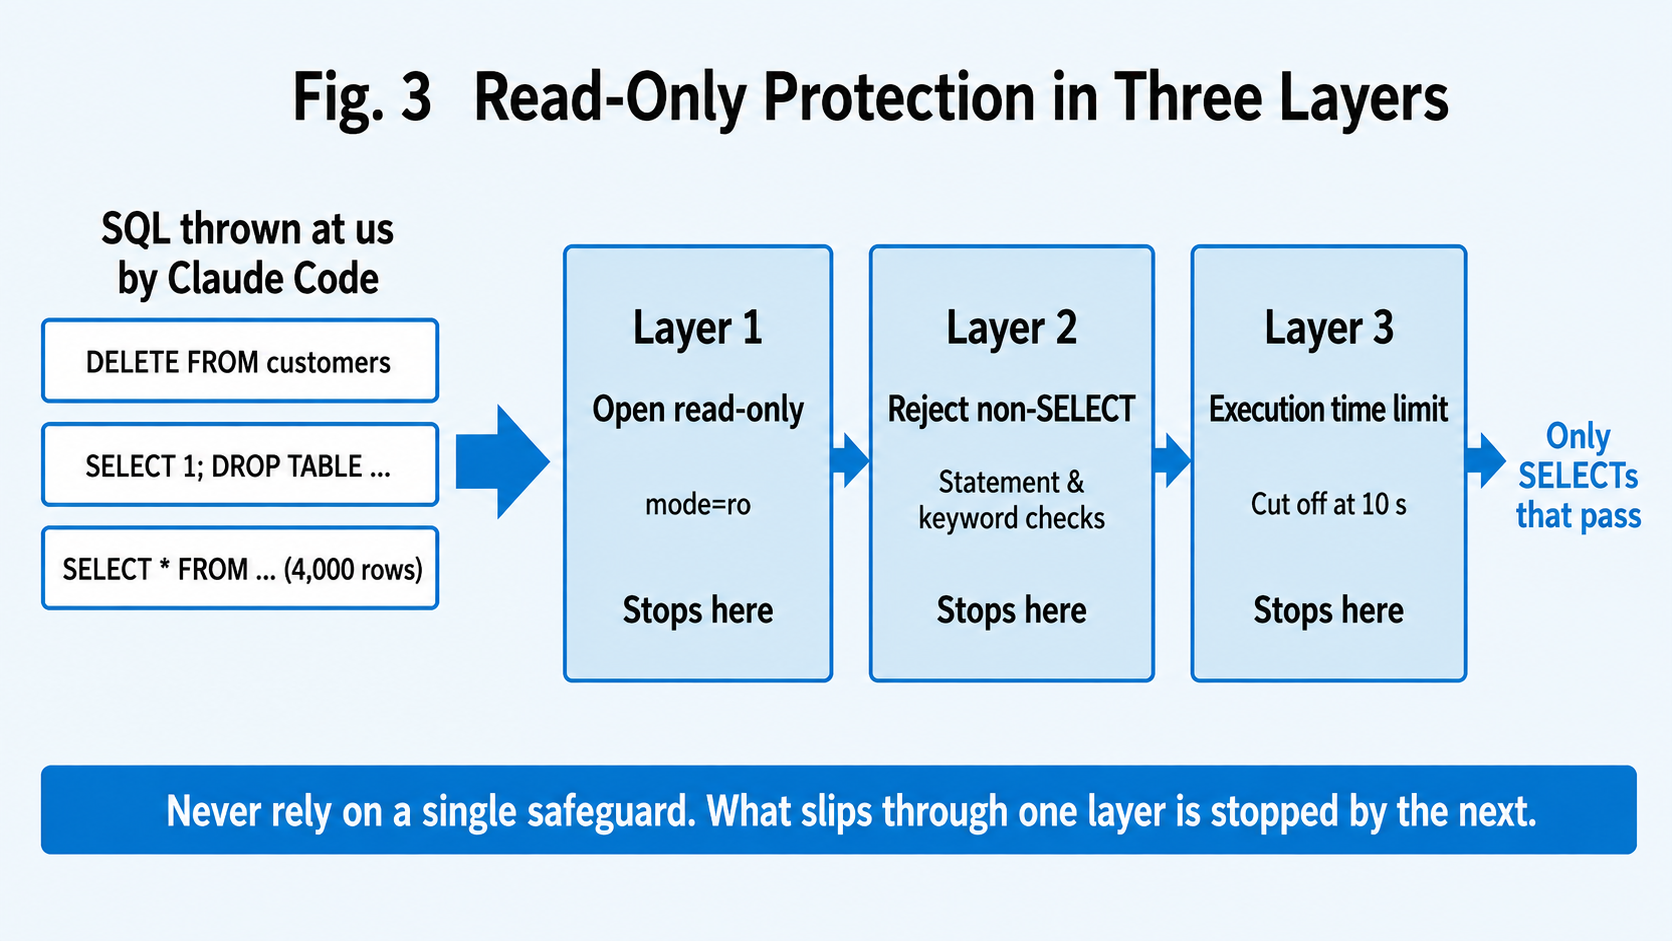
Layer 1: open the database read-only. With SQLite, connecting via a URI and specifying mode=ro makes the database refuse writes at the source. Even if something slips past the later checks, it stops here.
mcp_server_sales.py(Code for the read-only connection function (GitHub))
conn = sqlite3.connect(f"file:{DB_PATH.as_posix()}?mode=ro", uri=True)Layer 2: reject anything that is not a SELECT. This is a string check, not a SQL parser, so treat it as a conservative helper filter that knocks out obvious write commands early. Final write prevention is layer 1's job.
mcp_server_sales.py(Code for the SELECT-only filter (GitHub))
normalized = sql.strip().upper()
if not normalized.startswith("SELECT"):
    return "Error: only SELECT statements are supported"
for keyword in ("DROP", "DELETE", "INSERT", "UPDATE", "ALTER", "CREATE", "TRUNCATE", "ATTACH", "PRAGMA"):
    if keyword in normalized:
        return f"Error: {keyword} is not allowed"
Layer 3: put a hard limit on execution time. To keep heavy aggregations from hanging things, we cut them off with SQLite's progress handler.
mcp_server_sales.py(Code for the execution-time limit (GitHub))
import time

def install_query_timeout(conn, timeout_sec):
    deadline = time.monotonic() + timeout_sec

    def guard():
        return 1 if time.monotonic() >= deadline else 0

    # Call guard every time the SQLite virtual machine executes 1,000 instructions
    conn.set_progress_handler(guard, 1000)
This is a spot where I got it wrong once.I was counting the number of progress-handler invocations and using that as the limit, but the second argument of set_progress_handler is a count of SQLite virtual-machine instructions, not seconds. The invocation count is not wall-clock time, so the wait varied with machine speed and query content.time.monotonic() and comparing against real elapsed time was the correct answer.
Note that this third layer is not a measure for enforcing read-only access. It is protection against a runaway query monopolizing your resources. Each layer guards something different.
Whether all three layers actually work is something we will verify for real later on.
Step 4: Let the server decide how much goes back to the AI
This is the part that formats query results. Look at where we cap the number of rows returned.
mcp_server_sales.py(Code for formatting query results (GitHub))
    if not rows:
        return "No data matched your query."

    lines = [" | ".join(columns), "-" * 40]
    for row in rows[:MAX_ROWS]:                      # MAX_ROWS = 50
        lines.append(" | ".join("" if v is None else str(v) for v in row))
    if len(rows) > MAX_ROWS:
        lines.append(f"... plus {len(rows) - MAX_ROWS} more rows (aggregate or narrow your conditions to see the whole picture)")

    return f"Query result ({len(rows)} rows):\n\n" + "\n".join(lines)
The AI will happily throw SELECT * FROM sales_transactions at you. Returning all 4,000 rows would just overflow the context window. What worked in practice was reporting the true row count honestly and nudging it to "aggregate or narrow your conditions."
Note, though, that what this implementation limits is only the number of rows returned to the AI — it does not limit how many rows are read from SQLite. Facing millions of rows of real data, you will need additional measures: switch to fetchmany(MAX_ROWS + 1), add a LIMIT on the SQL side, look at query cost, and so on.
Step 5: Add a tool that shows the big picture first
The second tool simply returns a summary of the table structures and statistics.
mcp_server_sales.py(Full code for the statistics tool (GitHub))
@mcp.tool(description="""Returns the database's table structures, row counts, data period, and per-category sales statistics.
Before writing any SQL, always call this tool first to check the structure.""")
async def get_database_stats(ctx: Context) -> str:
    ...
The last sentence of the description does the real work.
"Before writing any SQL, always call this tool first"
In my environment, adding this line made the model check the statistics first and then build its SQL.
Keep in mind, though, that this is a request to the model, not a control enforced by the server. Depending on the model, the client, and the flow of conversation, it may fire off SQL without ever looking at the statistics. The important thing is not to let your safety story rest on this one sentence. A healthy mental model: a tool description works not only as feature documentation but as the place to tell the model the conditions and procedure for using the tool.
Trying it out
Register it with Claude Code.
claude mcp add sales-db -- python C:\qualiteg_examples\mcp_server_sales.pyConfirm the registration.
claude mcp listsales-db: python C:\qualiteg_examples\mcp_server_sales.py - ✔ Connected✔ Connected shows up, the AI can see this server. After that, you just ask in natural language — plain Japanese, in our demo.
claude -p "職業別の売上トップ3を教えて" # "Show me the top 3 occupations by sales"This is what came back.
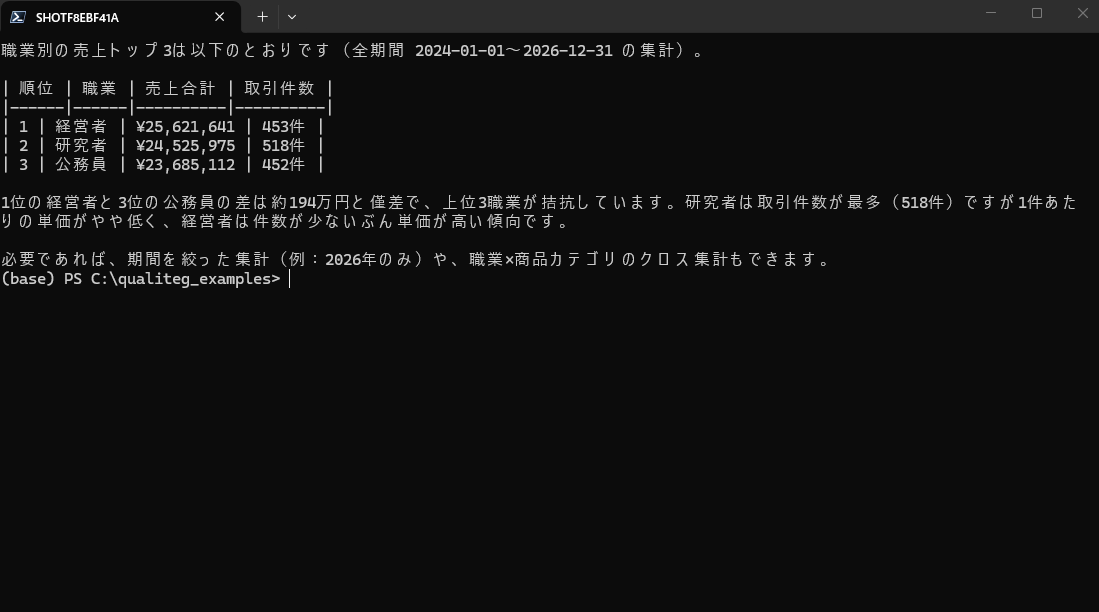
The question was a single sentence in natural language. Without me writing a single line of SQL, the AI checked the table structure, issued a query with a JOIN and GROUP BY, and returned the aggregation neatly formatted as a table.
The amounts match the measured values in the dummy data. On top of that, it also aggregated transaction counts — which the question never asked for — and added its own reading: researchers have the most transactions but a low average ticket, while executives buy less often but spend more per purchase. It is not just generating SQL; it interprets the aggregated results.
Multi-step conditions like "high-end GPUs released in 2025, ordered by sales to customers in their 20s" go through in the same easy way. People who have never written SQL can now talk to the sales database.
That said, being able to ask in natural language and the aggregation being correct for business purposes are two different things. If the results feed important decisions, make sure you can review the executed SQL, the aggregation definitions, the time period, and any exclusion conditions. "Sales," "customer count," and "average ticket" can all change depending on your in-house definitions.
Verifying the guardrails actually work
Nothing is scarier than a defense you wrote but that is not actually working. In fact, while writing this article I discovered the timeout was not functioning.
The three layers each protect something different, so they have to be verified in different ways as well. The keyword check that runs through the tool is verified with FastMCP's in-memory client; the read-only mode and the timeout are verified by touching the DB connection directly.
verify.py(Full code for the verification script (GitHub))
# Layer 1: does the connection itself refuse writes?
conn = connect_readonly()
try:
    conn.execute("DELETE FROM customers")
    raise AssertionError("This was supposed to be read-only, but the write went through")
except sqlite3.OperationalError as e:
    assert "readonly" in str(e).lower()

# Layer 3: is a heavy query interrupted based on real time?
conn = connect_readonly()
install_query_timeout(conn, QUERY_TIMEOUT_SEC)
started = time.monotonic()
try:
    conn.execute(HEAVY_SQL).fetchone()
    raise AssertionError("The query was not interrupted")
except sqlite3.OperationalError as e:
    assert "interrupted" in str(e).lower()
    print(f"interrupted after {time.monotonic() - started:.1f} s")
Here are the results in my environment.
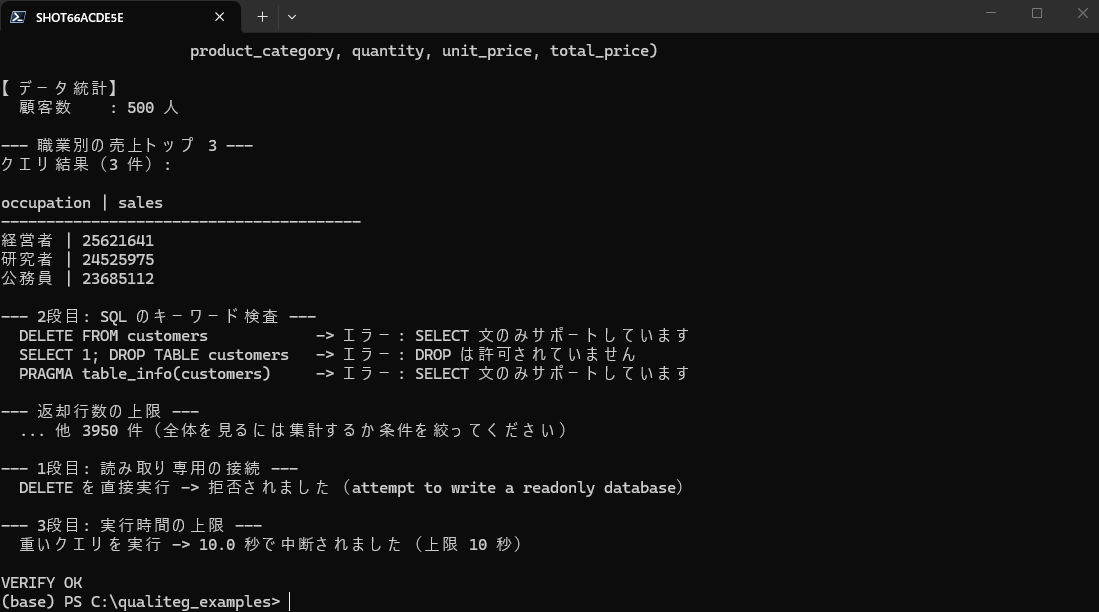
SELECT at the start does not save a query that smuggles in a DROP — that gets stopped too. The read-only connection rejects writes with "attempt to write a readonly database," and the heavy query was interrupted at 10.0 seconds of real time. The row cap also works: throwing SELECT * FROM sales_transactions returns 50 rows followed by "... plus 3,950 more rows."
Note that this verification used the in-memory client and direct DB connections; it does not cover behavior through the stdio or HTTP transports.
Only after checking this far should you start letting people in your company use it.
Running it as a resident HTTP server
Everything so far used stdio — the AI app launches the server locally. To run it as an independent, long-lived server used over the network, switch to Streamable HTTP. Only one line of the startup code changes.
mcp_server_sales.py(Code for the startup section (GitHub))
mcp.run(transport="http", host="127.0.0.1", port=9904)With this, http://127.0.0.1:9904/mcp becomes your MCP endpoint.
Bind to 127.0.0.1. This server has no authentication.0.0.0.0 means anyone who can reach you over that network can execute SQL. The sample code defaults to 127.0.0.1 and prints a warning when you specify an external bind address. Once you move on to sharing it inside the company or using it from outside, the baseline becomes HTTPS, authentication and authorization, source restrictions, Origin validation, and audit logging in front of it. The server in this article is the minimal build that comes before all of that — for understanding the mechanism.
Adding a health-check endpoint also makes operations easier.
mcp_server_sales.py(Health-check code (GitHub))
@mcp.custom_route("/health", methods=["GET"])
async def health_check(request):
    from starlette.responses import JSONResponse
    return JSONResponse({"status": "ok", "service": "sales-database-server"})
In the sample code, the --http option lets you switch between them.
python mcp_server_sales.py --http --port 9904Once it is up, hit the health check to confirm it is alive.
curl http://127.0.0.1:9904/health{"status":"ok","service":"sales-database-server"}It returns status only. There is no reason to leak information monitoring does not need (like the DB's absolute path or exception internals).
What I learned building this
What helped most this time was limiting the server to two tools. Rather than lining up per-task functions, handing over one general-purpose SQL execution tool lets the AI think for itself and produce answers. That said, this holds for a small dummy DB. With real data, per-task tools that restrict which tables, columns, and aggregation granularity can be accessed are safer and easier to audit.
In exchange, the way you write the description changes the results dramatically. Writing in the full schema and example queries made the AI's SQL stable. A description works not only as feature documentation but as the place to tell the model the conditions and procedure for using the tool. Remember, though, that procedural instructions are requests — nothing guarantees they are followed.
The safety work came in three layers: open read-only, reject non-SELECT, cap execution time. And we did not stop at writing them — we actually exercised each of the three. Skip that step and you will ship defenses to your company that you merely believe are working. In fact, my first timeout implementation never measured real time and did nothing at all.
Do not forget the cap on returned rows, either. The AI will happily request full table dumps. Cutting off at 50 rows while honestly reporting the total count was enough, in my environment, to make it switch to aggregation queries.
If you are going to run it as a resident server, switch to Streamable HTTP and add the health check — it makes operations easier. But remember there is no authentication built in, so do not put it on the office LAN or the internet as-is.
One more thing: this sample is a minimal build for understanding the mechanism. For multiple concurrent users you will separately need measures like moving the synchronous DB work onto threads, capping concurrency, and setting DB-side timeouts.
Coming up in Part 2
What Part 2 does is clear-cut.
We will connect this MCP server, built on localhost, to the web versions of ChatGPT and Claude — and get over the OAuth wall.
The CLI version of Claude Code is for developers. But the web versions, running in a browser, can be handed to people who never touch a command line. A sales-planning teammate can ask "What was our best-selling GPU last month?" right from their usual ChatGPT screen. Same MCP server — a dramatically wider audience.
And this is where it gets genuinely hard. To connect an MCP server to the web versions' connectors, you need two things.
One is an HTTPS URL reachable from the internet. Nobody outside can reach a server running on your local PC — and you cannot simply expose a server that can reach your internal database, either.
The other is authentication and authorization to identify users and control access.
Depending on configuration, both ChatGPT and Claude can connect to remote MCP servers without authentication. But publishing an unauthenticated MCP server that can reach an internal database is simply not an option. So in Part 2 we use OAuth, following the MCP Authorization spec.
Implementing that yourself means authorization metadata, client registration, an authorization endpoint, and token issuance and validation — an entire implementation completely separate from the tools themselves. The tool code took 200 lines, yet you burn out before reaching the main event. This is where a lot of people stall.
In Part 2, we will walk through how to get over these two walls, with screenshots, all the way to connecting the web versions of ChatGPT and Claude to this sales DB.And with a way you can try for free.
Full disclosure up front: Part 2 uses WireCanal, a service we provide. It has a free tier, so you can follow along hands-on (terms and the free tier are as of the time of writing).
See you next time!
Sample code
All the code from this article is on GitHub.
qualiteg/mcp-server-tutorial | Complete sample code and README (GitHub)
git clone https://github.com/qualiteg/mcp-server-tutorial.git
cd mcp-server-tutorial
python -m pip install -r requirements.txt
python db_setup.py
Then register it with Claude Code.
claude mcp add sales-db -- python /path/to/mcp-server-tutorial/mcp_server_sales.py
claude mcp list
claude -p "職業別の売上トップ3を教えて"  # "Show me the top 3 occupations by sales"
When using stdio, you do not need to launch python mcp_server_sales.py manually in a separate terminal. Claude Code starts the registered command as a child process.
Everything described here is also in the repository's README. It covers the quick start, how to register with Claude Code, the tools provided, and running as an HTTP server — so when working hands-on, the README alone is enough.



