
npm Classic Tokens Fully Retired on December 9, 2025: Fixing Package Install Errors (403/404)

Hello!
In this post, we walk through an important npm update that rolled out on December 9, 2025.
On December 9, 2025, npm completely disabled classic tokens as part of a security hardening effort.
As a result, projects that use private packages may suddenly find that npm install fails. (Public packages are not affected.)
In this article, we look at the errors we actually ran into and how to resolve them.
The Problem
Symptoms
In a project that contains private packages (in the @your-org/package-name format), running
npm install
produces errors like the following
Pattern 1: 404 error
npm ERR! code E404
npm ERR! 404 Not Found - GET https://registry.npmjs.org/@your-org/package-name/...
npm ERR! 404  '@your-org/package-name@x.x.x' is not in the npm registry.
Pattern 2: 403 error
Even with a token configured in your existing .npmrc, the error still occurs
npm ERR! code E403
npm ERR! 403 403 Forbidden - GET https://registry.npmjs.org/@your-org/package-name/...
npm ERR! 403 In most cases, you or one of your dependencies are requesting
npm ERR! 403 a package version that is forbidden by your security policy.
Cause
The root cause is that classic tokens were forcibly disabled on December 9, 2025 (official announcement)
1. Complete deactivation of classic tokens
All existing classic tokens have been permanently disabled, so projects that relied on them now fail at npm install and similar operations.
2. Introduction of session-based authentication
npm login has changed as well. Previously, running npm login issued a long-lived token internally that you could keep using for a while. Starting with this update, it instead issues a session token that expires after two hours.
In practice, this means the following
- Sessions automatically expire after two hours
- Re-authentication is required
- Sessions do not appear in the token list in the UI or CLI
- 2FA (two-factor authentication) is enforced for publish operations
Security has clearly improved. (Put another way, things have become less convenient.)
3. New CLI token management tools
There are improvements as well. A new tool was introduced that lets you manage granular access tokens directly from the command line, so you can now create tokens without going through the web console.
npm token create   # Create a token
npm token list     # List tokens
npm token revoke   # Revoke a token
4. 2FA enforced by default for new packages
Starting the week of December 9, 2025, newly created packages have 2FA enabled by default. Existing packages keep their current settings.
Solutions
From here, we introduce three ways to use the new npm access tokens (granular access tokens) in a local development environment.
Here are three ways to access private packages.
| Method | Security | Convenience | Recommendation |
|---|---|---|---|
| Method 1: Session-based authentication | ◎ Most secure | △ Re-authenticate every 2 hours | ⭐ Officially recommended |
| Method 2: Environment variables | ○ Relatively secure | ○ Renew every 90 days | Practical |
| Method 3: Token directly in .npmrc | △ Risky | ◎ Easiest | Use with caution |
Method 1: Session-based authentication (officially recommended)
The first option is session-based authentication via npm login.
This is the most secure method, and the one npm officially recommends.npm login now issues a session token that is valid for two hours.
Steps
npm login
A browser window opens and asks you to authenticate with your npm account. Once authentication completes, you can access private packages for the next two hours.
Characteristics
- The token is never saved to a file, so the risk of leakage is low
- Sessions do not appear in the token list in the UI or CLI
- It expires after two hours, so you need to run
npm loginagain
Best suited for
- You prioritize security
- You do not run
npm installfrequently - Personal projects
Method 2: Use environment variables
This approach stores the token in an environment variable and references it from .npmrc. Since the token is never written directly into a file, it is safer than Method 3 below.
Step 2-1: Create a granular token
First, create a new granular access token.
Creating it on the web
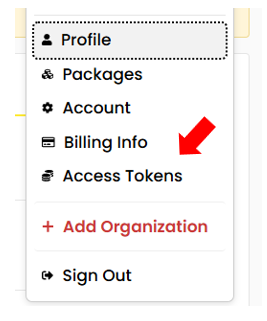
1. Go to npmjs and select Access Tokens from the settings menu
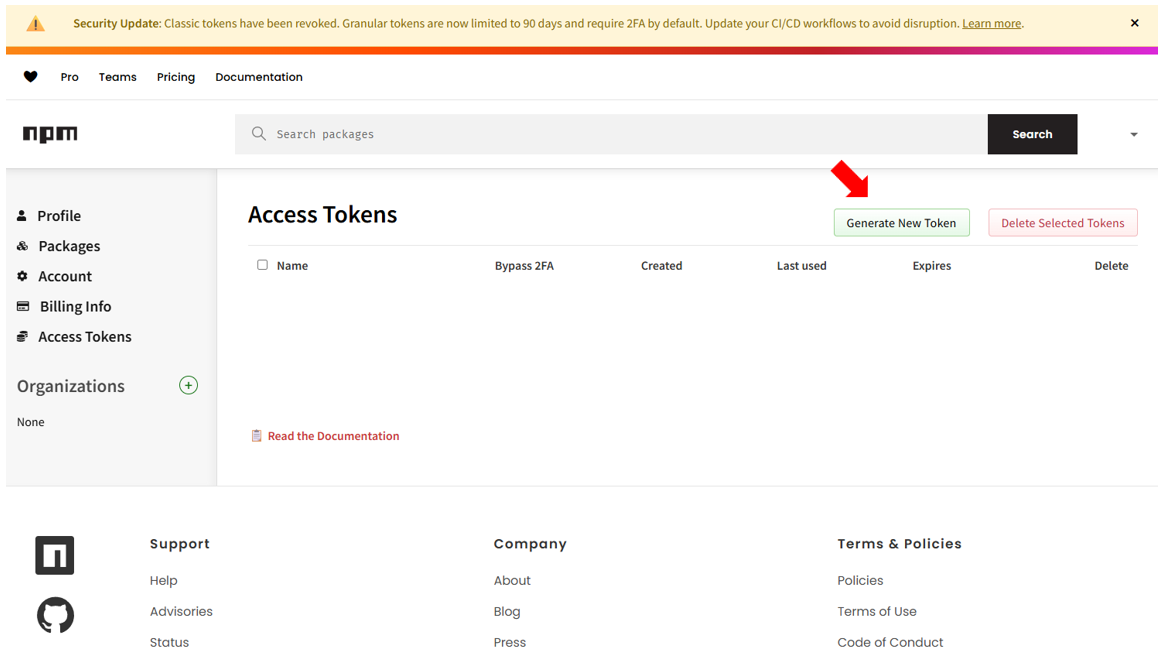
2. Select "Generate New Token"
3. Configure the following
(1)Token name: any name you like (e.g., local-dev)
(2)⚠️ Bypass two-factor authentication: Check this box
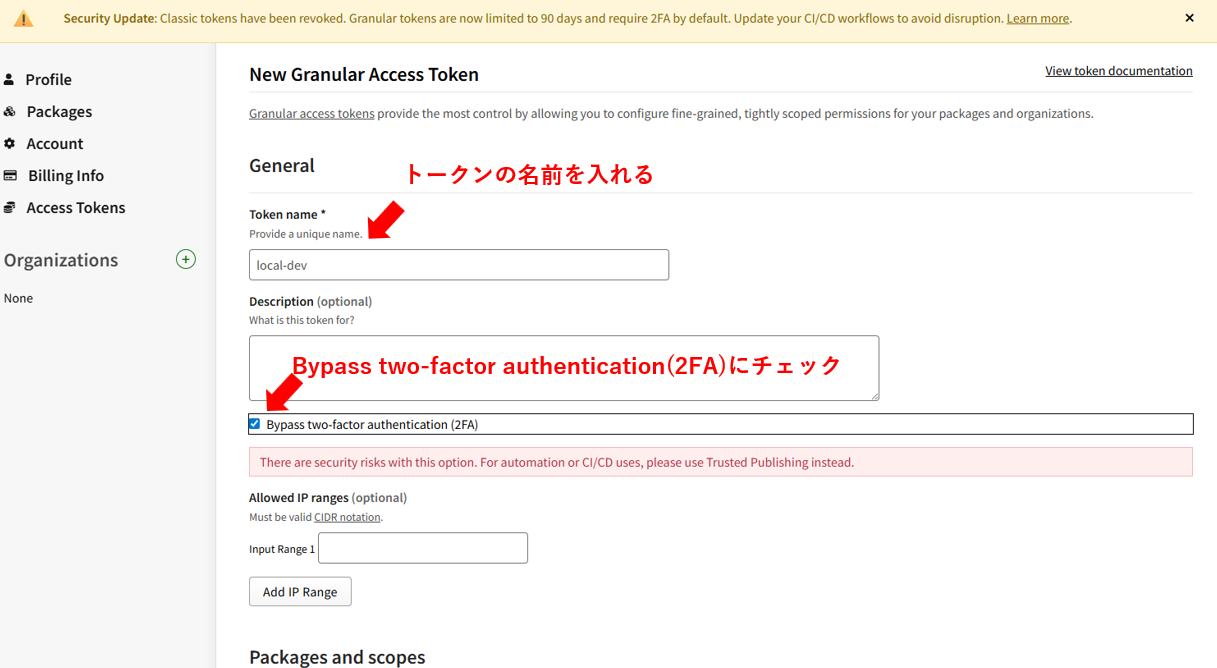
(3)Allowed IP Ranges: set an allowed IP range if needed
(4)Permissions: choose Read Only or Read and Write
Read Only is enough if you only consume packages,
but if you also want to publish packages, choose Read and Write.
In particular, if you run npm publish and get
Two-factor authentication or granular access token with bypass 2fa enabled is required to publish packages.
, create an access token with Read and Write access and configure it
(5)Select Packages: select the packages this token can access
(6)Expiration Date: set the token's expiration
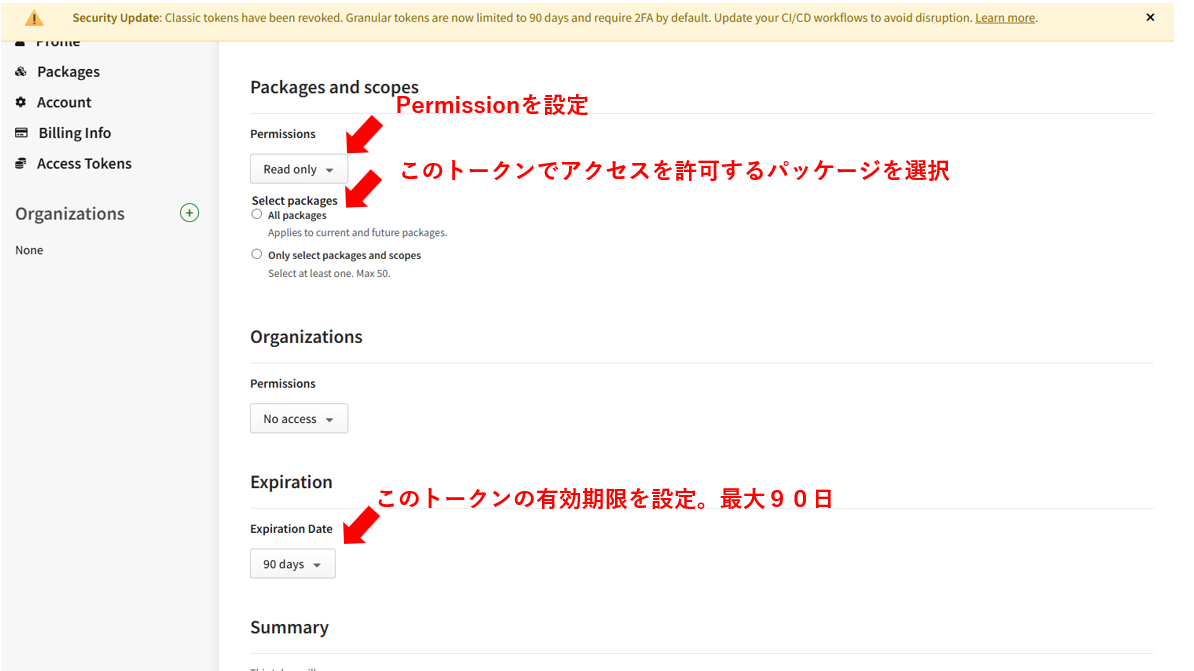
4. Once everything is configured, click "Generate token"
5. Copy the token that is displayed (npm_xxxx...)
Important: the token is shown only once, so be sure to copy it and store it somewhere safe
Creating it from the CLI (new feature)
To create a token from the CLI, run the following.
npm token create
Step 2-2: Set the environment variable
Once you have your access token, set it in an environment variable.
Mac/Linux (add to ~/.zshrc or ~/.bashrc):
export NPM_TOKEN=npm_xxxxxxxxxxxxxxxxxxxxxxxxxxxxxxxx
Apply the settings
source ~/.zshrc # or source ~/.bashrc
Windows (persistent setting via PowerShell)
[Environment]::SetEnvironmentVariable("NPM_TOKEN", "npm_xxxxxxxxxxxxxxxxxxxxxxxxxxxxxxxx", "User")
After setting it, restart your terminal.
Step 2-3: Reference the environment variable in .npmrc
Add the following to the .npmrc in your project root or home directory so that the token is read from the environment variable.
//registry.npmjs.org/:_authToken=${NPM_TOKEN}
Because this .npmrc does not contain the token itself, it is safe to commit to Git.
That completes Method 2.
Characteristics
- The token is never part of your codebase
- Environment variables are managed by the OS, so this is relatively safe
- The token must be renewed every 90 days
Method 3: Put the token directly in .npmrc
This is what many teams have long been doing in practice.
It is convenient for personal projects, but it raises security concerns for professional or team development
Steps
After creating a granular token following Step 2-1 of Method 2, write the token directly into .npmrc.
To configure it in your home directory:
# Mac/Linux: ~/.npmrc
# Windows: C:\Users\<username>\.npmrc

//registry.npmjs.org/:_authToken=npm_xxxxxxxxxxxxxxxxxxxxxxxxxxxxxxxx
To configure it in the project root:
# project-root/.npmrc

//registry.npmjs.org/:_authToken=npm_xxxxxxxxxxxxxxxxxxxxxxxxxxxxxxxx
⚠️ Serious security caveats
This method carries real risks. Be especially careful in team development.
Risk 1: Accidentally committing to Git
If you place .npmrc in the project root, forgetting to add it to .gitignore will expose the token in your repository.
# Always add it to .gitignore
echo .npmrc >> .gitignore
Risk 2: Sharing within a team
We sometimes see teams that commit .npmrc to Git "so everyone on the team can share it." This is extremely dangerous, so please do not do it.
- Everyone with access to the repository can see the token
- If the repository ever becomes public, the token leaks
- Former employees may still hold the token
For team development, we recommend having each member set their own token via environment variables, as in Method 2.
Risk 3: Plaintext storage
The token is stored in the file unencrypted, so if the machine is ever compromised, the token can leak.
Risk 4: 90-day renewal
Granular tokens expire after at most 90 days. Forget to renew one, and your builds will suddenly start failing.
Running the install
Whichever method you choose, finish with the following.
Clean up the existing node_modules
# Mac/Linux
rm -rf node_modules
rm package-lock.json

# Windows (Command Prompt)
rmdir /s /q node_modules
del package-lock.json

# Windows (PowerShell)
Remove-Item -Recurse -Force node_modules
Remove-Item package-lock.json
Reinstall
npm install
If everything succeeds, your private packages install normally.
Configuration in CI/CD environments
In CI/CD environments such as GitHub Actions and GitLab CI, create tokens the same way as in Method 2 above
Option 1: Use a granular token
- Create a token with the new CLI command (
npm token create) or on the web - Enable "Bypass 2FA" (for non-interactive automated workflows)
- Set an appropriate expiration (write tokens: 90 days max)
- Store the token in your CI/CD environment variables (Secrets)
Example (GitHub Actions)
- name: Create .npmrc
  run: echo "//registry.npmjs.org/:_authToken=${{ secrets.NPM_TOKEN }}" > .npmrc
Option 2: Use OIDC Trusted Publishing (most secure, recommended)
When you publish packages, this is the method npm officially recommends most
- No token generation or management required
- Integrates with GitHub Actions and similar services
- Significantly reduces security risk
Details: npm Trusted Publishing documentation
Note: Trusted Publishing cannot be used when installing packages. It applies to publishing only.
Troubleshooting
Q1: A warning appears when I check "Bypass 2FA"
There are security risks with this option.
For automation or CI/CD uses, please use Trusted Publishing instead.
A: This warning is normal. If you plan to write the token into .npmrc and use it that way, this option is required.
As noted earlier, the points to keep in mind are:
- Add the token file to
.gitignoreand never commit it to Git - Never share the token with others
- Renew the token every 90 days
Those are the essentials.
Q2: "Access token expired" is displayed
A: Granular tokens expire after at most 90 days.
The fix is, unsurprisingly, to create a new token
- Create a new token following Step 2-1 of Method 2
- Replace the token in your environment variable or
.npmrcwith the new one npm install— run it again
Q3: npm whoami succeeds, but access to the package is denied
A: This is a bit outside today's main topic, but it is worth covering for troubleshooting purposes. The following causes are likely
Cause 1: You are not a member of the organization
How to check:
npm org ls <org-name>
If you get a 403 error, you are not a member of that organization. Ask an organization admin to invite you.
Cause 2: The organization was not selected when the token was created
You may not have selected the target organization under "Packages and scopes" when creating the token. Create the token again.
A note on the "Bypass 2FA" option
The option name "Bypass two-factor authentication" can sound a little alarming when you create a token.
You get a warning like the one below:

Here we clarify what this option means and how a token behaves when you leave it unchecked (a 2FA-protected token).
Behavior of a 2FA-protected token (without Bypass 2FA)
If you create the token without checking this option, you will be prompted for a 2FA code every time you use the token.
npm install @your-org/private-package
# → Enter your OTP code: ______
When would you use a 2FA-protected token?
Honestly, the use cases for a 2FA-protected token are quite limited.
| Scenario | 2FA-protected token | Verdict |
|---|---|---|
| CI/CD | Cannot enter 2FA codes | ❌ Not usable |
Install with token in .npmrc |
2FA prompt every time | ❌ Impractical |
| Manual publish | Works, but... | △ npm login is sufficient |
Now that session-based authentication (npm login) has been introduced, 2FA at publish time is enforced by the session itself.
There is very little reason to go out of your way to use a 2FA-protected token.
So, in conclusion:
Conclusion
"Bypass 2FA" may sound scary, but in practice it is an option you will almost always need.
If security is a concern, we recommend skipping tokens entirely and using npm login session-based authentication (Method 1).
Summary
- npm classic tokens were completely disabled on December 9, 2025 (they cannot be recreated or restored)
- You need to create a new Granular Access Token.
npm loginwith a two-hour session token is the officially recommended approach- New CLI token management commands (
npm token create, etc.) were introduced - When creating a token, always check "Bypass 2FA".
- Write-enabled tokens expire after 90 days at most
- In team development, committing
.npmrcto Git is dangerous (environment variables are recommended instead) - For publishing from CI/CD, OIDC Trusted Publishing is the most recommended approach
References
- npm official blog: classic token deprecation announcement
- npm official documentation
- npm CLI documentation
We hope this article helps other engineers who run into the same problem.
See you next time!



