
TensorRT 10 × Blackwell Migration Guide (Part 1): Inference Assets Won't Run on RTX 50 — The Basics and the First Walls


Hello!
You get a new GPU, excitedly move your existing inference stack over, and
everything that ran fine yesterday now stops with errors across the board
— sound familiar? In migrations to the NVIDIA RTX 50 series and NVIDIA RTX PRO series (the Blackwell generation), this happens with rather high probability.
And here is the troublesome part: stopping with an error is actually the kind case. TensorRT's world also contains
"the build passes, execution passes, the speed is there — but the output alone is quietly broken"
— the hardest kind of failure to find.
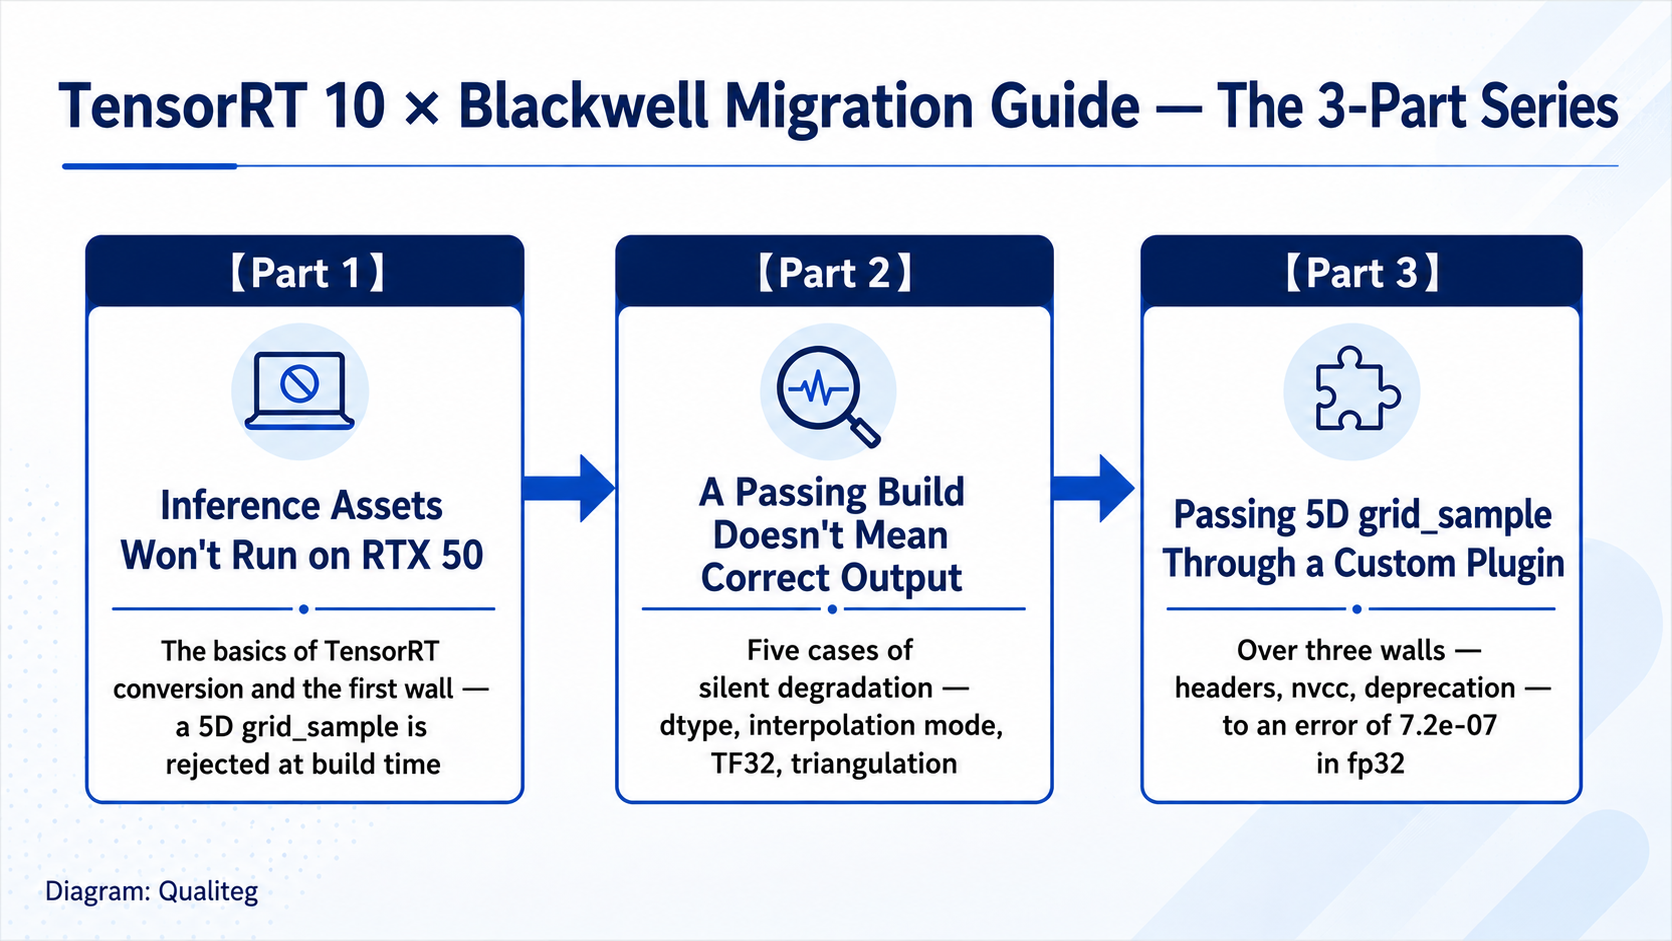
This article is Part 1 of a series covering the whole picture.
| Part | Topic |
|---|---|
| Part 1 | Inference Assets Won't Run on RTX 50 — The Basics and the First Walls (this article) |
| Part 2 | A Passing Build Does Not Mean Correct Output — Five Cases of Silent Degradation |
| Part 3 | Passing 5D grid_sample Through a Custom Plugin |
Target environment
OS: Ubuntu 24.04 (WLS)
GPU: NVIDIA RTX PRO 4000 Blackwell / GeForce RTX 5060 Ti
(both Compute Capability 12.0 = sm_120)
Stack: PyTorch 2.11.0 + cu128 / TensorRT 10.16.1.11.
Part 1 delivers the following three things.
- What TensorRT conversion actually is
Why it is faster than running plain PyTorch — and what you pay in exchange - Why existing assets stop working on Blackwell (RTX 50 series, RTX PRO series)
There is not one area to check but, broadly, three - Steps to get a minimal TensorRT 10 conversion through
From environment setup to engine build, numerical comparison, and speed measurement, in a form you can reproduce by running the code in this article in order.
As the subject — so the same verification steps can be followed without depending on any particular product — we use a small dummy model whose full code is included in this article.
This is not about any specific product or model; read it as a story about TensorRT conversion itself.
The numbers, error logs, and behaviors shown in this article are actual results from real runs. The code targets the TensorRT 10.x API.
TensorRT 11 has changed or removed some APIs, including the precision flags (`BuilderFlag.FP16`, etc.), so the code does not run there as-is.
We deliberately use 10.16 to reproduce the migration path of existing assets.
To find out which generation (which SM) your GPU belongs to, you can use our "2026 NVIDIA GPU quick-lookup tool." Start there to check whether this article applies to your environment.
Part 1: What TensorRT conversion is — and why it beats PyTorch
In one phrase: ahead-of-time compilation
When you run PyTorch inference plainly — torch.compile and CUDA Graphs not in use, i.e. eager execution — think about what is happening inside the GPU.
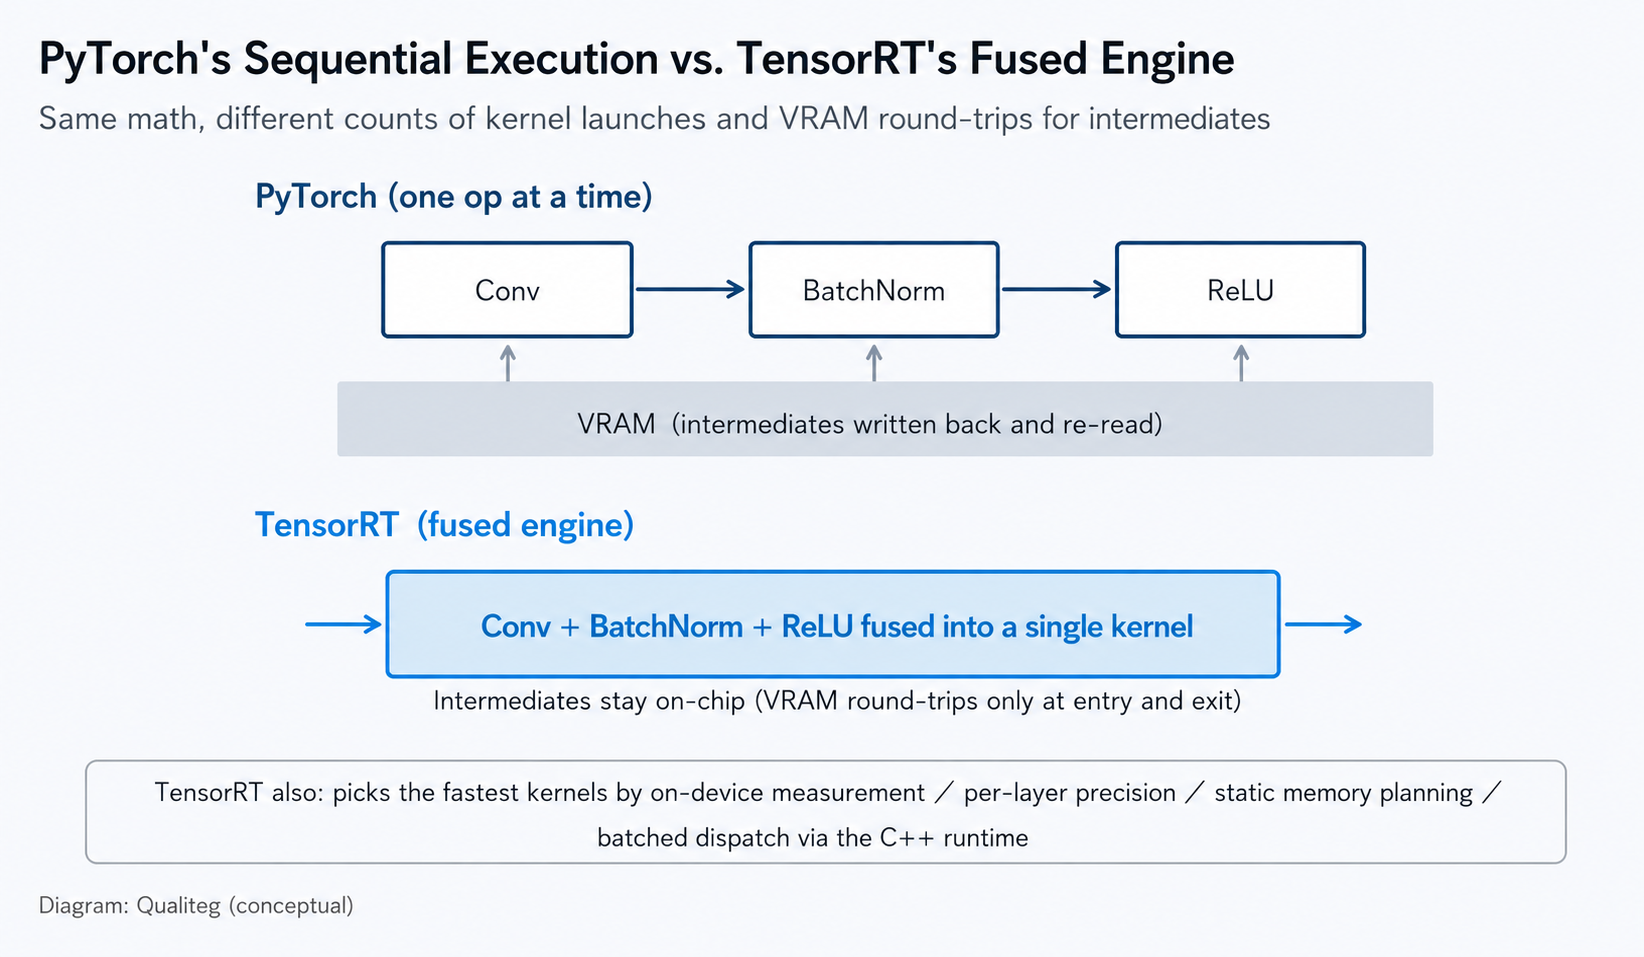
Every operator call goes through dispatch, and a GPU kernel is launched per operation. Between unfused operations, intermediate results are written out to GPU memory (VRAM) and read back by the next operation.
TensorRT conversion changes this mode of execution at the root.
The model's entire computation graph is compiled ahead of time into an execution plan specific to that GPU, and at inference time the host merely submits that plan in a single call.
TensorRT calls this precompiled artifact an engine (engine / plan).
Note that the comparison target throughout this article is PyTorch eager execution. PyTorch itself has acceleration paths such as torch.compile and CUDA Graphs, and comparisons against those are a separate story.
The mental image is close to the difference between interpreting source code line by line and compiling it ahead of time into a native binary.
Five mechanisms behind the speed
Break down "why is it fast" and you get roughly these five.
| Mechanism | PyTorch eager (no torch.compile) | TensorRT engine |
|---|---|---|
| Layer fusion | Unfused Conv, BatchNorm, ReLU, etc. run as separate kernels, with intermediate tensors read and written between them | Fuses multiple layers into a single kernel and keeps intermediate results in the GPU's fast internal memory. The more memory-bound the model, the more dramatic the effect |
| Kernel auto-tuning | cuDNN and friends pick implementations per operation (with benchmark-based selection for input shapes, depending on settings) | At build time, looks at the whole network, measures multiple implementation candidates on the actual device, and adopts the combination that makes the whole fastest (this is why builds take time — and why engines end up specific to a GPU model) |
| Low-precision engineering | Coarse-grained fp16 via autocast | Controls permitted precision per layer to saturate the Tensor Cores. Enables things like pinning only the risky layers to fp32 |
| Static memory planning | Creates intermediate tensors per operation and manages memory with a caching allocator (whole-graph lifetime planning has limits) | With fixed shapes, every tensor's lifetime is known in advance. Reuses regions to trim VRAM and suppresses the overhead of runtime dynamic allocation |
| Reduced runtime overhead | Passes through the Python interpreter and dispatcher for every operation (autograd also stays active unless inference_mode is used) | A C++ runtime submits the whole graph in a single enqueue. The more small operations a model has, the wider the gap |
[The cost] What you give up with TensorRT conversion
TensorRT articles tend to end with "it got faster!", but
in practice, understanding what you lose matters more.
- Builds take time —
Because kernels are measured on the real machine, builds can take minutes to tens of minutes depending on the model - Engines have poor portability —
An engine built with default settings depends strongly on the TensorRT version and GPU used to create it; "copy the engine from the dev machine to production" is, as a rule, not possible. Compatibility modes (version compatibility, hardware compatibility) can widen the target range, at the cost of performance and feature constraints - An unsupported operation makes the build fail outright
Part 4 of this article is exactly this - The numbers change — sometimes breaking silently
Beyond precision loss, the very meaning of an operation can get swapped (the subject of Part 2 of the series) - Fixed shapes are easiest to handle —
Dynamic shapes are officially supported via optimization profiles, but covering too wide a range can make per-shape optimal implementations harder to select and can increase memory - Harder to debug
Unlike PyTorch, you cannot drop aprintinto the middle of the model to peek inside
Criteria for deciding "should we TensorRT this?"
Given all that, the decision becomes fairly clear.
Cases where it pays off
- An ONNX model still running on CPU remains in the pipeline
(top priority — the gain is an order of magnitude) - Models with lots of small operations where kernel-launch overhead is the bottleneck
- Inference services with fixed input shapes that keep running the same model at volume
Cases where it pays off less, or deserves caution
- Modules that spend most of their time on the computation itself — with the main operations' compute time already dominant, the per-item latency gain from a straightforward ONNX → TensorRT conversion was limited
(increasing the batch barely changed the per-item time; this is the result for this particular module, though — with quantization or dedicated kernels the story changes, and throughput is another metric altogether) - Workloads with wide shape variation, where the cost of designing optimization profiles or managing multiple engines does not match the benefit
- Models containing operations TensorRT does not support
(→ apply it partially with Part 4's hybrid configuration) - Workloads that can simply be batched
This point deserves emphasis. If kernel-launch overhead is the bottleneck, you can sometimes gain several× just by batching on the PyTorch side, without TensorRT at all.
In our case, running one module in batches shrank the per-frame time by more than 2× — faster than the configuration we had painstakingly converted to TensorRT. The optimal answer differs between "process one frame at a time in real time" and "render everything out in bulk"
In short,
TensorRT is not a universal speed button; it is
a tool you apply after measuring which stage is losing time, and to what
. Skip that and charge into converting every stage, and the result will not repay the build effort.
Part 2: Why assets that worked yesterday stop working on Blackwell
Now, on to Blackwell.
The RTX 50 series, and the RTX PRO Blackwell workstation GPU we tested, are sm_120 (Compute Capability 12.0) — a new generation, and this is where the causes of broken assets converge
(within the wider Blackwell family, some data-center products carry a different Compute Capability; check each product's generation with the GPU lookup tool introduced above).
In our test environment, problems appeared in the following three areas.
- TensorRT
The first release to support sm_120 was TensorRT 10.8.0 (the release notes state "supports NVIDIA Blackwell GPUs, such as the GeForce 50-series").
Put the other way around,
TensorRT 8-series `.engine` / `.plan` files built with default settings fail the compatibility check and, as a rule, cannot be reused on sm_120
(engines built on TensorRT 8.6+ with version compatibility and hardware compatibility enabled can be exceptions, but for existing assets whose compatibility settings cannot be confirmed, the safe assumption is a rebuild) - PyTorch
The first stable release with native Blackwell support is 2.7.0 (CUDA 12.8 wheel = cu128). Install an earlier wheel and it gets rejected with an error likesm_120 is not compatible with the current PyTorch installation.. - onnxruntime: In our test environment (onnxruntime 1.27), CUDAExecutionProvider failed to initialize and execution fell back to CPU.
Because nothing stops with an error, it is easy to miss — the only symptom left is "things feel slow."
This depends on the combination of onnxruntime version, distributed build, and CUDA, though — it does not mean official wheels uniformly fail on Blackwell. Verify with the versions you actually use
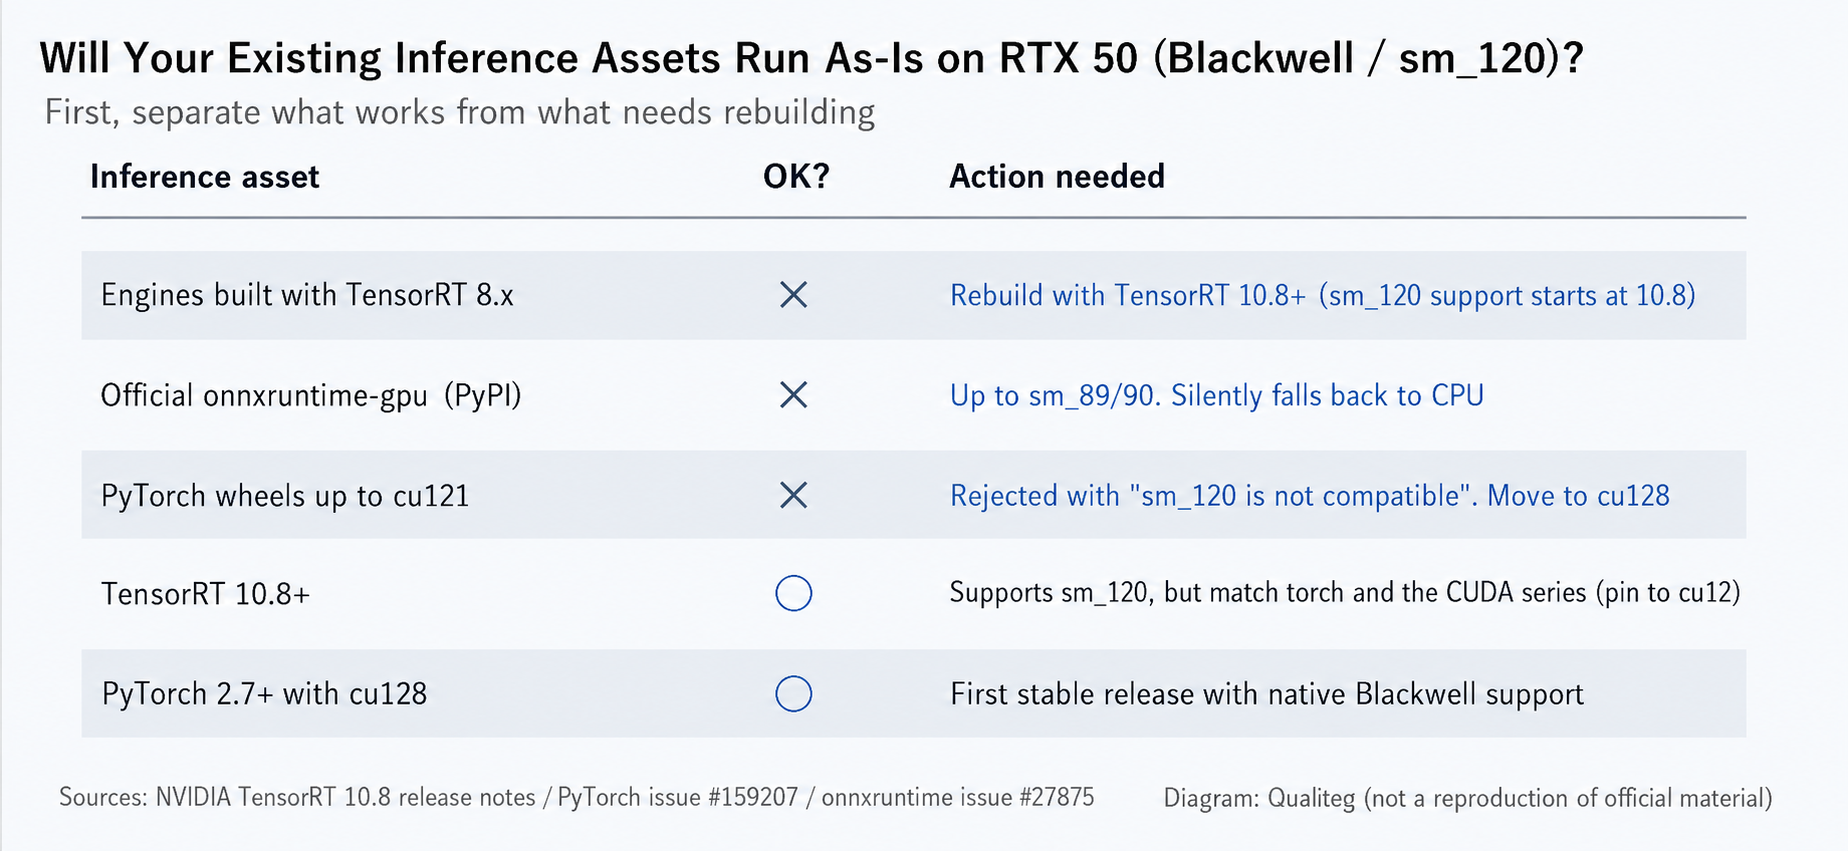
In other words, Blackwell migration is not just swapping the GPU; it is
"move PyTorch to the cu128 generation"
and "move TensorRT to the 10.x generation," plus
"re-examine which backend peripheral runtimes such as onnxruntime are actually running on"
— all run at the same time
.
The third item, onnxruntime, tends to be left alone with a shrug of "if CUDA won't work, CPU is fine" — but there is a good chance that is exactly where your pipeline's bottleneck sits, so beware.
Start by actually printing the providers and checking whether you have fallen back to CPU.
import onnxruntime as ort
print(ort.__version__)
print(ort.get_available_providers())   # if CUDAExecutionProvider is absent, the CUDA EP cannot be used in this environment

sess = ort.InferenceSession("model.onnx",
                            providers=["CUDAExecutionProvider", "CPUExecutionProvider"])
print(sess.get_providers())            # providers registered to the session, in priority order
One caution.sess.get_providers() tells you only "which providers were registered to the session" — it is not proof that every node ran on the GPU
(some nodes may be assigned to CPU). To confirm node-level placement, use onnxruntime's profiling or verbose logs.
Part 3: Getting a minimal TensorRT 10 conversion through — five steps
From here on, we get hands-on.
Do not start by converting your real model.
First push a minimal model of a few dozen lines through the five steps — export → build → run → numerical comparison → speed measurement — and confirm the environment itself is healthy.
With this self-check in place, when the real model later fails you can instantly separate "is it the environment, or the model."
Environment setup — the first trap lives here
All verification was done on WSL2 (Ubuntu 24.04).
We choose WSL2 because the Linux-first toolchain around CUDA / TensorRT works as-is. The venv is created with uv, and the system Python is left untouched.
# Create a working venv with uv (leaves the system Python untouched)
uv venv ~/work/trt_venv --python 3.11
source ~/work/trt_venv/bin/activate

# Pin PyTorch to the cu128 (CUDA 12.8) generation (confirmed to resolve to 2.11.0 as of 2026-07-23)
uv pip install torch --index-url https://download.pytorch.org/whl/cu128

# Pin TensorRT to the 10.x cu12 build (★ reasons below)
uv pip install "tensorrt-cu12==10.16.1.11"
# onnxscript is required by PyTorch's new exporter (dynamo=True)
uv pip install onnx onnxscript numpy
Trap 1: pip install tensorrt pulls in the CUDA 13 series
A bare pip install tensorrt resolved, at the time of testing, to TensorRT 11.1.0.106 (a CUDA 13-series build).
Meanwhile, this article's PyTorch environment is cu128 (CUDA 12.8). Having libraries from different CUDA major series in the same environment is not immediately invalid in itself, but it complicates dependencies and troubleshooting.
And above all, this article's code does not run on the TensorRT 11 API.
So, to keep the test conditions aligned, we match TensorRT's CUDA series to torch's and explicitly pin the cu12 build of TensorRT 10.16.
"Just install the latest" is not the rule here.
Once the environment is up, first confirm the GPU really is recognized as sm_120.
import torch
print(torch.__version__, torch.version.cuda)   # e.g. 2.11.0+cu128 / 12.8
print(torch.cuda.is_available())               # must be True
print(torch.cuda.get_device_capability())      # (12, 0) on RTX 50 series and the GPUs tested here
Step 1: Prepare the dummy model
We set up a small convolution block — unrelated to any product, just Conv + BatchNorm + ReLU stacked.
# tiny_model.py
import torch
import torch.nn as nn

class TinyBlock(nn.Module):
    """Minimal model for verifying TensorRT conversion (Conv+BN+ReLU ×3).
    Deliberately lines up small operations so the effect of layer fusion is easy to see."""
    def __init__(self, ch=64):
        super().__init__()
        layers = []
        for _ in range(3):
            layers += [nn.Conv2d(ch, ch, 3, padding=1), nn.BatchNorm2d(ch), nn.ReLU(inplace=True)]
        self.body = nn.Sequential(*layers)

    def forward(self, x):
        return self.body(x)

INPUT_SHAPE = (1, 64, 256, 256)   # handled as a fixed shape
Step 2: Export to ONNX
In later steps we compare numbers against "the very model we exported," so the `model` and `x` created here are reused throughout what follows.
Fixing the seed also makes the results reproducible.
torch.manual_seed(0)
model = TinyBlock().eval().cuda().float()
x = torch.randn(*INPUT_SHAPE, device="cuda")

torch.onnx.export(
    model, (x,), "tiny.onnx",
    input_names=["x"], output_names=["y"],
    opset_version=20,
    dynamo=True,          # PyTorch 2.x's new exporter (requires onnxscript)
)
For models with multiple inputs, there is the seed of an extremely hard-to-find accident right here.
torch.onnx.export's args parameter is a tuple, bound positionally, in order.
Get the parameter order of the model's forward wrong, and the export succeeds without error or warning, with the arguments swapped inside the ONNX.
That accident, and the permanent fix, are covered in detail in Part 2 of the series.
Step 3: Build the TensorRT engine
import tensorrt as trt

TRT_LOGGER = trt.Logger(trt.Logger.WARNING)

def build_engine(onnx_path, engine_path, fp16=True, workspace_gb=4, tf32=True):
    builder = trt.Builder(TRT_LOGGER)
    # TensorRT 10 defaults to explicit batch. The flag below remains for backward compatibility
    network = builder.create_network(1 << int(trt.NetworkDefinitionCreationFlag.EXPLICIT_BATCH))
    parser = trt.OnnxParser(network, TRT_LOGGER)

    # parse_from_file also resolves large models' external data (.onnx.data)
    # automatically from the same directory as the ONNX
    if not parser.parse_from_file(onnx_path):
        errs = [str(parser.get_error(i)) for i in range(parser.num_errors)]
        raise RuntimeError("ONNX parse failed:\n" + "\n".join(errs))

    config = builder.create_builder_config()
    config.set_memory_pool_limit(trt.MemoryPoolType.WORKSPACE, workspace_gb * (1 << 30))

    if fp16:
        # Add FP16 implementation candidates (tactics) to the choices. This does not guarantee
        # every layer becomes FP16; some layers may get FP32. The actual execution precision
        # can be confirmed by dumping layer information
        config.set_flag(trt.BuilderFlag.FP16)

    # ★ Even in fp32 builds, TensorRT uses TF32 (10-bit mantissa) by default.
    #    Disable it when strictly verifying fidelity (details in Part 2 of the series)
    if not tf32:
        config.clear_flag(trt.BuilderFlag.TF32)

    plan = builder.build_serialized_network(network, config)
    if plan is None:
        raise RuntimeError("build_serialized_network returned None (engine build failed)")
    with open(engine_path, "wb") as f:
        f.write(plan)
    return engine_path

build_engine("tiny.onnx", "tiny_fp16.plan", fp16=True)
As the comment says, BuilderFlag.FP16 does not mean "make everything fp16"; it means "allow FP16 implementation candidates". From here on, whenever the text says "built with fp16," read it as "built with FP16 tactics allowed."
Step 4: Run the engine (passing PyTorch tensors directly)
This is probably the part practitioners most want to know.
If device, dtype, shape, and memory layout (contiguous) already match the engine's requirements, you can register the PyTorch tensor's GPU memory address (`data_ptr()`) with TensorRT directly and avoid an extra copy at the boundary.
Once you can do this, the hybrid configuration — "convert only part of the model to TensorRT and leave the rest in PyTorch" — becomes realistic (we use it in Part 4).
For safety, the sample below automatically matches dtype and device before passing
(when the conditions do not match, a converting copy happens there; why this auto-conversion is needed is explained in the trap just below).
_TRT2TORCH = {
    trt.float32: torch.float32, trt.float16: torch.float16,
    trt.int32: torch.int32, trt.int64: torch.int64,
    trt.int8: torch.int8, trt.bool: torch.bool,
}

class TRTRunner:
    """Loads an engine and runs it using PyTorch tensors for I/O (fixed shapes assumed)"""

    def __init__(self, engine_path, device="cuda:0"):
        self.device = torch.device(device)
        # Runtime / engine / context are tied to the current CUDA device, so create them
        # with the target device made explicit (mandatory when using anything other than cuda:0)
        with torch.cuda.device(self.device):
            self.runtime = trt.Runtime(TRT_LOGGER)
            with open(engine_path, "rb") as f:
                self.engine = self.runtime.deserialize_cuda_engine(f.read())
            if self.engine is None:
                raise RuntimeError(f"deserialize failed: {engine_path}")
            self.ctx = self.engine.create_execution_context()

        self.inputs, self.outputs = [], []
        for i in range(self.engine.num_io_tensors):
            name = self.engine.get_tensor_name(i)
            if self.engine.get_tensor_mode(name) == trt.TensorIOMode.INPUT:
                self.inputs.append(name)
            else:
                self.outputs.append(name)

    def prepare(self, feed: dict):
        """Set input shapes and addresses, and allocate output buffers.
        If input buffers are reused, once is enough (in speed measurement, keep this outside the timed region)"""
        self._feed = {}
        for name, t in feed.items():
            # ★ Even with FP16 tactics allowed at build time, the engine's I/O types stay as defined
            #   in the ONNX (usually fp32). Pass a half tensor's address as-is and the fp16 bits get
            #   read as fp32, corrupting the output. And no exception is raised (details below)
            want = _TRT2TORCH[self.engine.get_tensor_dtype(name)]
            t = t.to(device=self.device, dtype=want).contiguous()
            # The set_* calls also return bool. Swallowing failures is strictly off-limits, given this article's theme
            if not self.ctx.set_input_shape(name, tuple(t.shape)):
                raise RuntimeError(f"set_input_shape failed: {name}, shape={tuple(t.shape)}")
            if not self.ctx.set_tensor_address(name, t.data_ptr()):
                raise RuntimeError(f"set_tensor_address failed: {name}")
            self._feed[name] = t

        self._outs = {}
        for name in self.outputs:
            shape = tuple(self.ctx.get_tensor_shape(name))
            if any(d < 0 for d in shape):
                raise RuntimeError(f"output shape unresolved: {name} {shape}")
            dtype = _TRT2TORCH[self.engine.get_tensor_dtype(name)]
            o = torch.empty(shape, dtype=dtype, device=self.device).contiguous()
            self._outs[name] = o
            if not self.ctx.set_tensor_address(name, o.data_ptr()):
                raise RuntimeError(f"set_tensor_address failed: {name}")
        return self._outs

    def enqueue(self):
        """Queue execution on the current stream (asynchronous). ★ Always check the return value"""
        ok = self.ctx.execute_async_v3(torch.cuda.current_stream(self.device).cuda_stream)
        if not ok:
            raise RuntimeError("TensorRT enqueue failed: possibly an engine/runtime mismatch. "
                               "The output cannot be trusted, so processing stops here")

    def run(self, feed: dict):
        """Convenience version for verification (prepare + synchronize every call). Not for speed measurement"""
        outs = self.prepare(feed)
        self.enqueue()
        torch.cuda.current_stream(self.device).synchronize()
        return outs
Trap 2: Even built with FP16 tactics allowed, the engine's I/O stays fp32
We actually stepped on this one during this verification.
config.set_flag(trt.BuilderFlag.FP16) enabled adds FP16 implementation candidates to TensorRT's choices (not every layer becomes fp16), but
the network's input/output tensor types follow the ONNX definition — fp32 in this example.
Pass a PyTorch half tensor's address here as-is, and TensorRT treats the region as an input buffer of fp32 elements. Since fp16 is 2 bytes per element and fp32 is 4, not only does the interpretation of the values change — TensorRT may also read beyond the region PyTorch allocated.
The behavior is undefined; beyond corrupted output, some environments may see CUDA errors or crashes
(set_tensor_address registers only the pointer and conveys nothing about the buffer's size).
Measured, it came out like this.
- With dtype correctly matched:
maximum absolute error about 0.001
(no major numerical breakdown under this FP16-tactics-allowed configuration) - With the half tensor's address passed as-is:
maximum absolute error about 13.8
(on a model whose output range is a bit under 0.5. This value is one observation in our environment and does not represent a reproducible error magnitude)
And the worst part: in our measurements, even in this state `execute_async_v3` returned `True` (success), produced no NaN, and threw no exception. The reason the code above includes the two want = _TRT2TORCH[...] lines is to prevent exactly this silent degradation.
Trap 3: Never discard the return value of `execute_async_v3`
This method throws no exception on failure — it merely returns `False`.
Leave that unchecked, and the un-updated output buffer (garbage, or the previous frame's values) flows straight downstream.
Processing looks "successful" while only the output is broken — the worst possible shape of failure. As in the code above, we strongly recommend making False raise immediately.
Step 5: Match the numbers first, then measure speed
Before measuring speed, first confirm the numbers match.
Do not reverse the order.
The reference for the comparison is the very fp32 `model` and `x` used for the export in Step 2. Do not construct a new model here
(you would be comparing against randomly initialized "different weights"), and do not use an fp16-converted variant as the reference either (that would no longer verify "are the export and the engine correct").
# model / x are the same fp32 objects used for the export in Step 2
with torch.inference_mode():
    torch_ref = model(x)

runner = TRTRunner("tiny_fp16.plan")
trt_out = runner.run({"x": x})["y"]

diff = trt_out.float() - torch_ref.float()
print("max_abs :", diff.abs().max().item())
print("nRMSE   :", (diff.norm() / torch_ref.norm()).item())
Without the output's own value range alongside it, the size of a maximum absolute error cannot be judged. An untrained dummy model has a different value range from a real model, so a normalized relative error (nRMSE) should be checked alongside — that is the safe practice.
For this TinyBlock: max_abs about 0.001, nRMSE about 0.0016 — a small error level for an engine with FP16 tactics allowed, under this configuration.
Measurement is done with a dedicated CUDA stream + CUDA Events.time.time() cannot correctly measure the GPU's asynchronous execution.
import numpy as np

def bench_callable(fn, n_warmup=30, n_iter=200, device="cuda:0"):
    """Measures fn() and returns mean/median/min/max (milliseconds).
    Using a dedicated stream lets PyTorch and TensorRT be compared fairly under identical conditions"""
    dev = torch.device(device)
    # Complete any work queued earlier on other streams (model conversion, prepare, etc.).
    # Streams have no guaranteed ordering unless explicitly synchronized
    torch.cuda.synchronize(dev)
    stream = torch.cuda.Stream(dev)
    with torch.cuda.stream(stream):
        for _ in range(n_warmup):      # warmup is mandatory (first runs are slow)
            fn()
        stream.synchronize()

        times = []
        for _ in range(n_iter):
            s = torch.cuda.Event(enable_timing=True)
            e = torch.cuda.Event(enable_timing=True)
            s.record(stream)
            fn()
            e.record(stream)
            stream.synchronize()
            times.append(s.elapsed_time(e))

    t = np.array(times)
    return {"mean": float(t.mean()), "median": float(np.median(t)),
            "min": float(t.min()), "max": float(t.max())}
For the speed measurement, the PyTorch side uses an fp16-converted model as its realistic production candidate. We want to keep the fp32 model used for the comparison intact, so we copy before converting to fp16. The key point: on the TensorRT side, run `prepare()` (buffer allocation and address registration) once, outside the timed region, and call only `enqueue()` during measurement.
Call run() every iteration and the dtype conversion, output allocation, and synchronization all get counted into TensorRT's time — no longer a fair comparison.
import copy

# The fp16 model for speed measurement is made separately via deepcopy, to preserve the fp32 model used for export
model_half = copy.deepcopy(model).half()
x_half = x.half()

# PyTorch side (eager + inference_mode, fp16)
def torch_fn():
    with torch.inference_mode():
        model_half(x_half)

# TensorRT side: prepare runs once, outside the timed region. Only enqueue is measured
runner.prepare({"x": x})
def trt_fn():
    runner.enqueue()

print("torch:", bench_callable(torch_fn))
print("trt  :", bench_callable(trt_fn))
Here are the results.
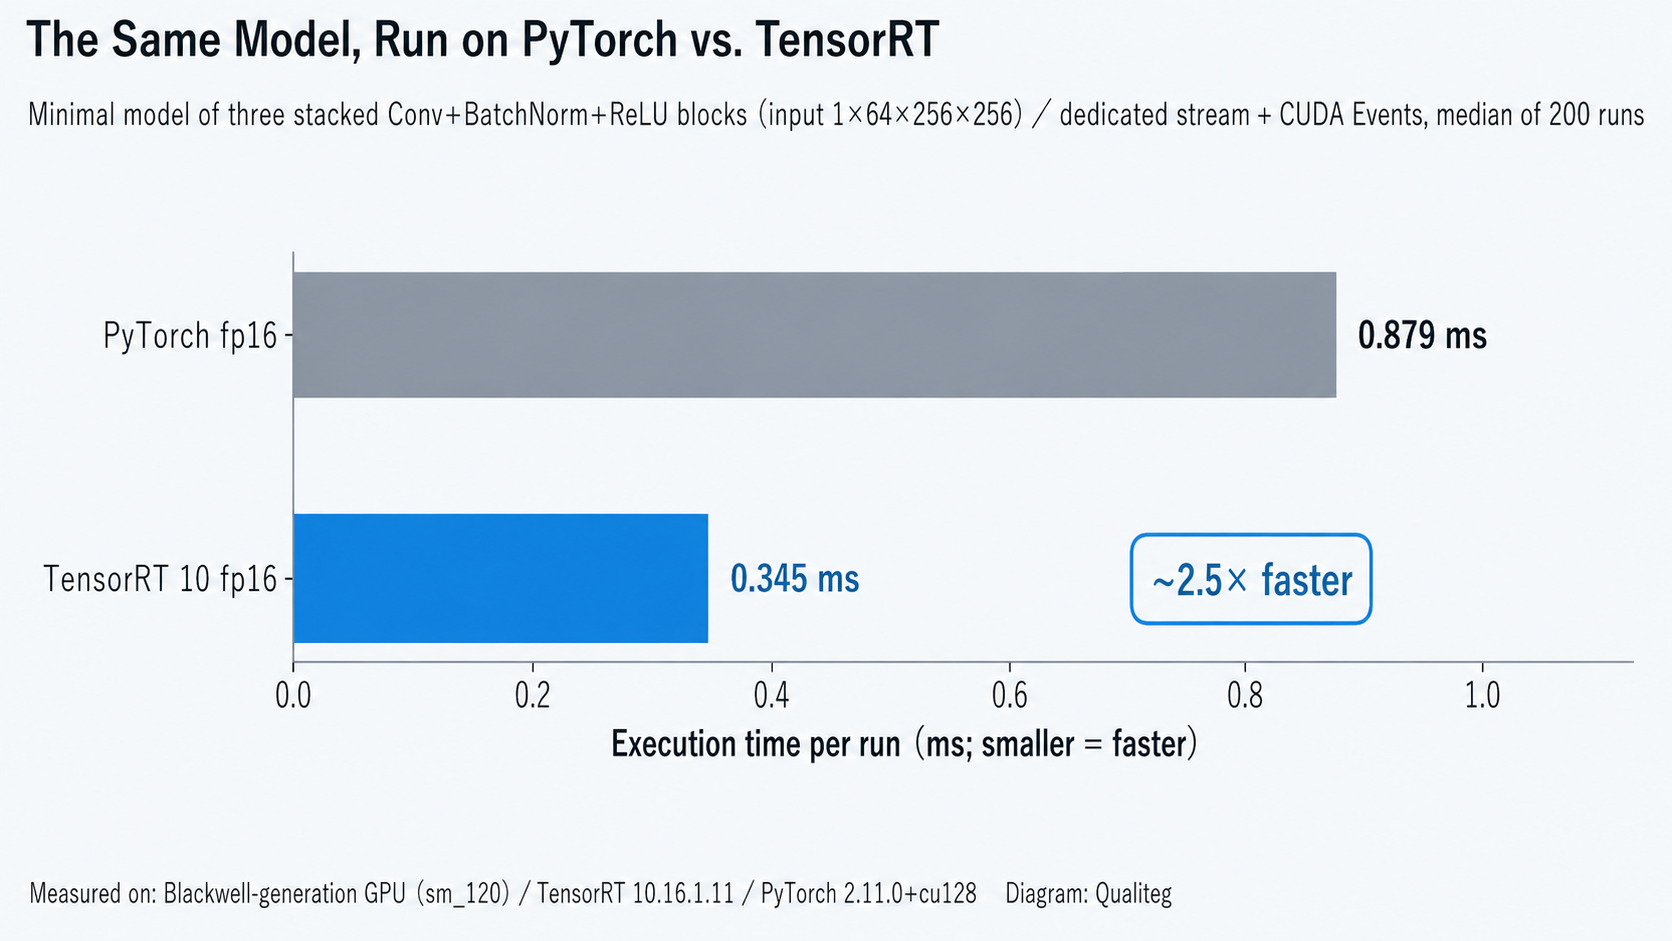
Measurement conditions: GeForce RTX 5060 Ti / batch=1 / PyTorch 2.11 eager + inference_mode, fp16 model / TensorRT 10.16, fp32 I/O, FP16 tactics enabled. TensorRT preallocates I/O buffers and only the enqueue region is measured. Median of 200 runs with 30 warmups each.For a small model that merely stacks Conv + BatchNorm + ReLU three deep, the GPU-execution region showed about a 2.5× difference.
Reading this number takes care, though.
This compares "fully fp16 PyTorch eager" against "a TensorRT engine with fp32 I/O and FP16 tactics allowed," over the GPU-execution region excluding upfront dtype conversion and buffer preparation.
It is neither a same-precision comparison nor an end-to-end speedup figure for a whole pipeline.
Even so, the fact that the same model structure shows this much difference when each side runs in its realistic production configuration is consistent with the effects listed in Part 1: layer fusion, kernel selection, and reduced runtime overhead.
For the comparison, look at median.
Averages get dragged around by the occasional outlier.
Also, keep the GPU exclusively yours during measurement. If other inference processes or desktop rendering share the GPU, the numbers swing by tens of percent easily and the comparison loses meaning.
Part 4: The first wall — the build falls over on grid_sample's dimensionality
When you start converting your real model, this is what most people hit first.If the model contains a 5-dimensional (volumetric) `grid_sample`, the TensorRT build does not pass.
Warping 3D volumes appears in many domains: medical image registration, NeRF-family methods, 3D feature warping. The minimal reproduction module is as follows.
import torch.nn.functional as F

class VolumetricWarp(nn.Module):
    """Minimal module containing a 5D (volumetric) grid_sample.
    input: [N, C, D, H, W] / grid: [N, D, H, W, 3]"""
    def forward(self, vol, grid):
        return F.grid_sample(vol, grid, align_corners=False)

VOL_SHAPE  = (1, 32, 16, 64, 64)
GRID_SHAPE = (1, 16, 64, 64, 3)
Export and build can be tried with the exact same tooling as Steps 2–3.
warp_model = VolumetricWarp().eval().cuda()
vol = torch.randn(*VOL_SHAPE, device="cuda")
grid = torch.rand(*GRID_SHAPE, device="cuda") * 2 - 1

torch.onnx.export(
    warp_model, (vol, grid), "volumetric_warp.onnx",
    input_names=["vol", "grid"], output_names=["y"],
    opset_version=20, dynamo=True,
)

# The ONNX export succeeds. What fails is the build that follows
build_engine("volumetric_warp.onnx", "volumetric_warp.plan", fp16=False)
Run it, and it fails with the following error (verbatim log from the real machine).
[TRT] [E] INetworkDefinition::addGridSample: Error Code 3: API Usage Error
    (Parameter check failed, condition: input.getDimensions().nbDims == 4.
     In addGridSample at /_src/optimizer/api/network.cpp:1803)
[TRT] [E] ModelImporter.cpp:138: While parsing node number 0 [GridSample -> "y"]:
[TRT] [E] ModelImporter.cpp:149: ERROR: ModelImporter.cpp:490 In function parseNode:
[6] Invalid Node - node_GridSample_0
input.getDimensions().nbDims == 4
In other words, TensorRT 10.16's native `GridSample` accepts only 4-dimensional inputs.
5D calls are rejected at the point where the parser adds the node.
This matches the primary sources. The onnx-tensorrt operators documentation states, for GridSample, "Input must be 4D input.", and the request for 5D support exists as NVIDIA/TensorRT issue #3890, which remains open / triaged with no native support provided.
"Raise the ONNX opset and it will pass" is wrong
This is a common source of confusion, so let's make it explicit.
The ONNX standard defines 4D grid_sample at opset 16 and 5D (volumetric) grid_sample at opset 20.
Therefore the export from PyTorch succeeds fine at opset 20, and a 5D GridSample node is duly generated inside the ONNX file. Indeed, the error log above shows the failure happening at build time, after a successful export.
What fails is not the export but TensorRT's build. What ONNX can express and what TensorRT can digest are separate questions.
The practical answer — leave only the failing module in PyTorch
One workaround is to write the operation TensorRT lacks as your own CUDA kernel and register it as a plugin. For 5D grid_sample there are existing OSS implementations (grid-sample3d-trt-plugin, among others), and rebuilding one for the new CUDA / TensorRT generation is a viable approach.
But that is expert work, so we cover it in the final installment of this series.
Making zero migration progress until the plugin is finished is not realistic. What works here is the hybrid configuration. The idea is utterly simple: convert to TensorRT only the modules that pass, and leave the failing modules in PyTorch.
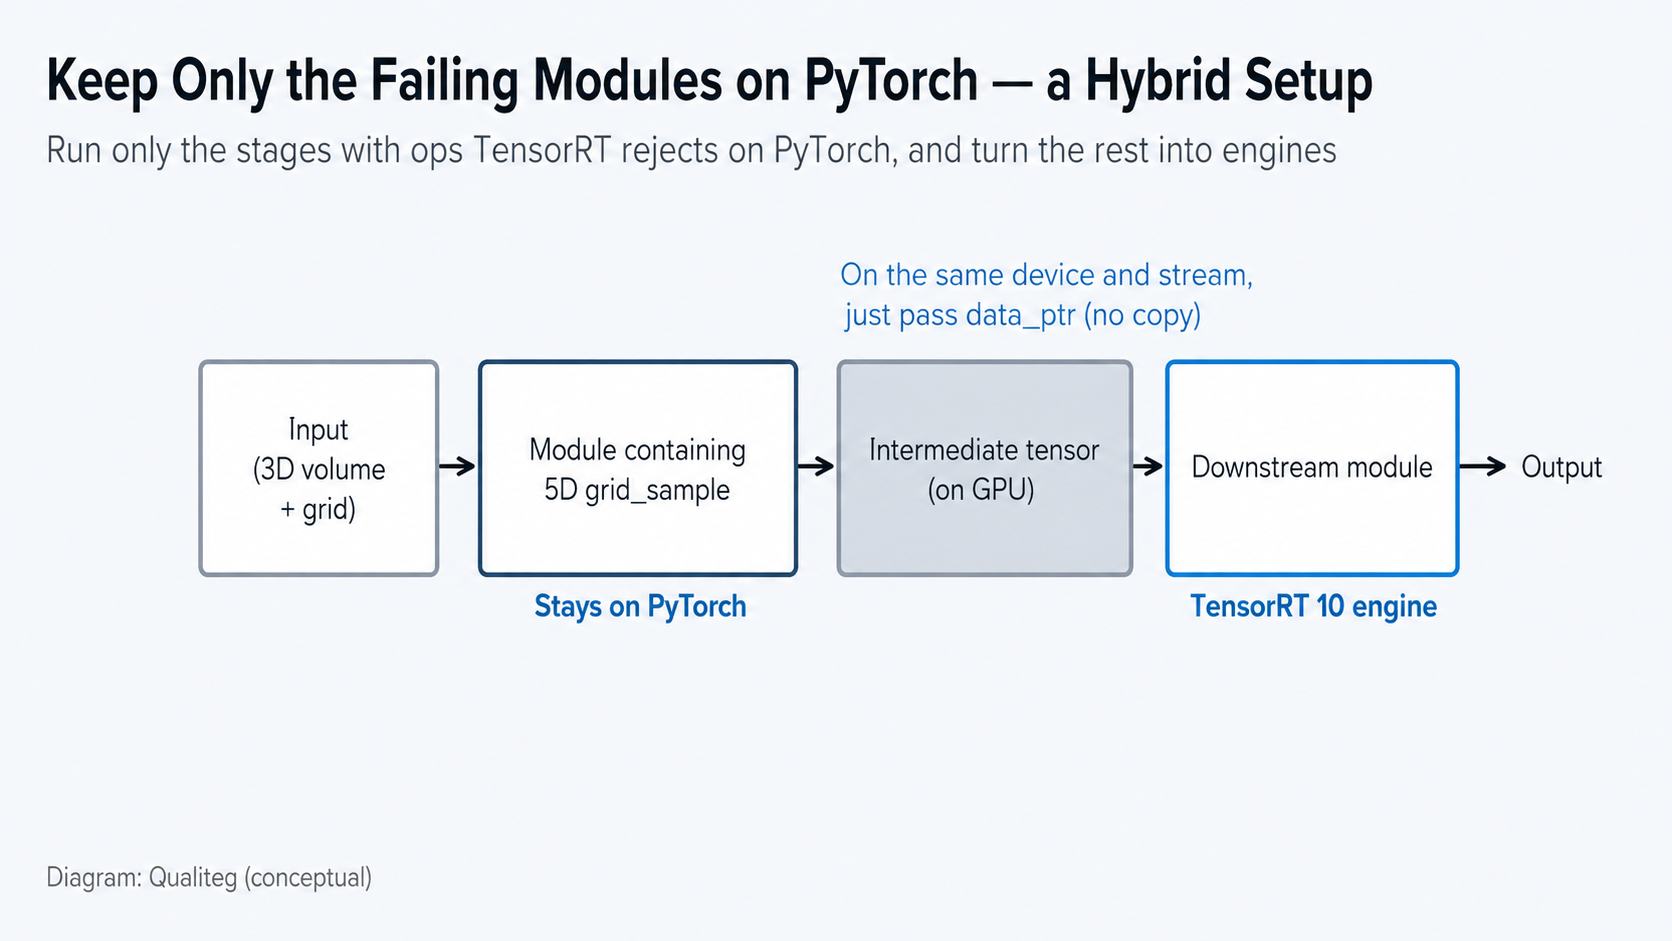
# Configuration sketch (head_fp16.plan is a placeholder name meaning "the engine for the TensorRT-converted latter stage")
warp = VolumetricWarp().eval().cuda()      # 5D grid_sample → stays in PyTorch
head = TRTRunner("head_fp16.plan")         # latter stage → TensorRT engine

def forward(vol, grid):
    with torch.no_grad():
        feat = warp(vol, grid)             # PyTorch produces its output on the GPU
    return head.run({"x": feat})["y"]      # and that address is handed to TensorRT as-is
As Step 4 showed, when dtype, device, and shape match, PyTorch tensors and TensorRT can exchange addresses on the same device and the same stream, so bridging the two incurs no additional copies.
In our case, this configuration alone — without writing a single plugin — improved things nearly 2×, and as we progressively replaced the modules that load cleanly onto TensorRT, the pipeline as a whole reached roughly 2× within the plugin-free scope.
"First, secure reliable speedups in the low-risk scope. Carve the custom plugin out as a separate project."
That, we believe, is the realistic way to run this migration.
What we have not yet confirmed
In the interest of honesty: the verification in this article was done on a single software configuration, "TensorRT 10.16 + PyTorch 2.11 + cu128." The following have not been confirmed here.
- Reproducibility on other TensorRT versions
— in particular, the behavior of 4Dgrid_sample(covered in Part 2 of the series) may be fixed in future versions. TensorRT 11 has also changed its APIs (strong typing), so this article's code does not run there as-is - Comparison against PyTorch with torch.compile or CUDA Graphs
— this article compares against eager execution only - Combination with int8 quantization
— this article covers fp16 / fp32 only - Builds with dynamic shapes
— everything in this article is fixed-shape.
Speed and accuracy with optimization profiles require separate verification - Numbers and speed for the 5D grid_sample plugin built for Blackwell
— planned for the final installment
Summary
To sum it up in one sentence:
"Blackwell migration is not a GPU swap; it is updating PyTorch's and TensorRT's support status plus re-confirming which execution backend the peripheral runtimes are actually using — and TensorRT conversion is a separate investment decision layered on top."
That is the story
(not exactly one sentence, we admit.
Incidentally, our environment did hit the onnxruntime CPU fallback).
Now, to close, let us restate the important points.
- Check the GPU's Compute Capability first
(RTX 50 series is sm_120. Other Blackwell product lines carry different values, so check per product) - PyTorch on the cu128 generation
(stable from 2.7.0) - Use TensorRT 10.8 or later.
Existing TensorRT 8 engines should, after checking compatibility settings and target GPU, be rebuilt as a rule - Match TensorRT's CUDA series to torch's (pin to cu12)
- Check whether onnxruntime has fallen back to CPU by actually printing the version and providers. If it has, it is your top TensorRT conversion candidate
- Self-diagnose with a minimal model before moving to the real one
- Pass tensors matched to the engine's I/O dtypes
(even FP16-tactics builds usually keep fp32 I/O) - Always check the return values of execute_async_v3 and set_input_shape / set_tensor_address
(no exception is thrown on failure) - Do the numerical comparison before the speed measurement, with the same weights and the same input used for the export.
- Check the dimensionality of
grid_sampleinside your model
(5D does not pass natively; raising the opset does not solve it) - Carve out the failing modules and go hybrid
- Measure with the GPU exclusively occupied, using the median of CUDA Events. For engine-only comparisons, separate the buffer preparation and time the enqueue region; for production decisions, also measure end-to-end time including dtype conversion, module boundaries, and synchronization
Coming next (Part 2) — a passing build is not necessarily correct
Next up is not the finale but the middle installment.
What this Part 1 covered were problems of the kind that have the decency to stop with an error.
What is truly frightening in a migration lies beyond that.
We will cover the "silent degradation" we actually stepped on.
- The build succeeds, execution succeeds, and the output's shape and values look plausible — yet the meaning of an operation has been swapped for something else — one such case
(this one we could fully reproduce with a publishable dummy model) - A build that succeeds with good speed — yet the output breaks the moment real data goes in — one such module
- An engine that worked perfectly on the dev machine quietly emitting garbage on a different GPU of the same generation — that phenomenon
- Building in fp32 that turned out not to be fp32 — that story
- And the one that made us cry the hardest: the export-time argument mix-up accident
Every one of these is deeply troublesome when it surfaces after you have reported "it's faster now, all good" — so stay tuned.
See you next time!
References (primary sources)
- NVIDIA TensorRT documentation (Release Notes 10.8.0 — the Blackwell support entry)
- NVIDIA official forum: Software Migration Guide for NVIDIA Blackwell RTX GPUs (CUDA 12.8 / PyTorch / TensorRT)
- PyTorch issue #159207: sm_120 is not compatible with the current PyTorch installation
- onnxruntime issue #27875: report on CUDAExecutionProvider initialization in Blackwell environments
- NVIDIA/TensorRT issue #3890: request for native 5D GridSample support
- SeanWangJS/grid-sample3d-trt-plugin (custom plugin implementation of 5D grid_sample)
- ONNX Operators: GridSample (opset 16 / 20 specifications)
- Related article from Qualiteg: 2026 NVIDIA GPU quick-lookup tool



