
Developing a LINE Bot Locally: Solving the Ever-Changing Webhook URL Problem with a Fixed URL

Hello!
The first wall you hit when building a LINE Bot is not the code — it is the webhook.
LINE's Messaging API delivers messages that users send to your bot as HTTPS POST requests from LINE's servers to your server.
For this receiving endpoint (the Webhook URL), you can only specifyan HTTPS URL reachable from the internet, so you cannot simply enter the http://localhost:5000 you use during development.
The standard workaround is to issue a temporary URL with a tunneling tool, but that brings its own problem. Depending on the tunneling method, a random URL is issued every time you start it. In that case, every time you resume development you have to open the LINE Developers console and rewrite the Webhook URL. Every time you fix your code, every time you pick things up the next day — you start by pasting in a new URL. It wears on you.
To state the conclusion up front:
give your local development server a single public URL that never changes, and configuring the Webhook URL becomes a one-time task.
This article covers the entire journey: creating a LINE Official Account, configuring the Messaging API, implementing a webhook receiver in Python, exposing it on a fixed URL, and confirming the bot replies on an actual smartphone.
Every step, command, and screen shown here was actually run and verified by the author
(verified on August 11, 2026; LINE's screens may change over time).
The bot itself is a minimal echo bot that returns whatever message it receives. The goal of this article is to build out the full path: a webhook from LINE reaches Python running locally, and a reply appears on your phone.
Step 1: Create a LINE Official Account (Current Procedure as of August 2026)
The first thing to know is that
Messaging API channels can no longer be created directly from the LINE Developers console
This screen currently displays the guidance
"After creating a LINE Official Account, enable the Messaging API in LINE Official Account Manager"
.
The current flow is as follows.
- Create a LINE Business ID (LY Corporation Business ID). It can be created with just an email address; no LINE app account is required
- Register as a developer on the LINE Developers console and create a provider
- Create a LINE Official Account. During creation you will be asked to connect to a Business Manager organization; if you do not have one, create it on the spot (if you leave the organization name blank, it defaults to the account name)
- Enable the Messaging API in LINE Official Account Manager
A provider represents the individual, company, or organization offering the bot. When combined with features such as LINE Login, it is also shown on the consent screen, so it is safest to use a name that lets users identify the source, such as your company or service name
(the author created one named "Qualiteg").
The Official Account creation form asks for the account name (the bot name shown in the friends list and chat screen), company/business name, industry, and so on. One thing to note here:creating a new Official Account requires phone number verification (SMS or voice call). According to the on-screen notice, the phone number used for verification is never disclosed to your friends.
Leaving the account type as an "unverified account" is fine. A verified account (the green verification badge) has benefits such as appearing in LINE's in-app search, but a development bot does not need it.
Step 2: Enable the Messaging API and Obtain the Three Keys
Once the Official Account exists, open LINE Official Account Manager and, under Settings, choose "Messaging API" and click "Use Messaging API." You will be asked to select a provider here, andonce a provider is linked, it cannot be changed later. Select the provider you created in Step 1.
Once enabled, this screen displays the Channel ID and Channel secret.
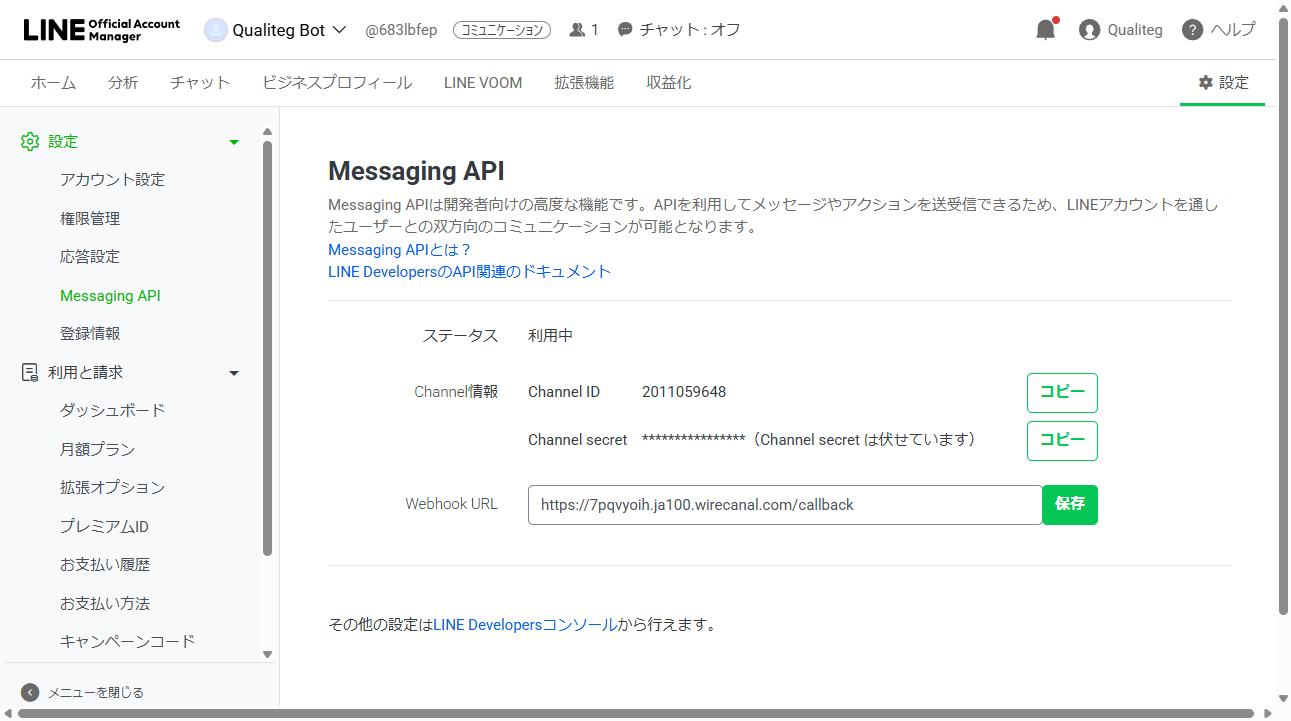
Three "keys" are needed for bot development.
| Key | What it is used for | Where it is found |
|---|---|---|
| Channel ID | Identifier for the channel | Official Account Manager / Developers console |
| Channel secret | Webhook signature verification (prevents spoofing) | Same as above |
| Channel access token (long-lived) | Authentication for the bot's reply API | Click "Issue" on the "Messaging API settings" tab in the Developers console |
Only the channel access token requires an issuing step in the Developers console. Pass the issued token and the Channel secret via environment variables rather than hard-coding them (we will use them in the next step).
Step 3: Write a Minimal Bot That Receives the Webhook
We will write the server in Python, using the official SDK (line-bot-sdk) and Flask.
pip install line-bot-sdk flaskIn the author's environment, this installed line-bot-sdk 3.25.0 and flask 3.1.3 (Python 3.11).
app.py(full source)
import os

from flask import Flask, request, abort
from linebot.v3 import WebhookHandler
from linebot.v3.exceptions import InvalidSignatureError
from linebot.v3.messaging import (
    ApiClient,
    Configuration,
    MessagingApi,
    ReplyMessageRequest,
    TextMessage,
)
from linebot.v3.webhooks import MessageEvent, TextMessageContent

app = Flask(__name__)

configuration = Configuration(access_token=os.environ["LINE_CHANNEL_ACCESS_TOKEN"])
handler = WebhookHandler(os.environ["LINE_CHANNEL_SECRET"])


@app.route("/health", methods=["GET"])
def health():
    return "OK"


@app.route("/callback", methods=["POST"])
def callback():
    signature = request.headers.get("X-Line-Signature", "")
    body = request.get_data(as_text=True)
    try:
        handler.handle(body, signature)
    except InvalidSignatureError:
        abort(400)
    return "OK"


@handler.add(MessageEvent, message=TextMessageContent)
def handle_message(event):
    reply = f"Received your message: \"{event.message.text}\""
    with ApiClient(configuration) as api_client:
        MessagingApi(api_client).reply_message(
            ReplyMessageRequest(
                reply_token=event.reply_token,
                messages=[TextMessage(text=reply)],
            )
        )


if __name__ == "__main__":
    app.run(host="127.0.0.1", port=5000)
The code does only three things./callback receives the POST from LINE, X-Line-Signature is verified against the Channel secret (this verification is built into the SDK, so there is no need to implement it yourself), and when a text message arrives, the bot replies with "Received your message: ...".
Note that this code is a minimal example for local development. For production, LINE's official documentation recommends returning the webhook response (200) promptly and processing events asynchronously.
Put the keys from Step 2 into environment variables and start the server.
$env:LINE_CHANNEL_SECRET = '(Channel secret)'
$env:LINE_CHANNEL_ACCESS_TOKEN = '(channel access token)'
python app.py
http://localhost:5000/health returns OK, the server is up. At this point everything is still confined to localhost, and nothing from LINE can reach it yet.
Step 4: Give localhost a Public URL That Never Changes
This is the heart of the matter: attaching an HTTPS URL to localhost:5000 that survives restarts.
In this article we use WireCanal, a service we develop and operate ourselves (so please read this part with that in mind).
That said, using a fixed URL is not specific to WireCanal — the same approach works with the fixed-domain features of other tunneling services.
Create a canal (the tunnel's public endpoint) in the dashboard. Choose HTTP as the type, specify localhost:5000 as the forwarding target, and a single public URL is issued.
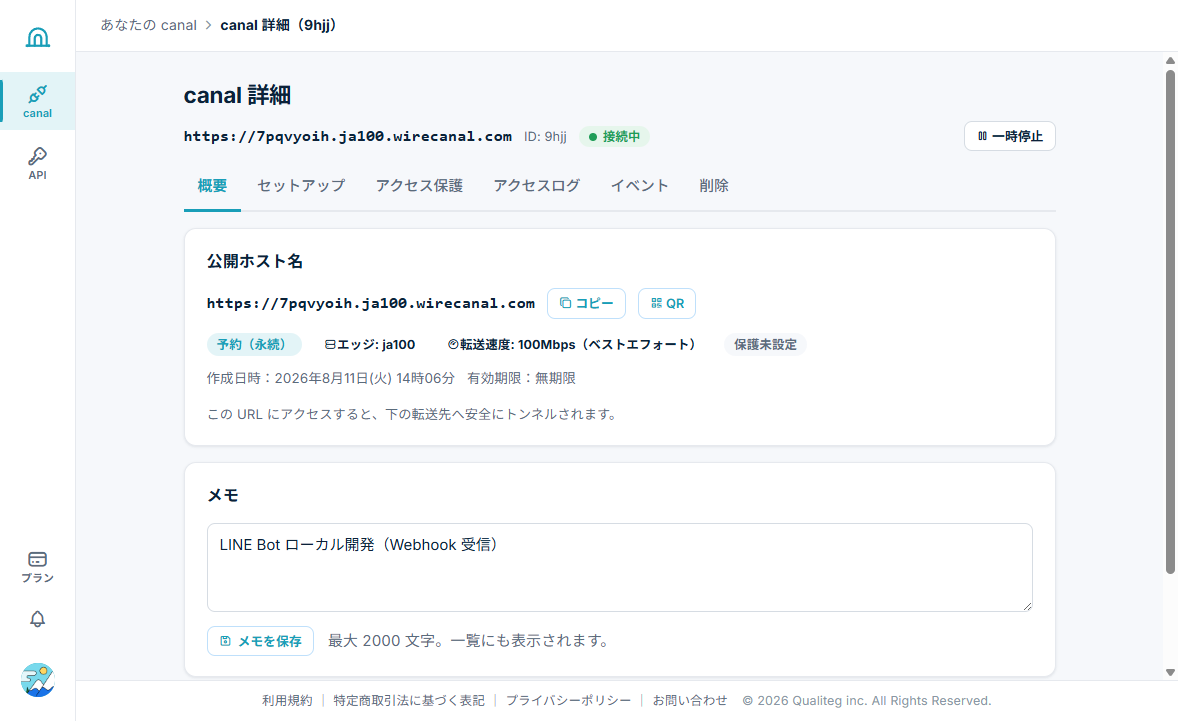
This URL is issued with a random string, but it does not change each time you start up. Reboot your PC, stop the agent and reconnect the next day — you keep receiving on the same URL. To be precise about the plan differences: on the free plan the public URL remains valid "as long as it is in use" (it expires 72 hours after the agent's last connection), so if you develop daily, the URL stays the same. If you want a persistent URL that survives even a pause of three days or more, you need the Lite plan or above (the author tested on the Lite plan; the "Reserved (persistent)" label in the screenshot reflects that).
Next, install and start the agent on your PC. As described in the setup guide (wirecanal.com), it is a single line in PowerShell.
irm https://download.wirecanal.com/install.ps1 | iexDownload the connection settings file (wirecanal.json) from the dashboard, place it in the same folder as the agent, and start it.
.\wirecanal.exe -config wirecanal.jsonWhen the dashboard shows "Connected!", access to the public URL is reaching localhost:5000.
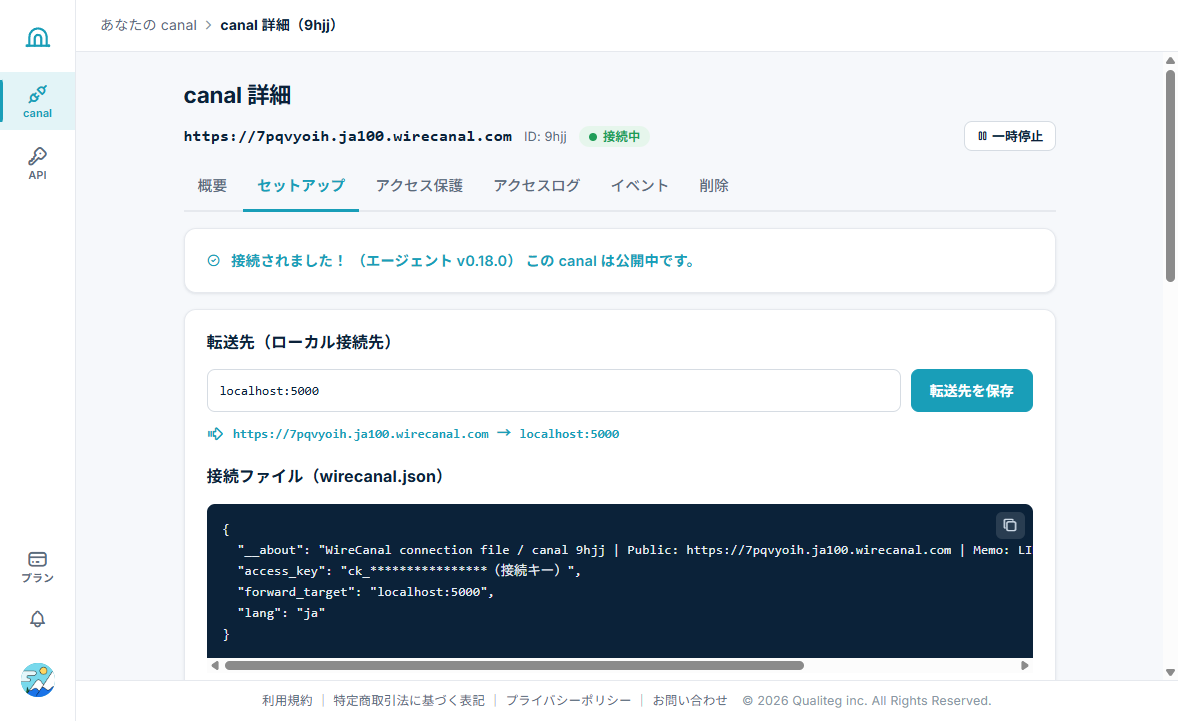
Let us verify from the outside.
> curl https://7pqvyoih.ja100.wirecanal.com/health
OK
The Flask server from Step 3 responded across the internet. No inbound port forwarding and no VPN are involved (the agent communicates using outbound connections only).
Step 5: Configure and Verify the Webhook URL
Return to the LINE Developers console and set the Webhook URL on the channel's "Messaging API settings" tab. It is your public URL with the path handled in app.py, /callback, appended.
https://(your-public-URL)/callbackAfter setting it, be sure toturn on "Use webhook" just below. Entering the URL alone is not enough for webhooks to be delivered.
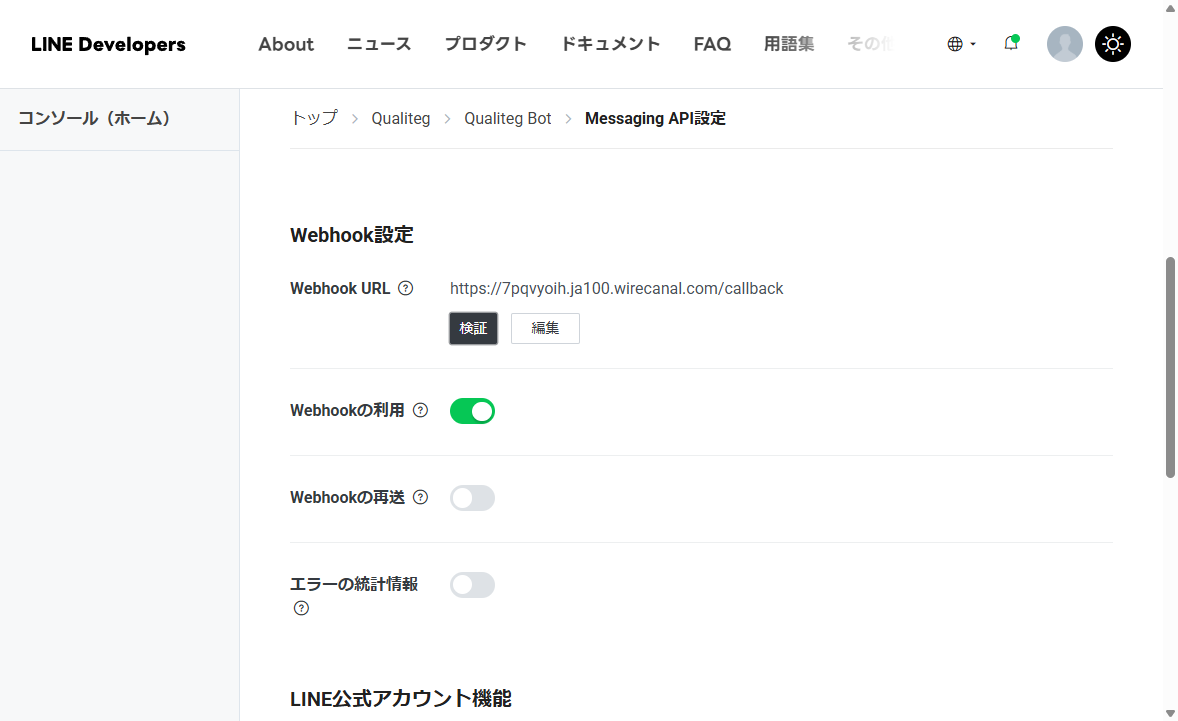
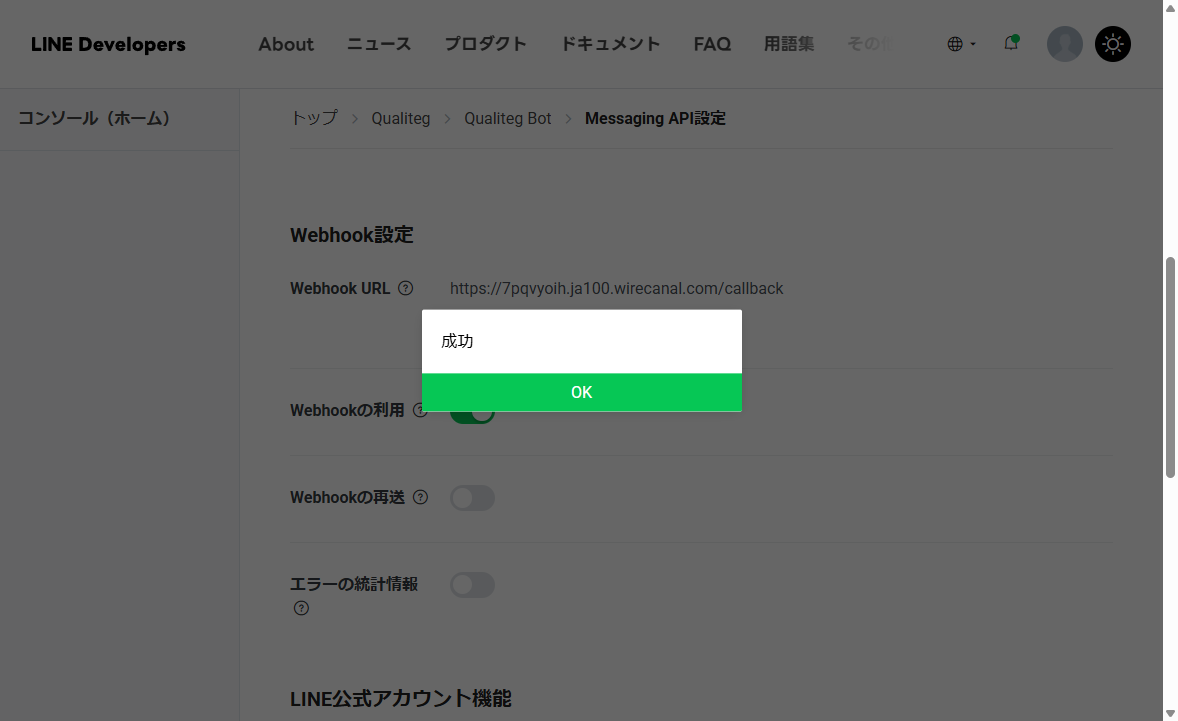
Pressing the "Verify" button sends an actual test connection from LINE's servers to this URL. If it reports "Success," the path from LINE through the tunnel to your local Flask server is working.
A Stumbling Block: Duplicate Replies
At this point everything should work — yet when the author actually sent a message from a phone, something odd happened. Before the bot's reply, an unfamiliar canned message arrived.
"Thank you for your message! Unfortunately, this account cannot respond to individual inquiries."
The culprit is theresponse messages (auto-reply) featurebuilt into Official Accounts from the start. On the author's newly created account, a blanket auto-reply named "Default" was enabled. It operates independently of the webhook, so users were receiving both the bot's reply and the canned message.
If you see duplicate replies, check the state of response messages in Official Account Manager. There are two ways to stop them: disable the individual message in the response message list, orturn off "Response messages" for the whole feature under "Settings" → "Response settings". You can confirm whether they are currently being sent via "Current status" at the top of the response message list (if it says the feature is in use and response messages are being sent, they will still go out). The author failed to notice this status was still "in use" and wasted one round of testing.
Trying It from a Smartphone
Scan the friend-add QR code (found under "Add friends guide" in Official Account Manager) with LINE on your phone, add the bot as a friend, and send it a message.
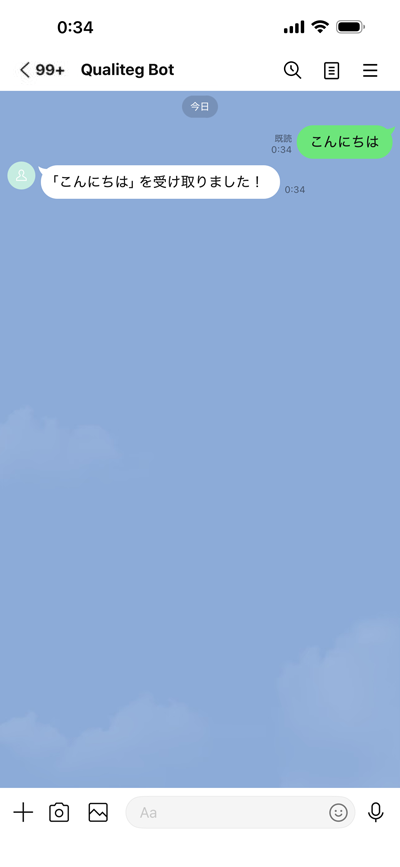
Send "こんにちは" (hello), and the reply comes back immediately: Received your message: "こんにちは". The server-side log also records the POST from LINE.
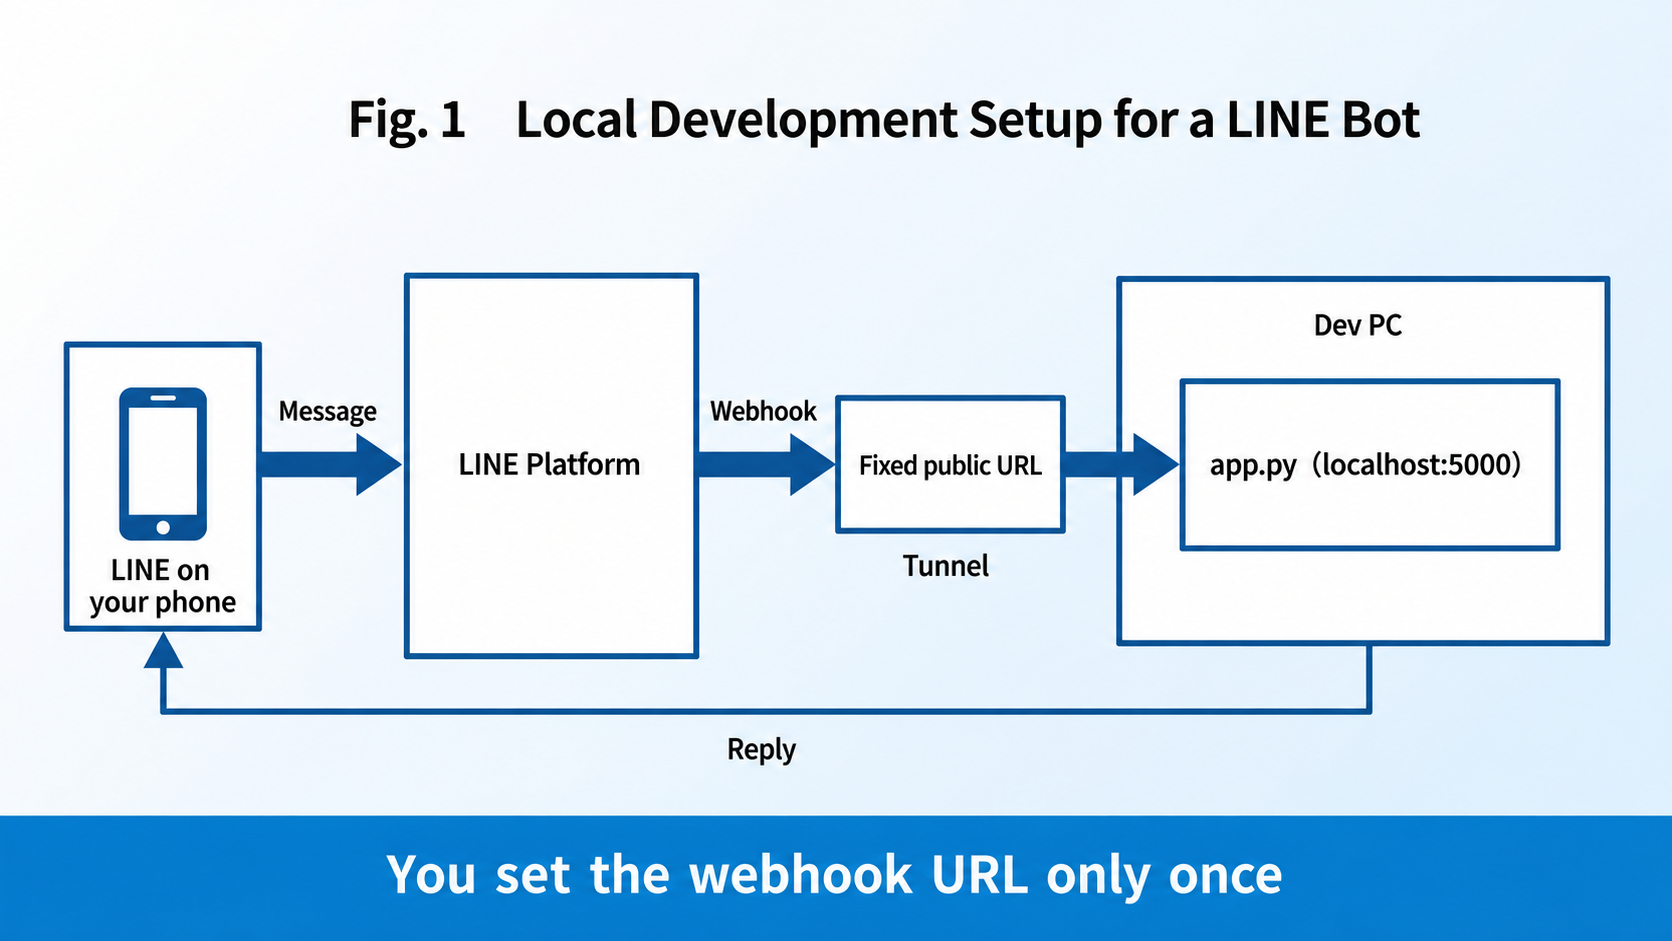
127.0.0.1 - - [11/Aug/2026 00:24:32] "POST /callback HTTP/1.1" 200 -With this, the entire path is connected: LINE on your phone → the LINE platform → the fixed public URL → Flask on your local PC → the reply.
Summary: No More URL Rewriting
The biggest benefit of this setup is that resuming development the next day comes down to starting the agent and app.py. Because the public URL never changes, there is simply no step where you reopen the LINE Developers console and paste in a new Webhook URL. After a code change, restarting app.py is all it takes to test on the same URL.
Finally, here are the key points of this setup.
| Key point | Details |
|---|---|
| How to create a Messaging API channel | Currently via a LINE Official Account (cannot be created directly from the console; phone number verification required) |
| When webhooks do not arrive | First check that "Use webhook" is on and that "Verify" succeeds |
| When replies arrive in duplicate | Turn off response messages (check "Current status" at the top of the list) |
| URL rewriting | The public URL does not change across restarts (free: valid while in use; Lite and above: persistent). The Webhook URL is configured only once |
See you next time.
Sources and References
- Get started with the Messaging API (LINE Developers official documentation)
- Messaging API overview (LINE Developers official documentation)
- line-bot-sdk-python (official LINE SDK, GitHub)
- WireCanal pricing plans
- WireCanal setup guide (Windows)



