How to Build an MCP Server — Using Your Own MCP Server from Web-Based ChatGPT and Claude (Part 2)
A step-by-step guide, with real connection screenshots, to making your own MCP server usable from web-based ChatGPT and Claude. We give a localhost server a public URL and OAuth authentication, letting browser AI query a sales database in Japanese without changing a single line of code.

Hello! This is the Qualiteg Product Development Team!
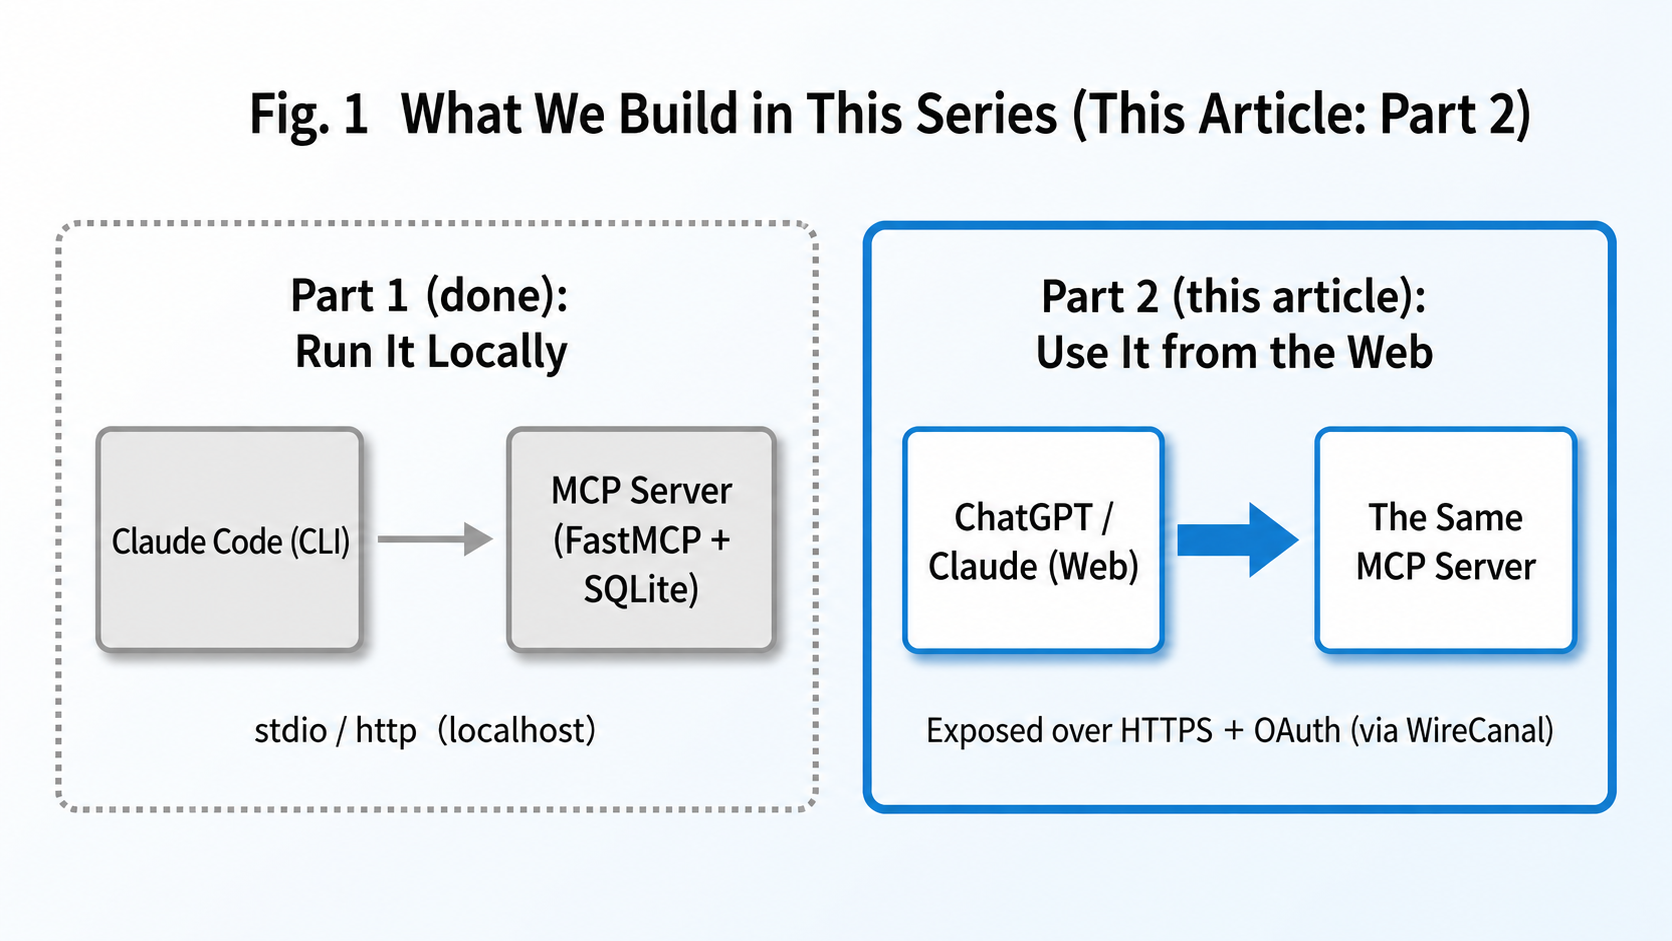
In Part 1, we built our own MCP server with Python and FastMCP, getting to the point where we could query a sales database in Japanese from Claude Code on our local machine. In this Part 2, we continue as promised.
We will make this MCP server, running locally on localhost, usable from the web versions of ChatGPT and Claude.
To state the conclusion first: without changing a single line of server code, the question "show me the top 3 occupations by sales" now works from both browser-based ChatGPT and Claude. The numbers returned match the measured values from Part 1 exactly. The three walls — reachability, HTTPS, and OAuth authentication — are crossed with our own WireCanal. As disclosed at the end of Part 1, it is our own service, but every step in this article uses only features available on the free plan. No credit card registration is required.
If you have not read Part 1, you can find it here.
Why the Web Versions Cannot Use It While It Stays on localhost
When the server from Part 1 is started in HTTP mode, http://127.0.0.1:9904/mcp becomes the MCP endpoint. The CLI version of Claude Code lives on the same PC, so this URL is reachable for it.
The web versions are an entirely different story. For both ChatGPT and Claude, the connection requests to a connector are sent bytheir servers — not by your browser. That gives us three walls.
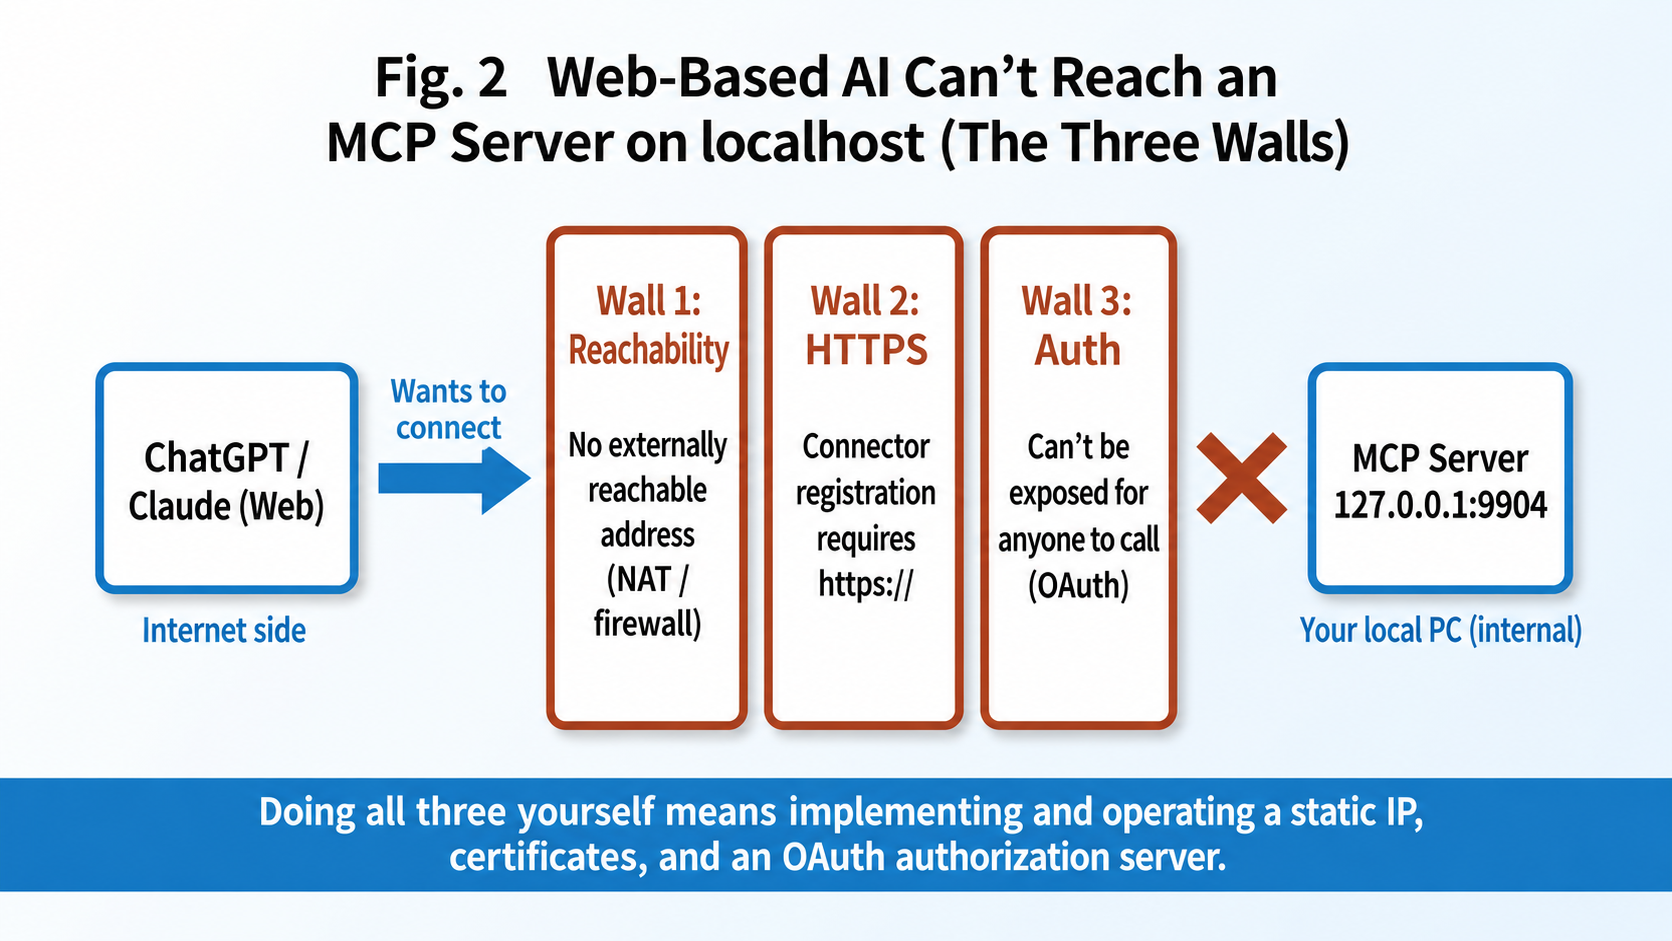
The first is reachability. On a typical home or office network, your PC sits behind NAT and a firewall and cannot be reached from outside as is. The second is HTTPS. URLs registered with a connector are expected to be https://. The third is authentication. Making the server reachable from outside means it is reachable by anyone in the world, so running a server connected to an internal database without authentication is simply not an option.
Of these, the third is the most formidable.
Both ChatGPT and Claude can, in some configurations, connect to a remote MCP server without authentication. But since exposing a server that reaches an internal database unauthenticated is not an option, we protect it with OAuth in line with the MCP Authorization specification. That means returning 401 to unauthenticated access, publishing authorization server information, handling client information, and providing the authorization screen, token issuance, and per-request verification. Implementing all of this yourself is a far larger job than the tool itself (the 200 lines we wrote in Part 1). This is where people tend to run out of steam and settle for "forget the web versions, we'll just use the CLI" — such was the reality of remote MCP.
WireCanal Takes On All Three at Once
So in Part 2 we use WireCanal, the secure tunnel service we provide.
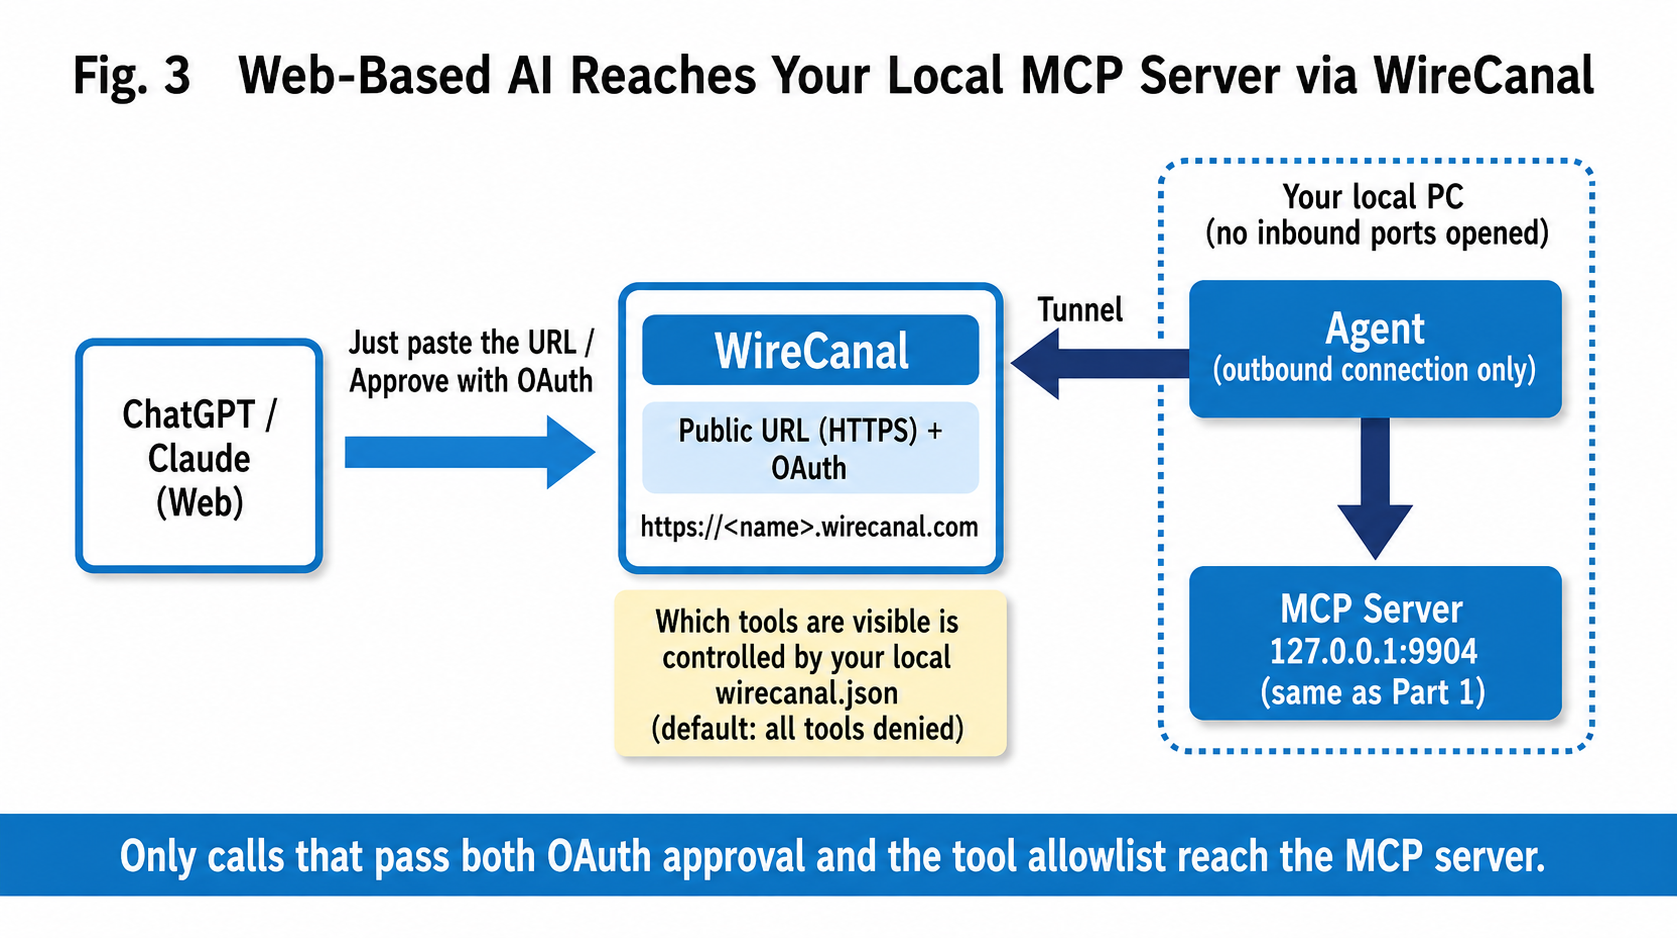
The mechanism is shown in Figure 3. Run a small program called the Agent on your PC, and the Agent connectsoutbound to WireCanal's servers to establish a tunnel. No inbound port opening and no VPN are required. On the outside, a public URL of the form https://<name>.wirecanal.com is created, and requests arriving there flow through the tunnel to your local 127.0.0.1:9904.
The same URL also handles OAuth. Unauthenticated access receives a 401, and connections from ChatGPT and Claude go through only if the owner has approved them on WireCanal's authorization screen.
There is one more mechanism specific to MCP.You choose which tools may be shown to outside AI in a local configuration file (wirecanal.json). The default denies all tools, and only tools listed in the allowlist are exposed. The authoritative copy of this allowlist lives in the local file. Changes made from the dashboard are treated as proposals, and no additional tools become public unless approved and applied on the local side.
With that, we start from the state where the Part 1 server is running at 127.0.0.1:9904.
Step 1: Create a canal in the Dashboard
Register an account on the WireCanal dashboard (app.wirecanal.com) and you can create a public route called a "canal." The creation wizard has five steps.
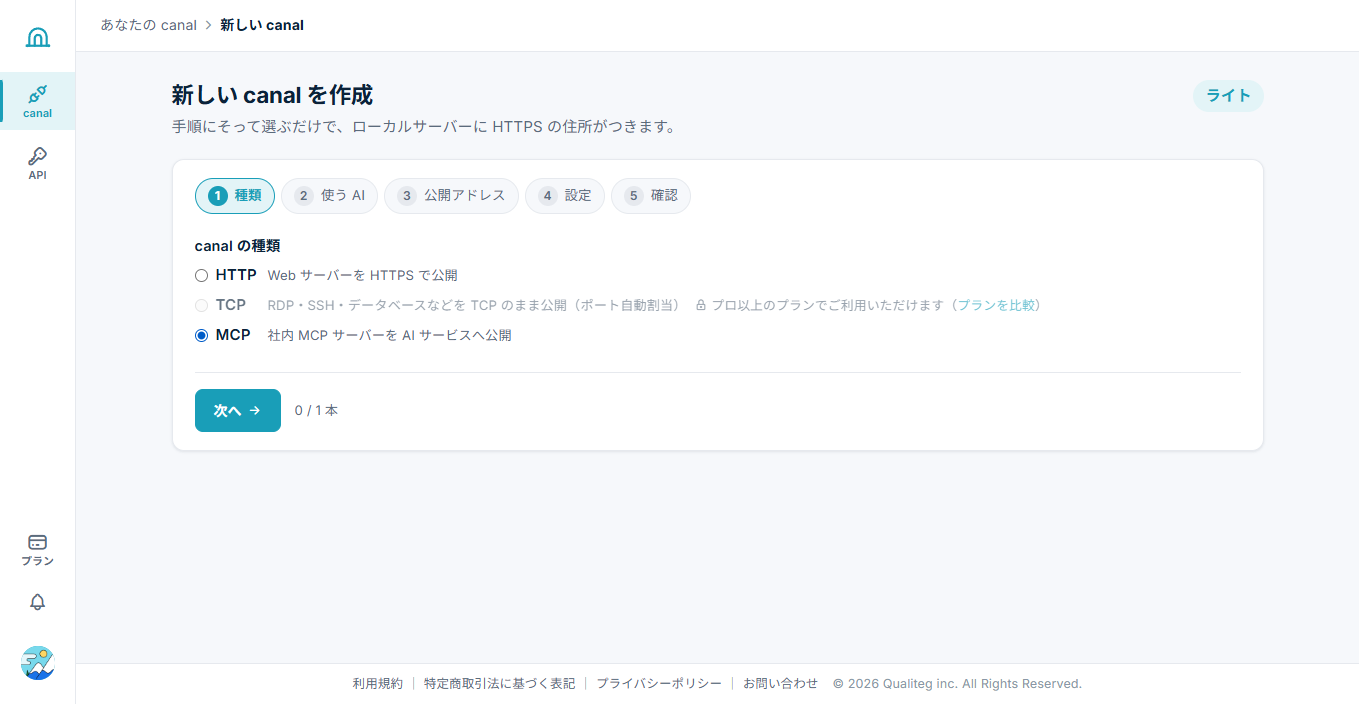
First, the type. Choose "MCP — expose an internal MCP server to AI services."
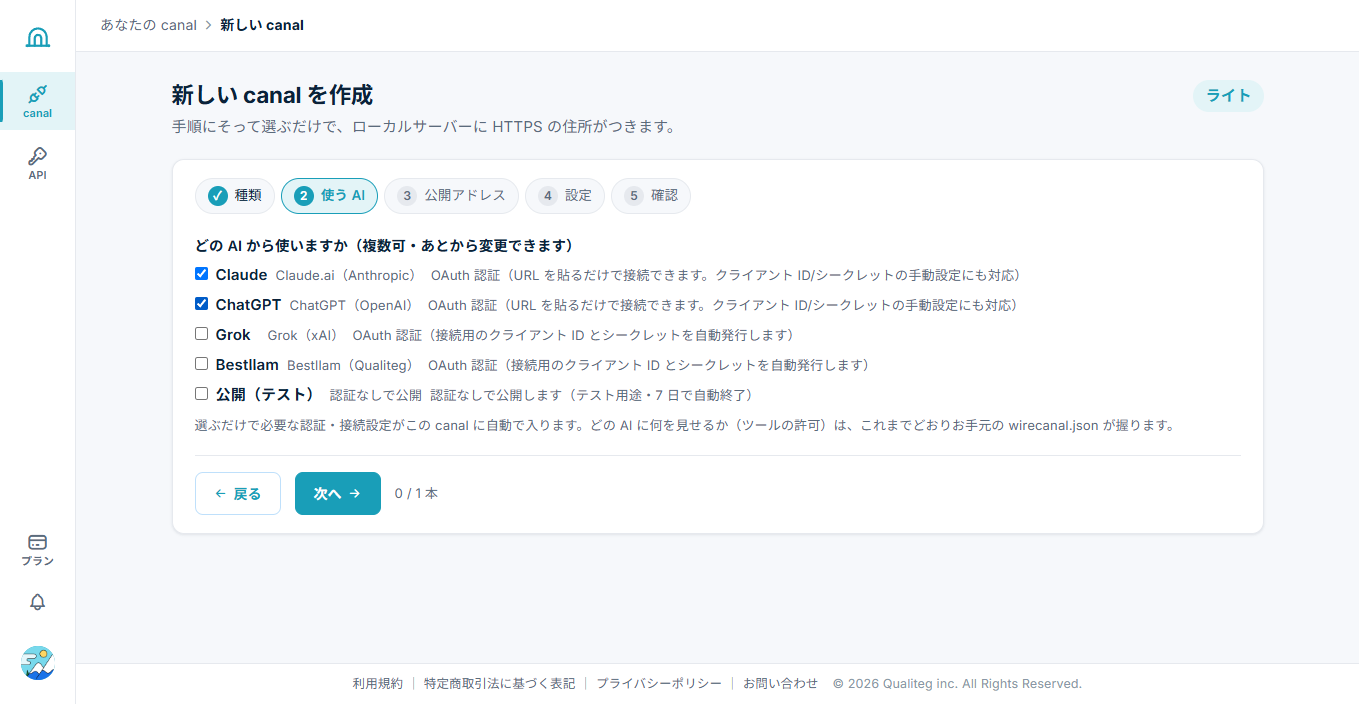
Next, "Which AI will use it?" This time we checked both Claude and ChatGPT. Based on the AI selected here, the OAuth connection settings are added to the canal automatically.
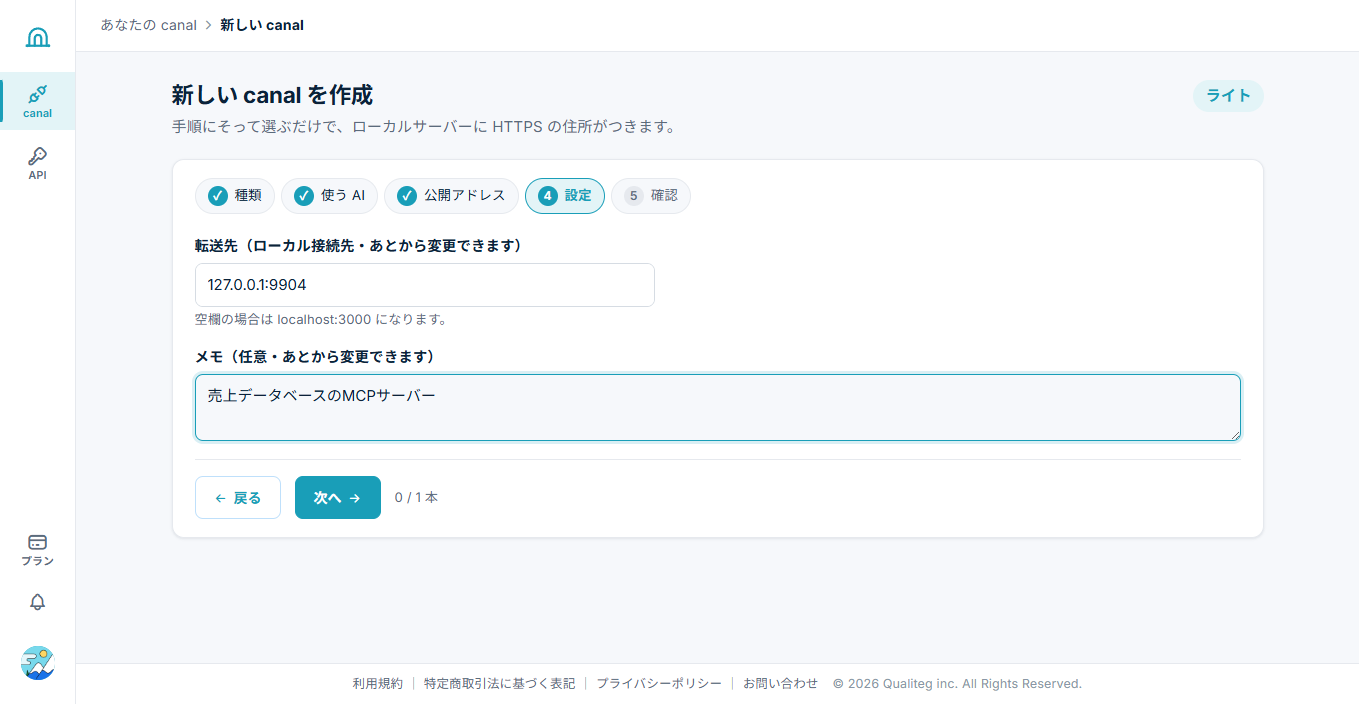
For the public address, proceed with the auto-assigned subdomain. For the forwarding target, enter 127.0.0.1:9904, where the Part 1 server is listening.
The public URL is finalized on the confirmation screen. In the author's environment, https://mh1sjzat.ja100.wirecanal.com was issued.
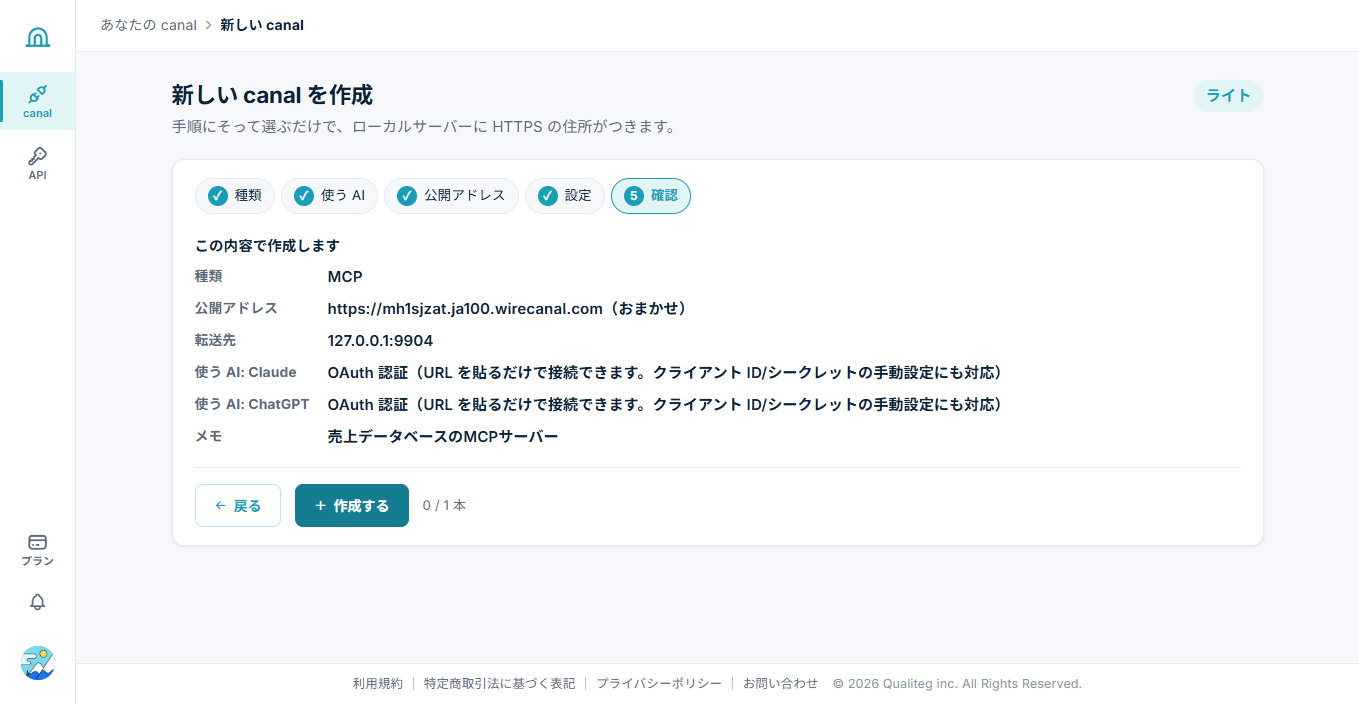
Press "Create" and you move to the canal detail screen. That completes the server-side configuration. No static IP, no certificate acquisition — nothing of the sort.
Step 2: List the Tools You Are Willing to Expose in wirecanal.json
The "Setup" tab of the canal detail screen shows the connection file (wirecanal.json). You can download and use it as is, but for MCP there is one edit to make.tools.allow, write the names of the tools that outside AI may see.
wirecanal.json(tools.allow with the two tools added)
{
  "access_key": "ck_(connection key issued per canal)",
  "forward_target": "127.0.0.1:9904",
  "mode": "mcp",
  "tools": {
    "default": "deny",
    "allow": ["execute_sql_query", "get_database_stats"]
  },
  "lang": "ja"
}
The default is "default": "deny" with an empty allow — in other words,immediately after connecting, all tools are denied. The Part 1 server has only two tools so we listed both, but even if, say, an internal MCP server had 20 tools, none beyond the two listed here would be visible to outside AI. They do not appear in the listing (tools/list) either.
This fail-safe default follows the same philosophy as the "don't show the AI everything" design from Part 1. Since the authoritative ledger deciding the exposure scope lives locally, dashboard operations alone cannot expand the set of public tools. Applying changes requires local approval.
Step 3: Start the Agent
Following the guidance on the Setup tab, install and start the Agent on the machine where the server you want to expose is running. On Windows, it is two commands.
irm https://download.wirecanal.com/install.ps1 | iex
.\wirecanal.exe -config wirecanal.json
The first line downloads the Agent (wirecanal.exe is placed in the current folder); the second starts it. If your organization's security policy prohibits direct execution of remote scripts, save install.ps1 to a file first, review its contents, and then run it. Here is the startup log from the author's environment.
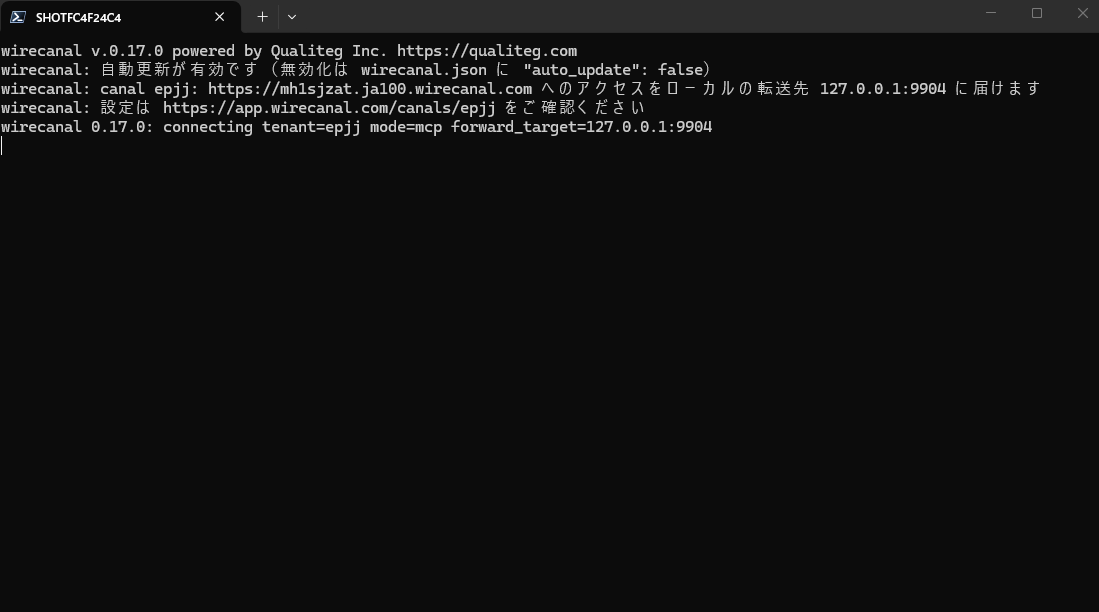
Within a few seconds the dashboard also shows "Connected!", and at this point the tunnel is up.
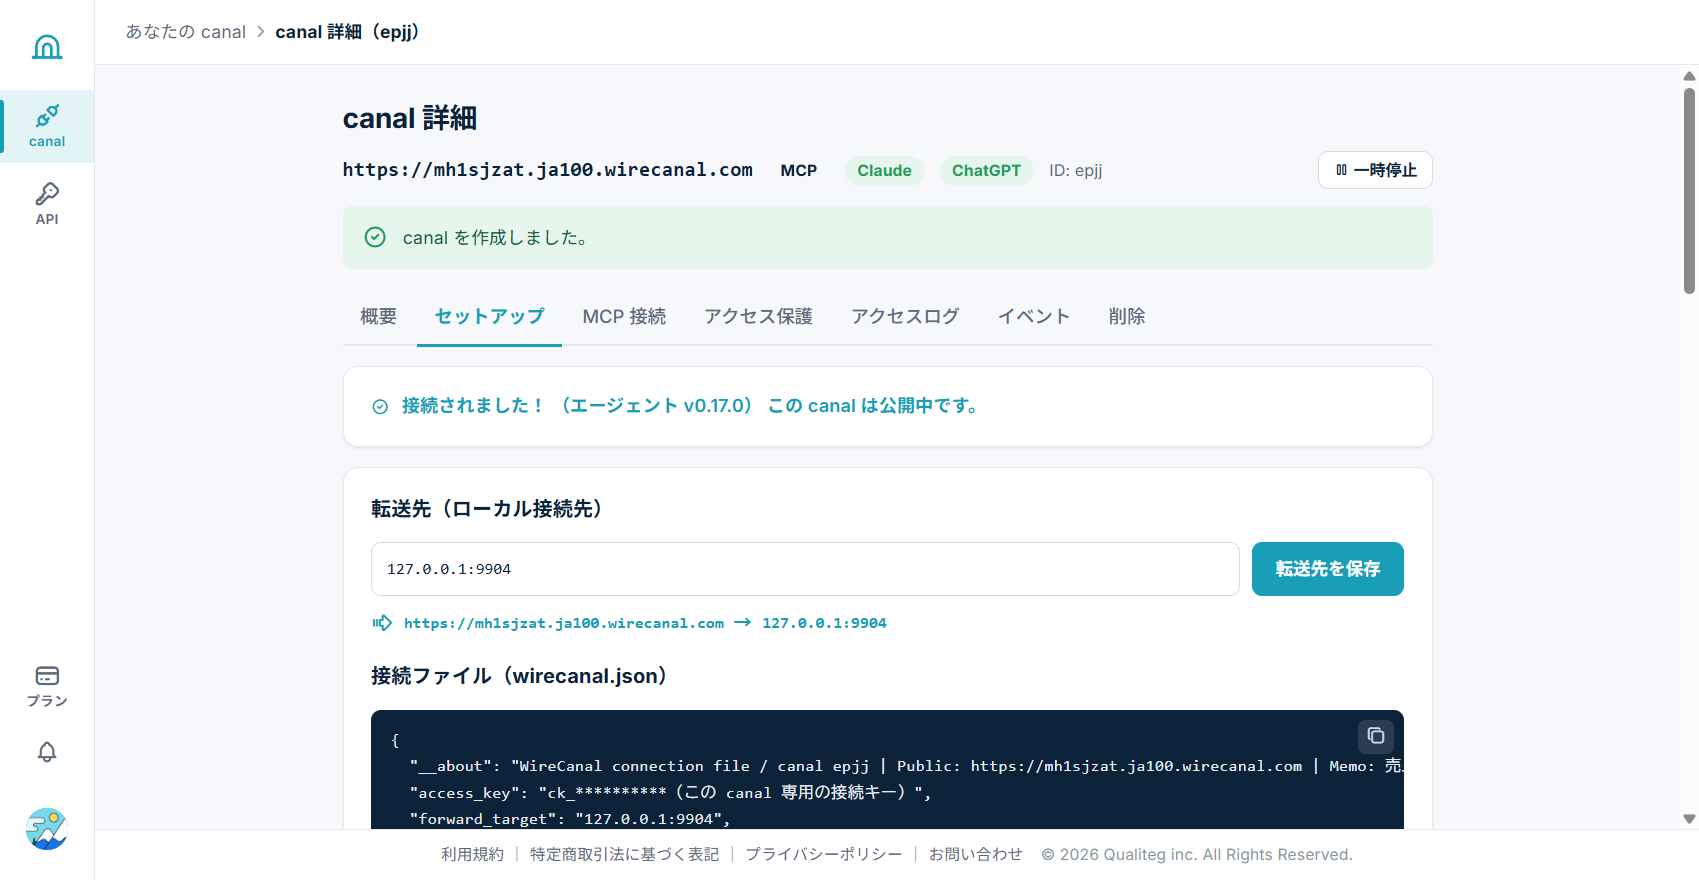
Confirm That Unauthenticated Access Is Stopped with a 401
Before connecting, let us confirm that the public URL is not in a "callable by anyone" state. As we wrote in Part 1, nothing is more dangerous than a defense that is not actually in effect — the reliable way to check is to actually hit it.
curl -i -X POST https://mh1sjzat.ja100.wirecanal.com/mcp \
  -H "Content-Type: application/json" \
  -H "Accept: application/json, text/event-stream" \
  -d '{"jsonrpc":"2.0","method":"initialize","id":1}'
HTTP/1.1 401 Unauthorized
WWW-Authenticate: Bearer resource_metadata="https://mh1sjzat.ja100.wirecanal.com/.well-known/oauth-protected-resource"The request without an authentication token was stopped with a 401 before it ever reached the local server. In addition, the WWW-Authenticate header carries resource_metadata. This is the URL of the "protected resource metadata document" defined in RFC 9728 — not the URL of the authorization server itself. ChatGPT and Claude first fetch this document, follow the authorization_servers written in it to find the authorization server, and start the OAuth connection procedure automatically.
Connecting from Claude
From the settings of web-based Claude, open the connectors screen and choose "Add custom connector." All you enter is a name and the public URL from earlier with /mcp appended. The client ID and secret fields can be left empty (the official WireCanal guide listed at the end describes entering a client ID and secret manually; in the author's environment as of August 6, 2026, entering only the URL was enough to connect).
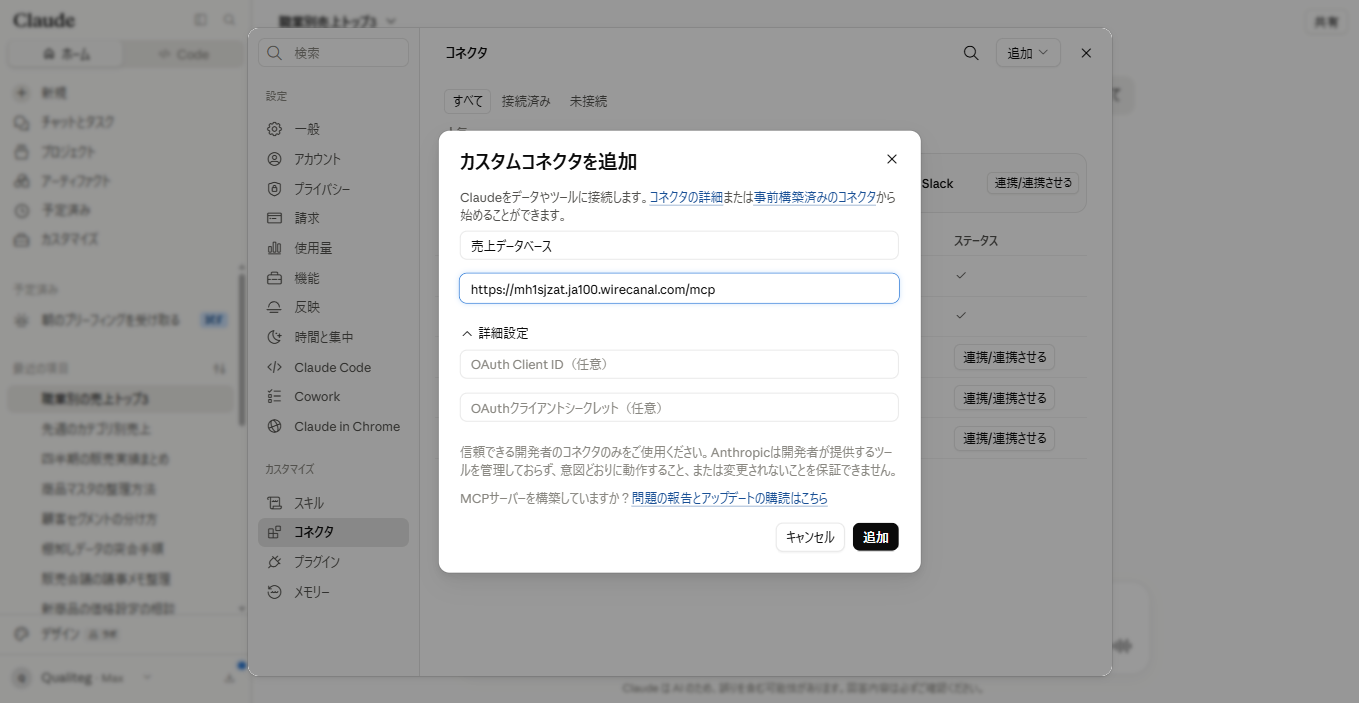
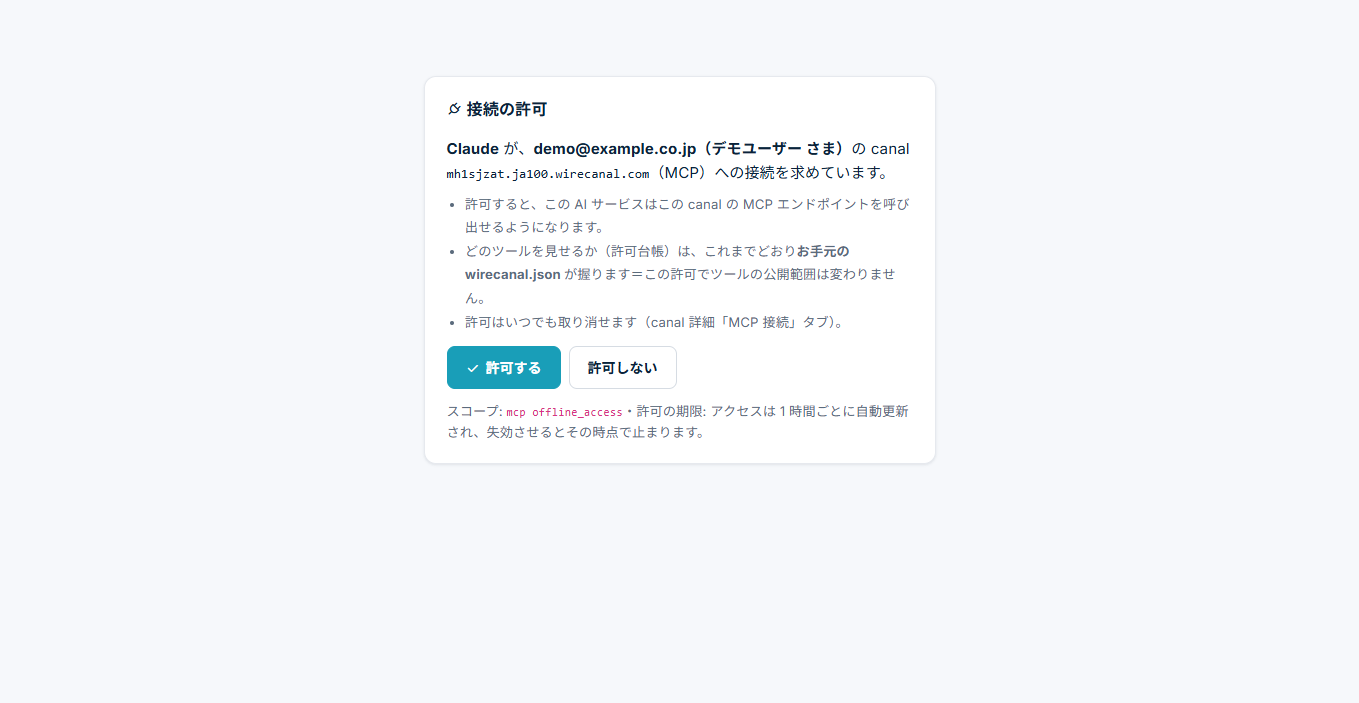
After "Add" and then "Connect," the screen switches to WireCanal's authorization page. It shows which canal the connection is being requested for; review the details and approve.
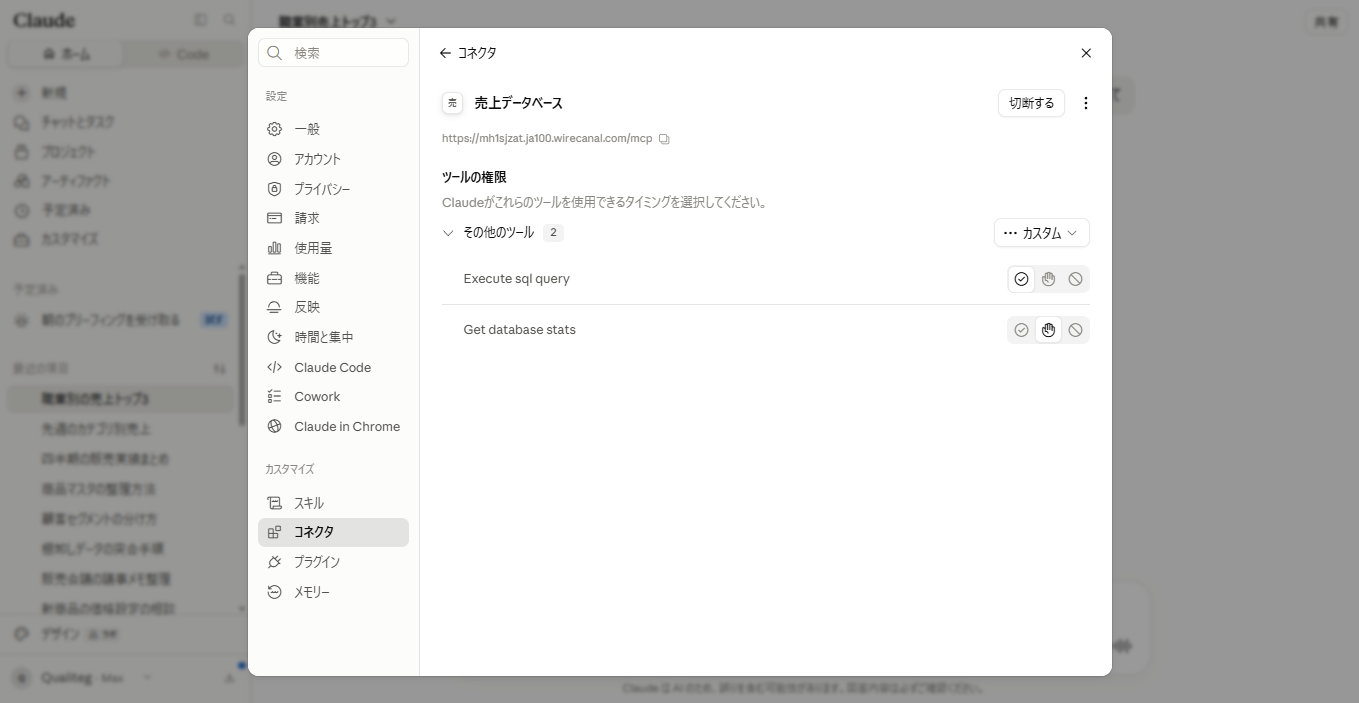
Once connected, the connector details show the tool list. Note this carefully:
the only tools listed are the two written in the allow list of wirecanal.json.
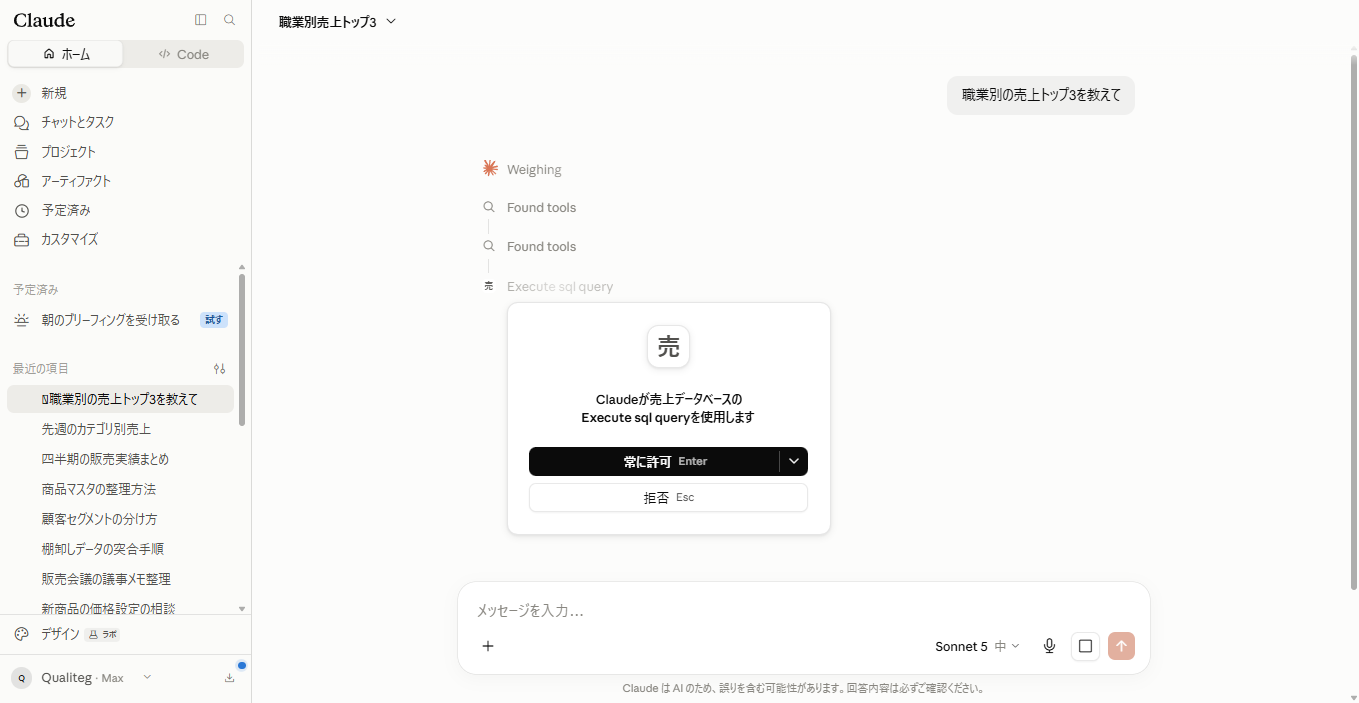
From here, just ask in chat — in Japanese, exactly as with Claude Code in Part 1. By default, you are asked for approval before a tool is used.
After approval, Claude issued SQL against the sales database and returned the answer.
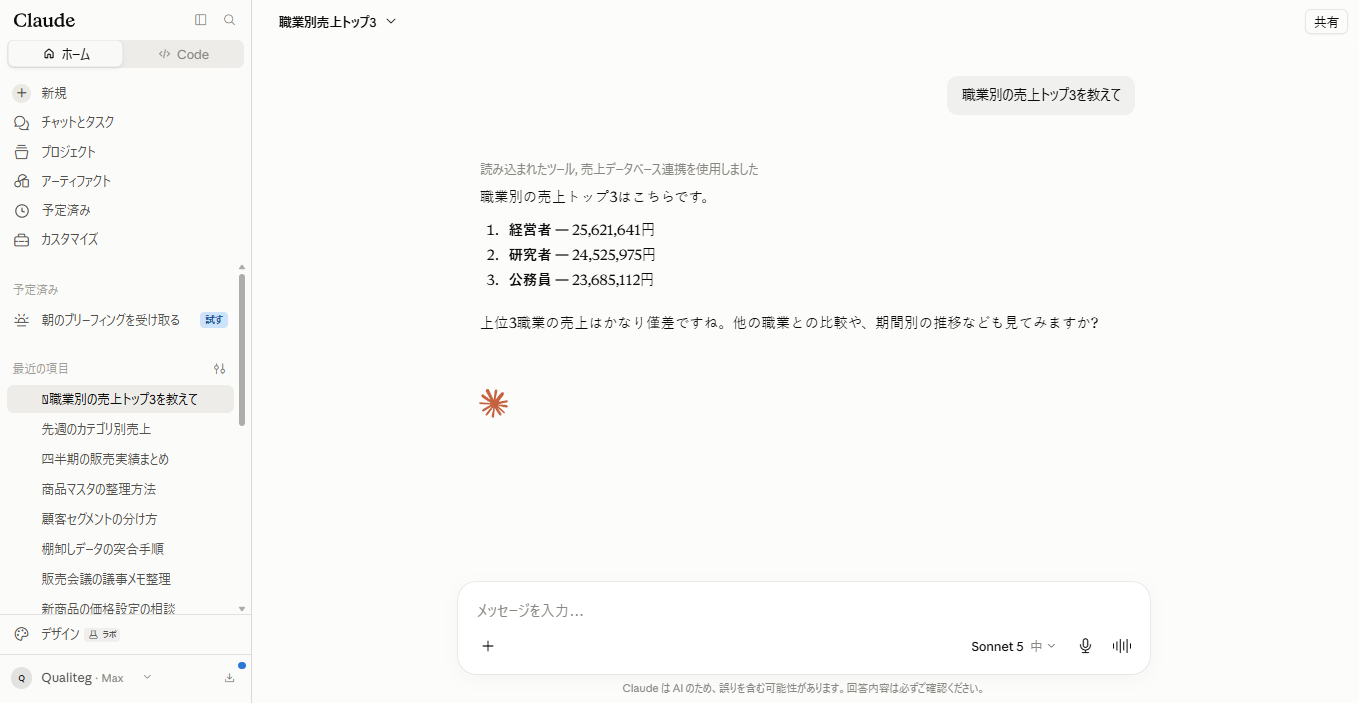
Company executives: ¥25,621,641. Researchers: ¥24,525,975. Civil servants: ¥23,685,112. These match the aggregates Claude Code returned in Part 1 — exactly the measured values of the fixed-seed dummy data. From Claude in the browser all the way to SQLite running on the local PC, a single unbroken path is in place.
Connecting from ChatGPT
On the ChatGPT side, first enable developer mode in order to connect an unverified MCP server. In the author's environment, we turned on "Developer mode" under "Security and login" in Settings (there is also a link to the same place at the bottom of the "Plugins" screen in Settings). This feature lets you add connectors that could damage data, at your own risk, so read the risk explanation carefully before proceeding. The screen layout may vary by plan and rollout timing.
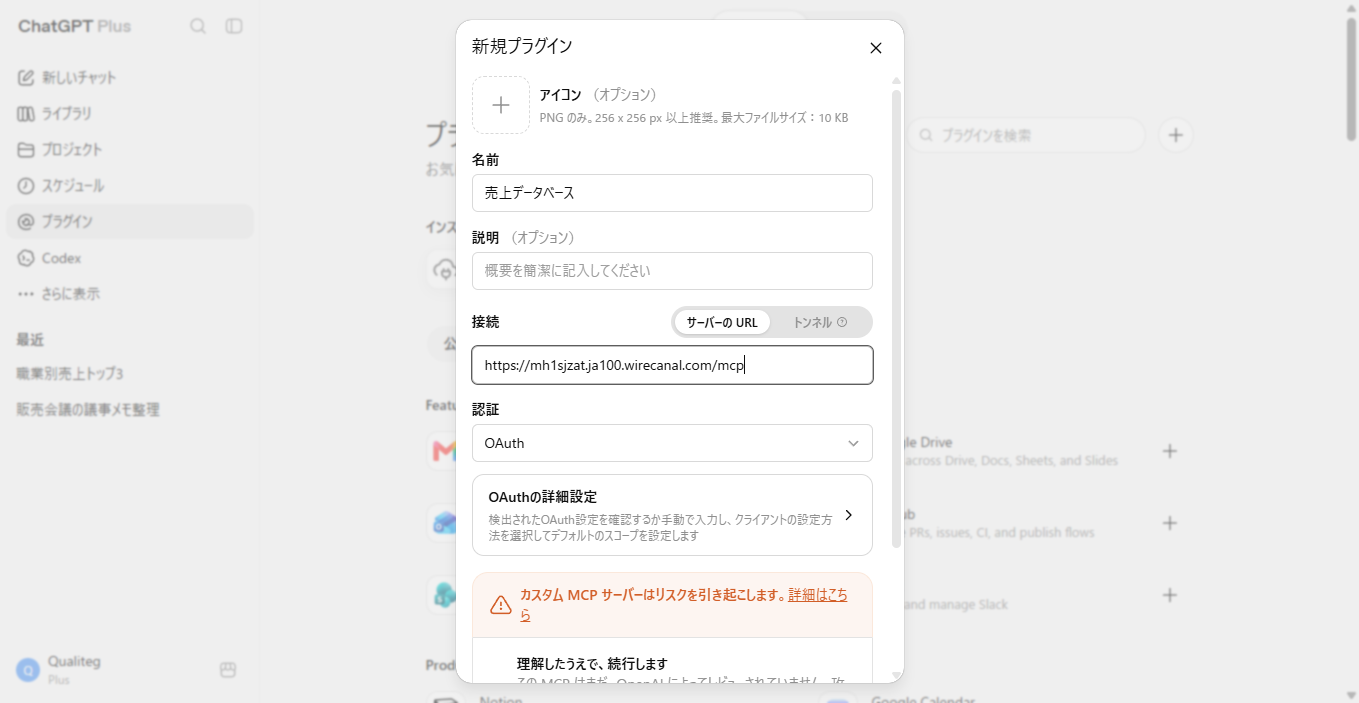
Next, from "Plugins" in the sidebar, choose "Create an app." Enter a name and the server URL (https://<name>.wirecanal.com/mcp), and the OAuth settings in the authentication section are detected automatically.
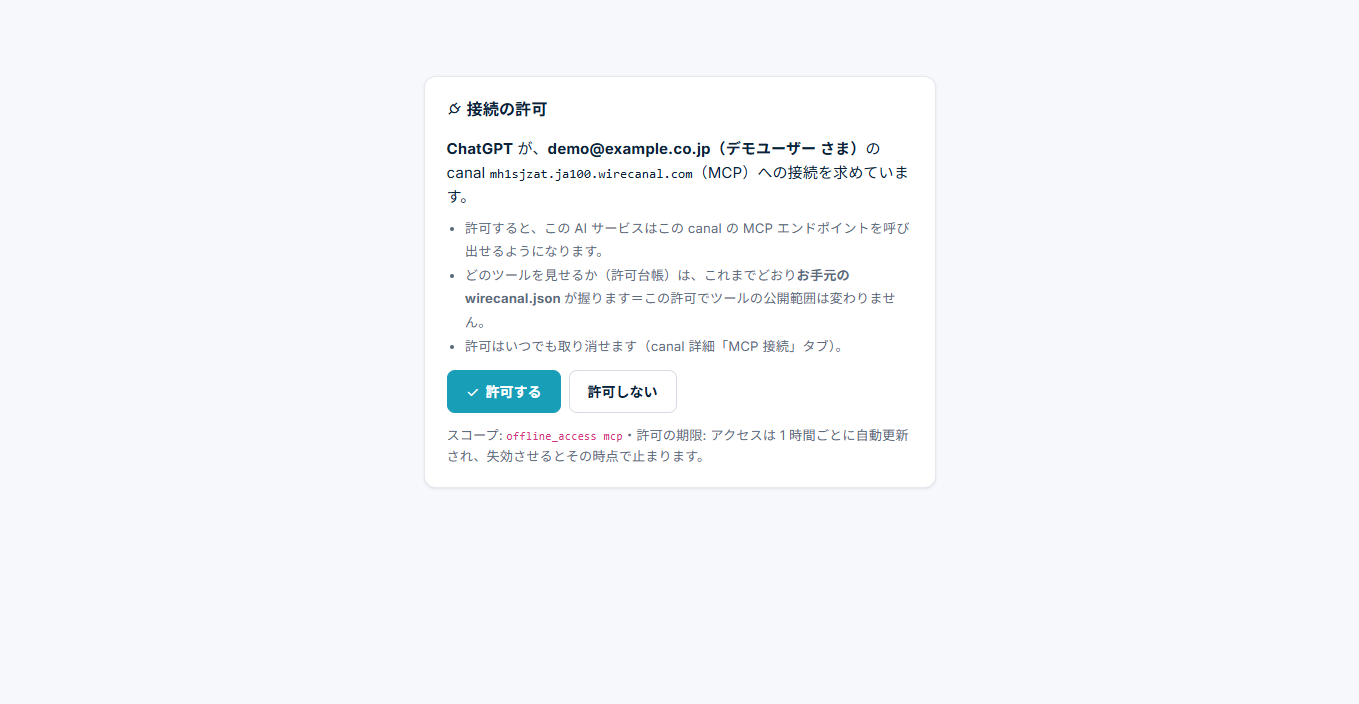
After "Create," proceed to "Sign in," and the same WireCanal authorization screen as with Claude appears; approve it.
When using it, there is one trick to know. From the "+" in the chat input field, select the app you just created and attach it to the conversation before asking your question. In the author's environment, asking in plain prose to "use the sales database" without attaching the app led ChatGPT to start a web search instead of using the connector. Selecting the app explicitly via "+" reliably invokes the MCP server.
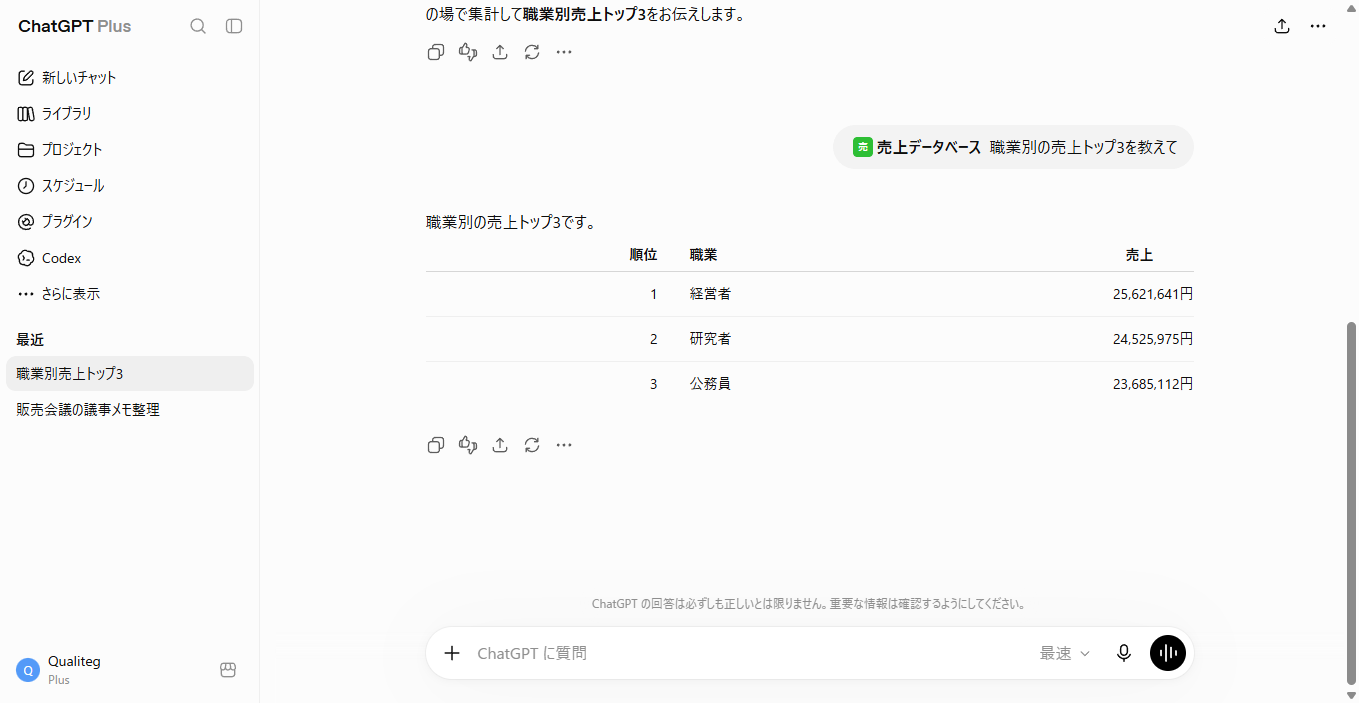
The table returned matches Claude's numbers. The local server log also recorded the request from the ChatGPT side as POST /mcp.
Pricing
The steps in this article (creating an MCP canal, OAuth authentication, auto-assigned subdomain) are, per the comparison table on the WireCanal pricing page (wirecanal.com), available on the free plan. No credit card registration is required either.
In other words, everything done in this article — from publishing a self-built MCP server to connecting it with web-based ChatGPT and Claude — can be done entirely for free.
The public hostname issued on the free plan does not disappear as long as it is in use. While the Agent's connection is alive, its expiration is extended automatically.
Conversely, if you sever the connection, for example by stopping the Agent, it expires 72 hours after the last connection (you can recreate it after expiration, but the URL will change).
If you use the MCP server regularly, the Agent will presumably be running continuously, so in practice you can keep using the same URL on the free plan.
If you want to reserve a subdomain with a name of your choosing, the Lite plan and above — which offer persistent hostnames that survive disconnections — are the candidates. Other plan differences include TCP exposure (RDP and SSH) from the Pro plan up, and bringing your own custom domain on Premium.
Note that some screenshots in this article were taken on a Lite-plan account, but every step can be performed with free-plan features alone.
One more point, on organizational use. This time the canal's owner personally approved the OAuth connection, but on Lite and above you can integrate with your company's identity platform (an OIDC IdP such as Google Workspace) so thatmembers of the organization can receive connection approval with their own company accounts. Having the whole team use the MCP server is something we will actually do in a later installment of this series.
OAuth for Connecting to ChatGPT Is Solved on the Route Side
The point of this installment is thatnot a single line of the Part 1 server was touched. The MCP server written for localhost worked as is from both web-based ChatGPT and Claude. The three walls — reachability, HTTPS, and OAuth — are problems of the route, not of the server code, so solving them on the route side is the sound approach. That is this installment's answer.
The safety of the public route is layered in two. At the entrance, OAuth stops unauthenticated access with a 401; beyond that, the tool allowlist hides everything except the two tools we chose to show. The authoritative allowlist lives in the local wirecanal.json and cannot be changed by dashboard operations alone — applying changes requires local approval. The three safety valves built inside the server in Part 1 (read-only access, SELECT-only inspection, and an execution time limit) remain in place as the last line of defense.
One thing that tripped us up was that ChatGPT did not select the app automatically. If you do not know this beforehand, it looks as though the connector is "connected but never used." Since many readers are likely to stall at the same spot, we kept it in the article.
We should also note what was not verified. What we connected were the author's ChatGPT Plus account, on which developer mode was visible as of August 6, 2026, and a paid Claude account. The availability and screen layout of ChatGPT's developer mode and custom MCP apps may vary by plan and account rollout, and the same items may not appear on every account. We also have not confirmed how far this works on the AI services' free plans. Furthermore, when connecting to a real internal database, there is work to do beyond this article, as described in Part 1 — splitting into task-specific tools, auditing access logs, and so on.
See you next time.
Sample Code
We use the Part 1 code as is. After cloning, the commands up to creating the DB and starting HTTP mode are as follows.
qualiteg/mcp-server-tutorial | Complete sample code and README (GitHub)
git clone https://github.com/qualiteg/mcp-server-tutorial.git
cd mcp-server-tutorial
python -m pip install -r requirements.txt
python db_setup.py
python mcp_server_sales.py --http --port 9904
References
- MCP Authorization (official Model Context Protocol specification) * The draft is subject to updates. This article was verified against the content as of August 6, 2026
- OAuth 2.0 Protected Resource Metadata (RFC 9728)
- WireCanal official site | MCP-ready secure tunnels
- How to connect Claude to an MCP canal (guide on wirecanal.com)
- How to connect ChatGPT to an MCP canal (guide on wirecanal.com)
Related Articles
 Qualiteg プロダクト開発部
 Qualiteg プロダクト開発部